Upgrading From a Previous Neuron Release
The procedures in this topic show you how to upgrade from Neuron ESB 2.5 to Neuron ESB 3.6. For assistance with upgrades from earlier versions of Neuron ESB, please contact support for guidance.
Upgrading from a previous release of Neuron ESB is fairly straight-forward. The basic steps are below. This sequence of steps needs to be repeated for each instance of Neuron ESB on the same server.
Upgrading Neuron ESB:
- Complete message processing
- Backup configuration files
- Uninstall previous version
- Install new version
- Replace backed-up files
- Migrate Neuron ESB Configurations
- Configure and start the Neuron ESB Service for the instance you upgraded
Note – If you run the installer (InstallNeuronESB.exe) on a computer that has one of the previous 3.x versions of Neuron installed, the installer will automatically uninstall the previous instance of Neuron that was installed prior to installing the new version. See the section Running the Installer With a Previous Version of Neuron Already Installed.
Once you complete step 4 – Install New Version, do not start the ESB Service until you’ve completed all the steps.
Complete Message Processing
Before taking the steps to upgrade a Neuron ESB Server, make sure all in-flight messages have completed processing. This typically involves making sure all of the publishers stop publishing messages to the ESB, and if you’re using MSMQ or RabbitMQ-based topics, letting all of the queues empty. To stop publishers from publishing messages, stop all publishing adapter and services endpoints and disconnect all instances of the Client API.
Backup Configuration Files
Any Neuron ESB configuration files you have modified should be backed up prior to upgrading. One reason for this is that the uninstall process will remove any standard configuration files that are normally installed (i.e. esbservice.exe.config). Some of the files to back-up are any application configuration files (esbservice.exe.config, neuronpipelines.config), any custom assemblies (adapters, processes or other assemblies you’ve copied to the installation folder) and all Neuron ESB Configuration folders you’ve created for your solutions. You can copy these files back to the installation directory after reinstalling Neuron ESB.
Uninstall Previous Version
The Neuron ESB installer does not perform an in-place upgrade. You have to uninstall the current version prior to installing the new version. Use Add/Remove Programs to uninstall Neuron ESB.
Install New Version
Use InstallNeuronESB.exe to install the new version of Neuron ESB. Do not start the Neuron ESB Service yet!
Replace Backed-Up Files
Replace all of the files you previously backed-up.
Migrate Neuron ESB Configuration – From 2.5 (and earlier) to 3.6
Neuron ESB configurations built with release 2.5 and earlier to not automatically upgrade to Neuron ESB 3.6. You will need to go through a series of upgrades to complete this migration. For assistance in upgrading older versions of Neuron ESB to the 3.6 release, please contact Neuron Support.
Migrate Neuron ESB Configuration – From 2.6 to 3.6
Starting with Neuron ESB 3.0, the Neuron ESB Configurations are saved in a folder structure instead of a single .esb file. If you are migrating from Neuron ESB 2.6 or higher to Neuron ESB 3.6:
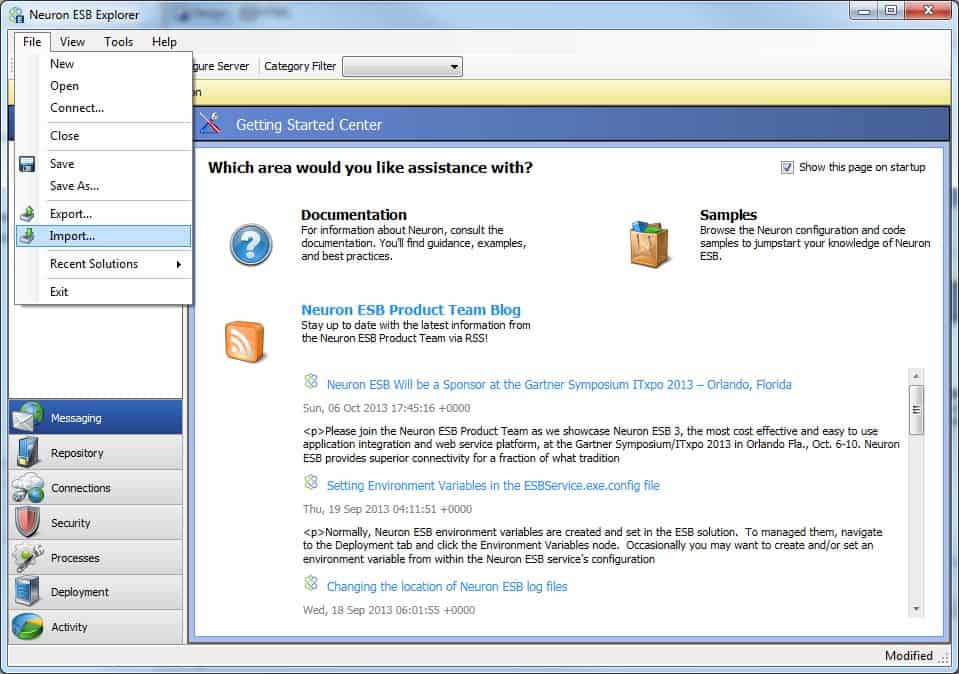
- Open the Neuron ESB Explorer and create a new configuration
- From the menu, click File->Import…
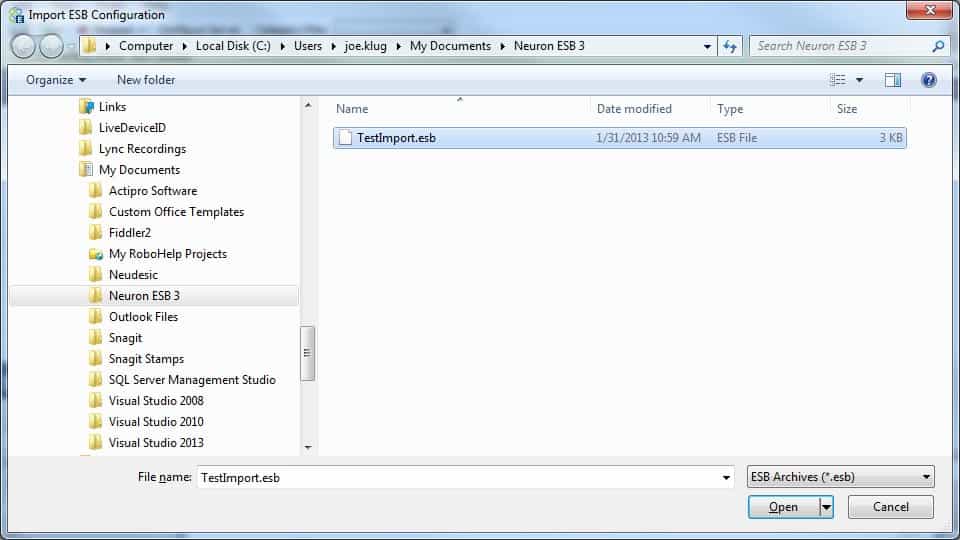
- From the Import ESB Configuration dialog, browse for your .esb file (or .xml), select it and click the Open button
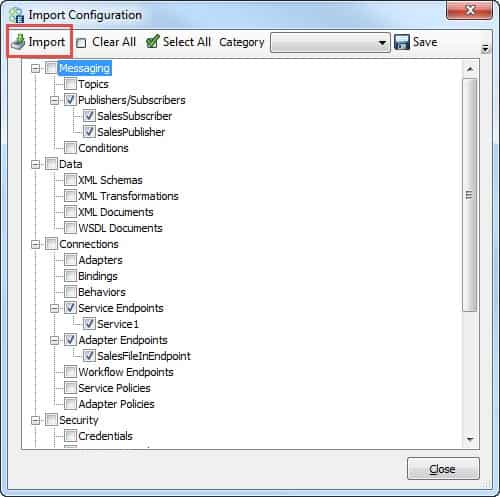
- In the Import Configuration dialog, select the artifacts you want to import (usually all of them for a migration), and click the Import button in the toolbar:
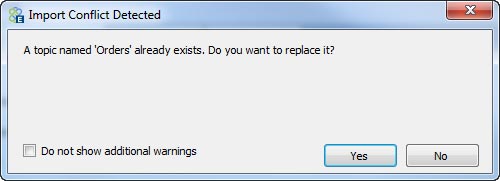
- You may receive several requests to overwrite existing items. Examine the conflicts and choose whether or not to replace them.
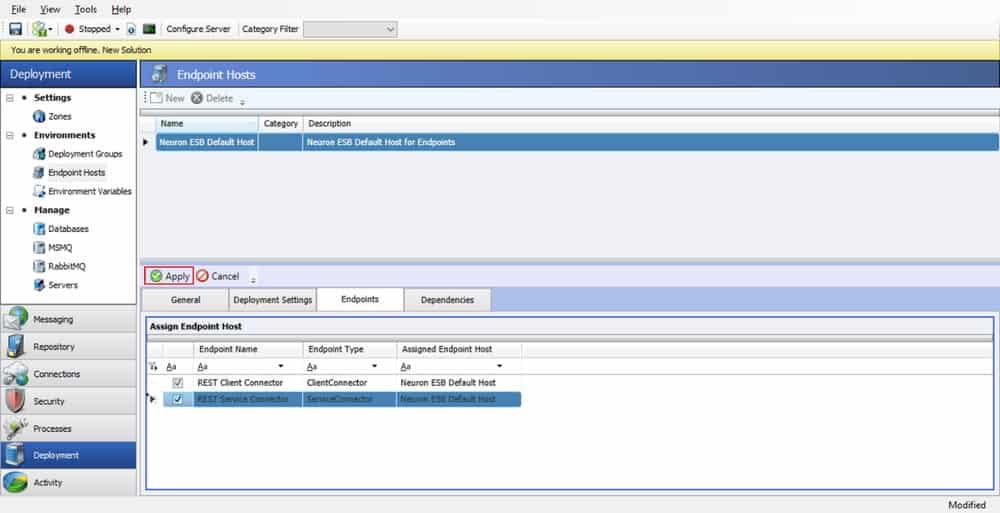
- Navigate to Deployment -> Endpoint Hosts and click on the Neuron ESB Default Endpoint Host
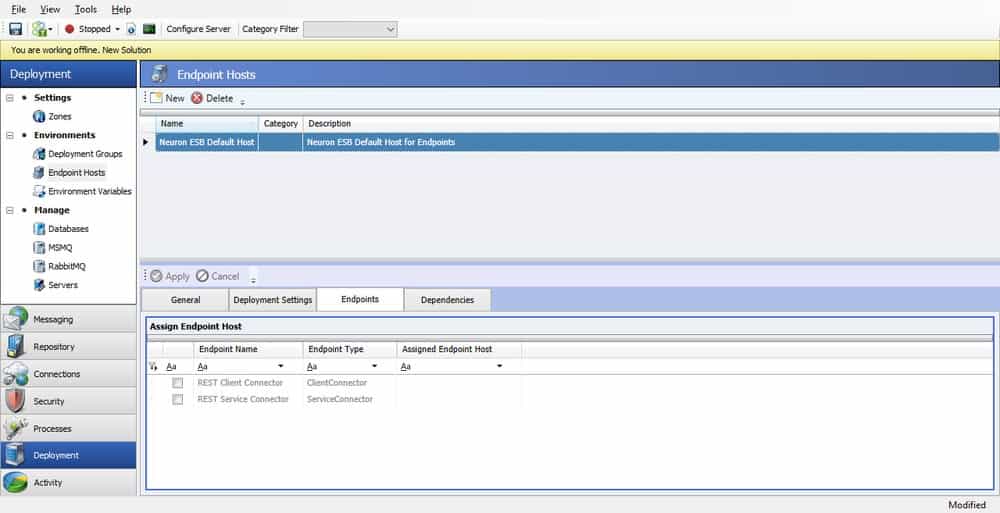
- Check the checkbox next to each endpoint to assign them to the default Endpoint Host (you can go back and create new endpoint hosts and assign endpoints to these new hosts after the migration is complete)

- Click Apply to apply the changes to the Endpoint Host to the configuration.
- Save the new Neuron Configuration by clicking File->Save As from the menu:

- In the Save ESB Configuration dialog, click the New Folder button (in red below) to create anew folder for you ESB configuration:
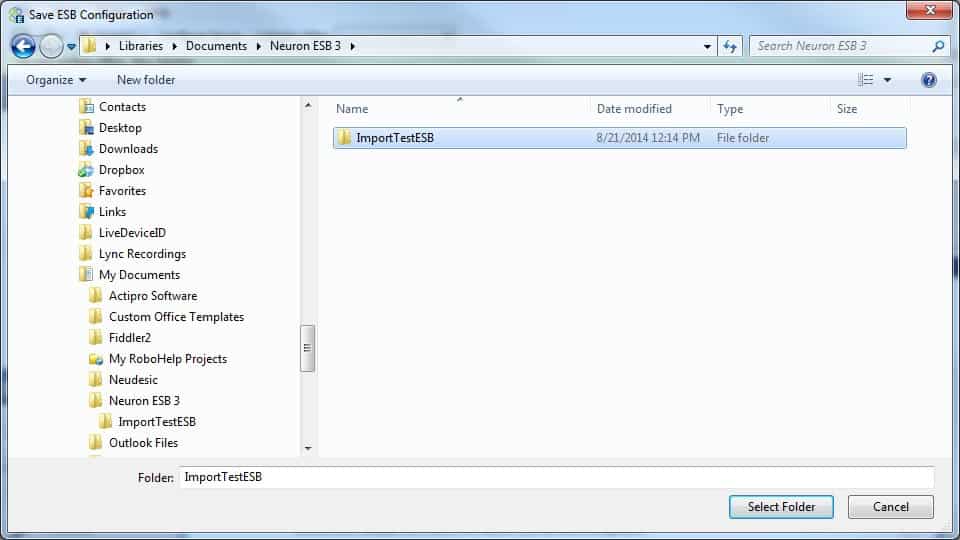
- Click on the folder you just created and click the Select Folder button.
The Neuron ESB Configuration is now saved in the new file format!
Migrating Neuron ESB Configuration 3.x to 3.6
The 3.6 release introduces significant changes in Neuron ESBs runtime environment and infrastructure. In consideration of this, users must upgrade elements of any existing solutions before attempting to run them using Neuron ESB 3.6. Other changes may be necessary if users have modified or introduced custom settings in Neuron ESBs native .config files, specifically in the App Settings section. Overall, the migration should be straight forward for most users. One of the first things a user must do is update any existing solutions by opening them directly in the new version of the Neuron ESB Explorer.
When migrating from 3.x versions, users must open their existing solution using the 3.6 version of the Neuron ESB Explorer. The Neuron ESB Explorer will automatically update their solution by doing the following:
- Create a new Endpoint Host named Neuron ESB Default Host
- Assign new Endpoint Host to all existing Deployment Groups.
- Assign all existing Adapter Endpoints to new Endpoint Host.
- Assign all existing Service Endpoints to new Endpoint Host.
- Update the internal Adapter Name property (not the Adapter Endpoint Name) of all existing Adapter Endpoints so that they properly map to all previously registered Adapters
- Remove all previously registered Adapters from the Adapter Registration section of the Neuron ESB Explorer
- Any Adapter Endpoints whose property names match either Password, Connection string, key or passphrase will have their respective values encrypted.
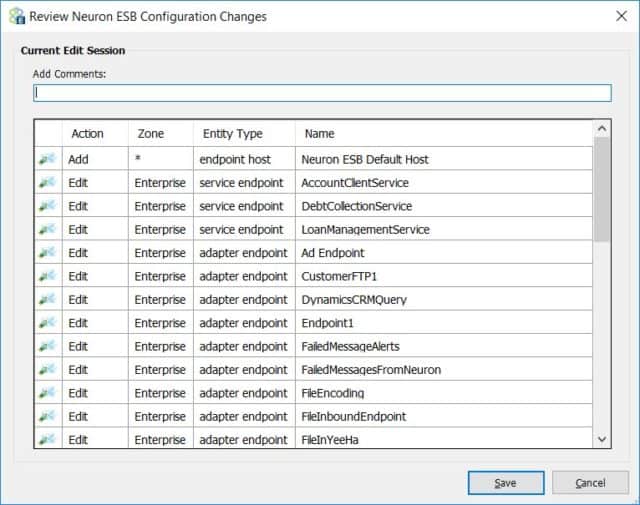
Once the updates are made, the user will be prompted with the Review Changes dialog similar to the one shown below, but specific to their solution.
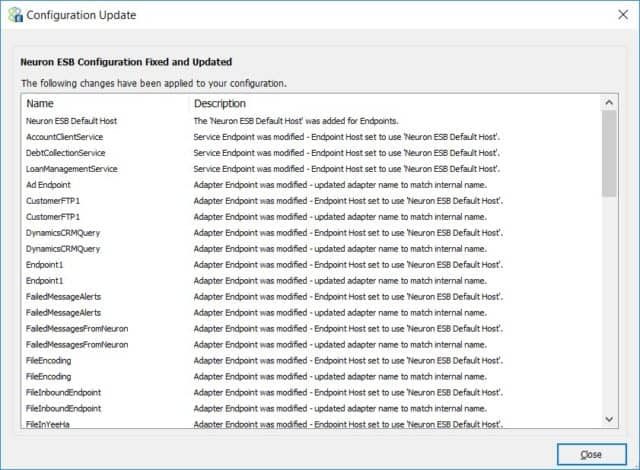
The changes should be accepted by clicking the Close button and the solution should be saved for the changes to take affect and be committed.
When saving the solution, a prompt with the Review Changes dialog similar to the one shown below, but specific to their solution.
The changes should be accepted and the solution should be saved for the changes to take affect and be committed.
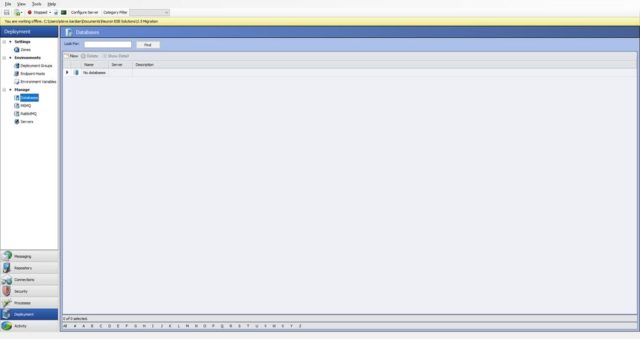
Database Migration
Every Neuron ESB solution requires a Microsoft SQL Server database to be associated with each Deployment Group. These databases can be created and configured by opening the solution within the Neuron ESB Explorer and navigating to Deployment->Manage->Databases.
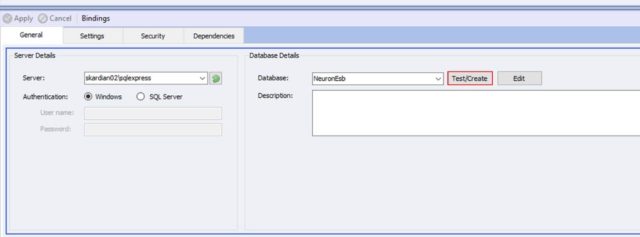
In this release, the data type for the Sequence ID associated with the Audit tables has been changed from an int to a long. This requires users to update any existing databases used in Neuron ESB solutions. This can be done by simply clicking the Test/Create located on the database user interface within the Neuron ESB Explorer.
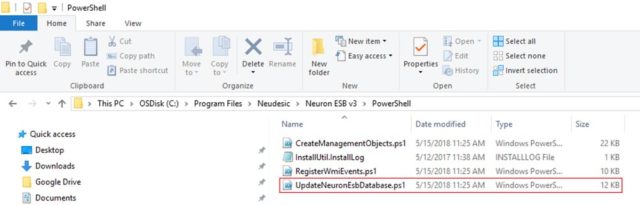
Users can optionally run the SQL update scripts using the PowerShell script located in the installation folder of Neuron ESB. More information on updating the database can be found under the Upgrading an Existing Database section within in the Readme.html file located at the root of the Neuron ESB installation folder.
If there are a large number of records in the Audit tables, this update could take a significant amount of time. Its strongly recommended that users first backup and purge the Audit Tables. This can be done either manually or by using the PurgeArchiveNeuron Microsoft SQL Agent Job. More information on updating the database can be found under the Archive and Purge Neuron Database Job section within in the Readme.html file located at the root of the Neuron ESB installation folder.
Monitoring
In Neuron ESB, many of the monitoring and server management functions were exposed through REST API based interfaces. These interfaces can be used to extend and build custom monitoring and management solutions for Neuron ESB Deployments. The Neuron ESB REST interfaces are hosted by the Neuron ESB Discovery service (DiscoveryService.exe) which is installed with the Neuron ESB Server Runtime. The default port (51002) for the REST interfaces is configurable through the Neuron ESB Discovery services app.config. The default installation location of the Neuron ESB Discovery service is: C:\Program Files (x86)\Neudesic\Neuron ESB v3.
In previous versions, the Swagger documentation for the REST API could be browsed at the default URL: http://localhost:51002/help/ui/index.html . In Neuron ESB 3.6 the default URL has been changed to: http://localhost:51002/help/index .
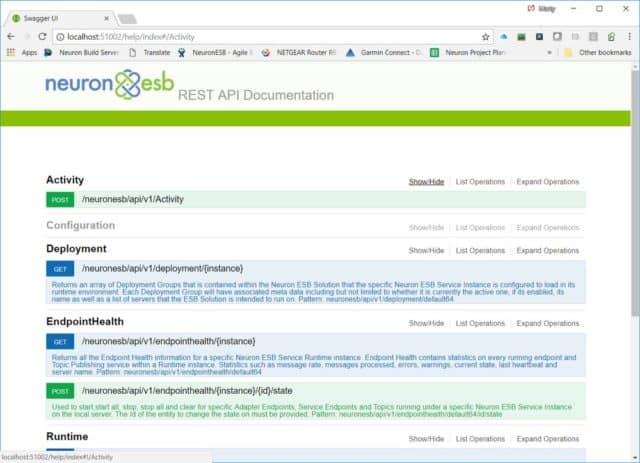
Neuron ESB REST Documentation Web Site The Neuron ESB REST interface documentation is hosted on the local Neuron ESB server.
The REST interfaces are self-documenting, providing detailed instructions on how to call each specific function and are separated into several categories. In Neuron ESB 3.6 a new category, Configuration, was added to support its integration with the future platforms. The following categories of REST APIs are listed below:
- Runtime
- Deployment
- Endpoint Health
- Activity
- Configuration
Configure and start the Neuron ESB Service for the instance you upgraded
AppSettings
Neuron ESB is essentially a .NET application and as such uses its associated .config file to maintain runtime configuration settings. In previous versions, these settings were maintained in the appSettings section within the following two files:
- ESBService.exe.config
- ESBHost.exe.config
These files are installed in the following default location: C:\Program Files\Neudesic\Neuron ESB v3\<Instance>.
Many of the settings are maintained and modified by using the Configure Server dialog launched from the Neuron ESB Explorer, while others can be set manually by editing the respective .config files.
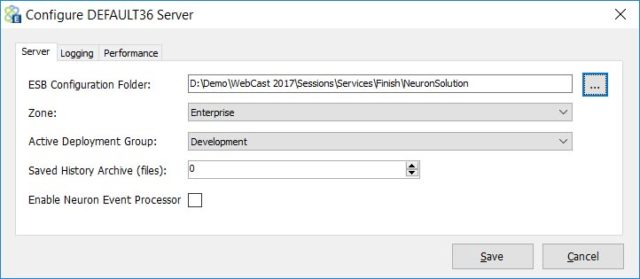
Configure Server dialog Accessible from either the Neuron ESB Explorers toolbar, or by navigating to Deployment->Manager->Servers within the Neuron ESB Explorer.
In the Neuron ESB 3.6 release, weve consolidated the appSetting entries into a dedicated .config file named appSettings.config located in the same default location as all the other .config files. The following .config files now contain a reference to this new file.
- ESBService.exe.config
- NeuronEndpointHost.exe.config
Additionally, several new key entries were added to facilitate integration with our future platforms. If users have added their own custom key/values to the existing Neuron ESB .config files, these will need to be migrated to the new appSettings.config file.
The table below lists all the appSetting key/values used in Neuron ESB 3.6
| Name | 3.6 | Default Value | UI | Description |
| esbInstanceName | Name of Neuron ESB runtime Instance | This is the name of the Neuron ESB runtime instance set by the installer and visible within the Service Control Manager | ||
| esbEnvironment | Full path of solution folder | X | Set by the Configure Server dialog. Full path of solution folder | |
| esbZone | Enterprise | X | Set by the Configure Server dialog. Should always be Enterprise. | |
| esbDeploymentGroup | Active Deployment Group | X | Set by the Configure Server dialog. Active Deployment Group that the runtime should load on startup | |
| overrideDotNetThreadPoolSize | False | X | Set by the Configure Server dialog. Performance tab. Whether or not to override .NET thread pool for Neuron ESB runtime. | |
| dotNetMaxWorkerThreads | 500 | X | Set by the Configure Server dialog. Performance tab. Used only if Override is enabled. | |
| dotNetMaxIOThreads | 1000 | X | Set by the Configure Server dialog. Performance tab. Used only if Override is enabled. | |
| dotNetMinWorkerThreads | 50 | X | Set by the Configure Server dialog. Performance tab. Used only if Override is enabled. | |
| dotNetMinIOThreads | 100 | X | Set by the Configure Server dialog. Performance tab. Used only if Override is enabled. | |
| MaximumLogFileSize | 104857600 | X | Set by the Configure Server dialog. Logging tab. Default is 100 MB | |
| MinimumDiskSpaceThreshold | 10485760 | X | Set by the Configure Server dialog. Logging tab. Default is 10 MB | |
| LogFileSchedule | Daily | X | Set by the Configure Server dialog. Logging tab. Default is Daily. Can be set to Weekly or None. Determines when a new Log file will be created for an endpoint. | |
| StartupTimeout | 00:10:00 | Maximum amount of time the Neuron ESB runtime is allowed to take to start up all internal services and endpoints. Timespan value | ||
| ConfigurationReloadDelay | 00:01:00 | The time between the detection and processing of Configuration change events. Timespan value | ||
| WSDiscoveryEnabled | true | Enables WS-Discovery on all Client Connectors, Neuron ESB Runtime as well as hosted Parties. When enabled, WS-Discovery can accept/respond to probe request, returning information and status of these endpoints. | ||
| WSDiscoveryBroadcast | true | Enables the Neuron ESB Runtime to broadcast WS-Discovery Hello/Goodbye messages. WSDiscoveryEnabled must also be set to true for broadcasting to be enabled. | ||
| WSDiscoveryAnnouncementInterval | 00:00:10 | Determines interval for WS-Discovery broadcasts. Timespan value. | ||
| WSDiscoveryApplicationScope | default | WS-Discovery scope used in announcements. Recommended that is should be the value of the esbInstanceName key. | ||
| DiscoverySwaggerPort | 51003 | Default Port used to host Swagger documents when Swagger is configured for a REST based Client Connector | ||
| DefaultHttpConnectionLimit | 100 | Used to set the value for the ServicePointManager.DefaultConnectionLimit property. Used for all HTTP service calls. | ||
| ClusterNetworkName | Empty String | This is set by the Neuron ESB runtime at startup. If Neuron ESB is installed on a Windows Failover Cluster as resource, this value will be the network name associated with the cluster resource. Otherwise it will be the machine name | ||
| MaxHeartbeatFailures | 2 | Max number of heartbeat failures against the Neuron ESB runtime master control service allowed before a Client Connector, Service Connector or Adapter Endpoint will shut down. | ||
| esbUseMachineEnvironmentVars | false | If set to true, allows users to use Windows Operating System Environment Variables within the Neuron ESB Explorers Binding Expressions dialog. | ||
| XsltFilesLocation | X | Empty String | Used by the Transform-XSLT Process step and the Transform Message/XML Workflow Activities. Defines a global location to retrieve XSLT files, rather than using the Neuron ESB repository location. This is a Global override. | |
| XsdFilesLocation | X | Empty String | Used by the Validate-Schema Process step and Validate XML Workflow Activity. Defines a global location to retrieve XSD files, rather than using the Neuron ESB repository location. This is a Global override. | |
| LogFolderCleanupSchedule | X | 10 | Number of days of log files that Neuron should not delete/remove at startup. Any log file older than the value will be deleted. Must be greater than 1. | |
| SavedHistoryCleanupSchedule | X | 0 | Number of history files to retain in the solutions History folder. Executes whenever a save is committed on configuration. A value of Zero means unlimited. | |
| TempDirectory | X | Empty String | If a dedicated TEMP directory is not provided, the default TEMP directory of the service account will be used, consistent with 3.5 behavior. | |
| DisableGlobalExceptionHandler | X | true | Enables/Disables the Neuron ESB Global Exception handler. When troubleshooting an issue, this should be set to false. | |
| NeuronEndpointHostPort | X | 51004 | Communication port used by the Neuron Endpoint Host REST API. Commands between the Neuron ESB runtime and Endpoint Host are brokered across this port. | |
| NeuronHybridFeaturesEnabled | X | false | X | Set by the Configure Server dialog. Server tab. This value represents the Enable Neuron Event Processor property. Can only be enabled if the Neuron ESB Instance has been registered within the Neuron Management Suite Portal. |
| NeuronHybridManagementSuiteHost | X | localhost | Location of the Neuron Management Suite Portal. Set by the portal during registration process | |
| NeuronEventProcessorMachine | X | localhost | Location of the Neuron Event Processor. Set by the portal during registration process | |
| NeuronEventProcessorPort | X | 51005 | Port configured for the Neuron Event Processor API. Set by the portal during registration process | |
| NeuronServiceRateFlushInterval | X | 5 | Configuration specific to the Neuron Event Processor. Set by the portal during registration process | |
| NeuronServiceRateCacheSize | X | 10000 | Configuration specific to the Neuron Event Processor. Set by the portal during registration process | |
| NeuronEventConsumerLevel | X | 1 | Configuration specific to the Neuron Event Processor. Set by the portal during registration process | |
| NeuronEventTimeToLive | X | 1440 | Configuration specific to the Neuron Event Processor. Set by the portal during registration process | |
| NeuronEventPoolSizeInit | X | 0 | Configuration specific to the Neuron Event Processor. Set by the portal during registration process | |
| NeuronEventPoolSizeMax | X | 200 | Configuration specific to the Neuron Event Processor. Set by the portal during registration process |
Dependencies
Neuron ESB is entirely built on the Microsoft .NET Framework. This makes it very easy for .NET developers to learn and extend the product using common C# skills. With the release of Neuron ESB 3.6 we took the opportunity to upgrade our support for version 4.7.1 of the Microsoft .NET Framework. This allows developers to take advantage of the new features included in the framework when building any extensibility as part of their Neuron ESB solution such as adapters, workflow activities, process steps and OAuth providers. This support is also provided through our own C# editors within the Business Process and Workflow designers.
Additionally, we upgraded our support for a number of other dependent libraries, including the following:
Lastly, Neuron ESB 3.6 has been upgraded to support Erlang version 20.2 and Rabbit MQ version 3.7.1. Installation of RabbitMQ Server is optional and is not required to use Neuron ESB 3.6. If RabbitMQ Server is not installed, the Neuron ESB 3.6 installer will provide users the option of automatically downloading and installing Erlang and RabbitMQ Server. If a developer wants to use RabbitMQ based Topics, but the computer does not have Internet access, the following software packages can be downloaded and installed either before or after installing Neuron ESB 3.6.
Temp Folder
One of the great things about Neuron ESB is its ability to auto detect changes and, based on those changes, re-configure itself. Part of that process involves dynamically compiling .NET assemblies from the changes detected. For instance, if a Business Process is modified, Neuron ESB will auto compile that Business Process and its respective C# code (if any) into a .NET assembly before it can be executed. This process also happens after the Neuron ESB runtime is initially started. Before the first execution of any Business Process, it is dynamically compiled. All other consecutive executions then run from the compiled assembly. Dynamic compilation only happens before the first execution of a Business Process or modified Business Process.
For this to happen, heavy use is made of the Windows TEMP directory of the service account assigned to the Neuron ESB runtime service (esbservice.exe) within the Service Control Manager. For instance, given a service account named NeuronSvc, the Windows TEMP directory location would be: C:\Users\NeuronSvc\AppData\Local\Temp. Due to our heavy use of this directory, Neuron ESB attempts to delete all the temporary files it generates during the startup of the Neuron ESB runtime service. Because Windows directories can only hold up to 65535 files, its important that the TEMP directory location be maintained and regularly cleared out.
However, outside processes (other than the Neuron ESB runtime) can negatively affect a running Neuron ESB solution by either placing locks on the temporary files Neuron ESB generates or, deleting those files. In other cases third party processes may also be using the same TEMP directory that Neuron ESB is configured to use (i.e. where a dedicated account is not used), generating files that exceed the maximum limit of the directory. Lastly, anti-virus programs are notorious for scanning the TEMP directories of user accounts as they are commonly exploited by viruses. Unfortunately, many tend to lock files as they scan.
To avoid these issues, Neuron ESB 3.6 can be configured to use any Windows directory as a TEMP directory. The location can be specified in a new appSettings key (i.e. TempDirectory) located within the appSettings.config file, the default location of which is: C:\Program Files\Neudesic\Neuron ESB v3\<Instance>. If a dedicated TEMP directory is not configured in the appSettings section, the default TEMP directory of the service account will be used as in previous versions of Neuron ESB. In all cases, the service account must be given full rights to the TEMP directory.
Using a dedicated TEMP directory can assist to eliminate the ability for third party processes to generate temporary files in the location that Neuron ESB uses. Also, Security protocols will usually allow the exclusion of an application specific folder from Anti-Virus scanning.
Environment Variables
Neuron ESB provides the ability to use Environment Variables for configuration of any adapter or service endpoint, database connection string or process step. By using the Bindings Expression editor, users can bind Environment Variables directly to the properties exposed by those entities. Many developers access the values of Environment Variables directly in Code Process steps within processes or workflow. An Environment Variable is defined at the Deployment Group level and can contain a unique value for each Deployment Group. On startup, the Neuron ESB service runtime replaces the Environment Variable with the value associated with the Deployment Group the service is configured for. To learn more about Environment Variables please review the Using Environment Variables section within the Neuron ESB Business Process documentation.
By default, all Environment Variable values are stored encrypted within the solution. However, those same values remain human readable in the Neuron ESB Explorer. In this release, weve introduced the ability to mask all the values of an Environment Variable. A check box, Mask Values has been added to the General Tab of the Environment Variable user interface and is disabled by default. If enabled, all the values (current and future) for that specific Environment Variable will no longer be visible. Each character will be masked by an asterisk (*). Once enabled, it cannot be disabled.
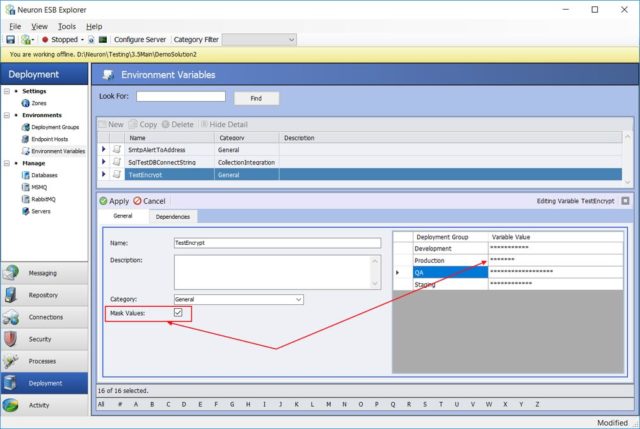
Neuron ESB Explorer Masking Environment Variables Once the Mask Values check box is checked, all values will be masked with an asterisk.
Windows OS level Environment Variables
One last thing was modified regarding the use of Windows OS level Environment Variables. In Neuron ESB 3.5, support was added for using Windows Operating System Environment Variables within the Neuron ESB Explorers Binding Expressions dialog. Previously, users could create Neuron ESB based Environment Variables to set most any property of most any Neuron ESB Entity, like Service Connectors, Client Connectors and Adapter Endpoints. The specific values of the Environment Variables are linked to Deployment Groups within the Neuron ESB Explorer. Hence the values used in one Deployment Group could be different than those used in another. The Neuron ESB runtime resolves these values dynamically at runtime on startup.
This new feature allowed users to enter the name of environment variables created at the machines Operating System level within the Binding Expressions dialog, rather than use Neuron ESBs built in Environment Variables. There are a few requirements to use this:
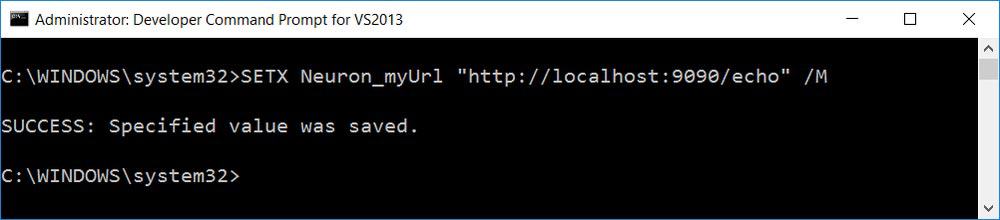
- Environment Variables had to be set at the System level. This could be done using the Windows Operating Systems UI tool, or using the Windows command line tool, SETX followed by the /M switch
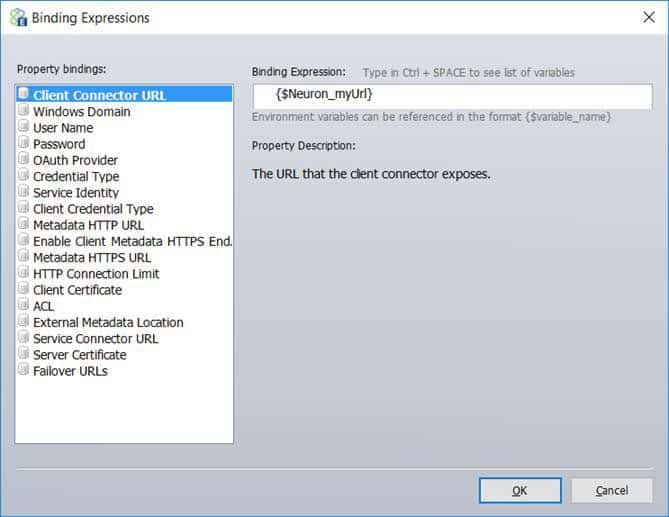
- Operating System level Environment Variables that are used within Neuron ESB must be preceded with Neuron_. For example, users could create an Environment Variable named Neuron_myUrl using the following command line:
- Within the Neuron ESB Explorers Binding Expression dialog, the Environment Variable must be enclosed in the Neuron ESB bracket notation as shown below:
- Lastly, the following flag must be added the AppSettings group within the esbservice.exe.config file: <add key=”esbUseMachineEnvironmentVars” value=”true”/>
However, because these were at the system level, this required that the Environment Variables had to be created AFTER the process is started. This was problematic when hosting Neuron ESB within Docker containers. In Neuron ESB 3.6, this has been changed to retrieve values stored at the Machine level.
Running the Installer with a Previous Version of Neuron Already Installed
When running the Neuron ESB 3.6 installer (InstallNeuronESB.exe) when there is a previous 3.x version of Neuron installed, the installer will automatically uninstall the oldest installed instance of Neuron of the previous version. The installer doesn’t give you the option to upgrade, only to install a new instance. However, take the example where you have two instances of Neuron ESB 3.x installed, in this order:
- Instance1 (3.1)
- Instance2 (3.1)
If you run the Neuron ESB 3.6 installer to install Instance3, the installer will uninstall Instance1 and install Instance3. Now you will have these instances installed:
- Instance2 (3.1)
- Instance3 (3.6)
The next time you run the installer, to install Instance4, the installer will uninstall Instance2 and then install Instance4:
- Instance3(3.6)
- Instance4 (3.6)
Now the next time you run the installer you will get a new instance of Neuron.
At this time there is no way to override this behavior.