Introduction
The Neuron ESB Salesforce Connector (Adapter) provides direct access to Salesforce.com. Using this adapter, organizations can easily integrate their business applications such as Dynamics CRM, SAP or NetSuite with Salesforce. This adapter operates in both subscribe publish modes. Organizations can use the adapter to perform operations on sobjects such as create, update or delete, as well as any other operations available in the SOAP and REST APIs. When developing applications that utilize this adapter, developers will be able to use the Adapter Metadata Generation Wizard to provide Xml schemas and samples that describe the request and/or response documents that are exchanged with Salesforce.
Before reading this document
If you are not familiar with Neuron ESB Adapters, take a moment to consult our online help: https://www.peregrineconnect.com/documentation/doc-development-adapters/. This document assumes you have the following knowledge:
- What adapters are and how they are leveraged in Neuron ESB
- Register a Neuron ESB Adapter within a Neuron ESB Solution
- Create an Adapter Endpoint in a Neuron ESB Solution
- Set a Neuron ESB Adapter Endpoint Properties
- Invoke a Neuron ESB Adapter Endpoint
This adapter exposes the functionality provided by the Salesforce SOAP, REST and Bulk APIs. All requests and replies are identical to those described in the Salesforce documentation. If you are not familiar with these APIs, review the online help:
SOAP API – https://developer.salesforce.com/docs/atlas.en-us.api.meta/api/sforce_api_quickstart_intro.htm
REST API – https://developer.salesforce.com/docs/atlas.en-us.api_rest.meta/api_rest/intro_what_is_rest_api.htm
Apex SOAP Methods – https://developer.salesforce.com/docs/atlas.en-us.apexcode.meta/apexcode/apex_web_services.htm
Apex REST Methods – https://developer.salesforce.com/docs/atlas.en-us.apexcode.meta/apexcode/apex_rest.htm
Outbound Messaging – https://developer.salesforce.com/docs/atlas.en-us.api.meta/api/sforce_api_om_outboundmessaging.htm
Streaming API – https://developer.salesforce.com/docs/atlas.en-us.api_streaming.meta/api_streaming/intro_stream.htm
Supported Modes
The Salesforce Adapter supports 2 modes:
- Subscribe: Used to send request-reply calls to Salesforce and will return a response. This mode can be used to call any operation exposed by the SOAP and REST APIs, as well as Apex methods that are exposed as SOAP or REST web services.
- Publish: Used to receive messages and events from Salesforce. This mode supports receiving Outbound Messages from Salesforce and the Salesforce Streaming API.
Salesforce Outbound messaging allows you to specify that changes to fields within Salesforce can cause messages with field values to be sent to designated external servers. Outbound Messages are published as Multicast messages to a topic and an acknowledgement is automatically returned to Salesforce once the message is successfully published. For more information on Outbound Messaging, see the links above.
The Streaming API enables streaming of events using push technology and provides a subscription mechanism for receiving events in near real time. The Streaming API subscription mechanism supports multiple types of events, including PushTopic events, generic events, platform events, and Change Data Capture events. On start-up, the adapter endpoint will create a “long-polling” connection to Salesforce, which Salesforce will use to send events back to the adapter endpoint. Events are published as Multicast messages to a topic. For more information on the Streaming API, see the links above.
Salesforce Adapter Properties
Every Neuron ESB Adapter has design time properties that can be configured within a standard Microsoft property grid (as shown below). These properties are used to determine the behavior of the adapter at runtime.
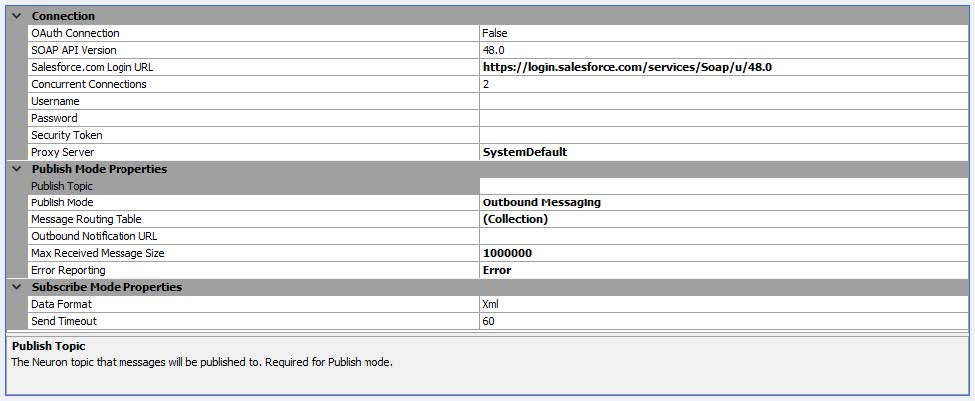
Connection Properties
The group of Connection properties is used to configure the connection to Salesforce, along with the security credentials used when sending requests to Salesforce.
OAuth Connection
Indicates whether the connection to Salesforce will be secured with OAuth 2.0. The adapter only supports OAuth when calling the REST API.
OAuth Authentication Flow
The authentication flow to use when OAuth Connection is set to True. The SAML Assertion Flow is for Organizations that are currently using SAML to access Salesforce and want to access the Web services API the same way. The Username and Password Flow is used to authenticate when you wish to use the REST API with just user credentials.
SOAP API Version
This is the version of the SOAP API to call. Salesforce consistently releases new versions of the SOAP API. This setting will ensure that the version of the SOAP API you have developed your integration with is used even after newer versions are released. This property is only available when OAuth Connection is set to False. When creating a new adapter endpoint, you should always use the latest version available.
Salesforce Login URL
The login URL for the SOAP or REST API. If OAuth Connection is set to False, the default value is the login URL for the selected version of the SOAP API. This value may need to be modified depending on the instance type:
Sandbox: https://test.salesforce.com/services/Soap/u/48.0
Production: https://login.salesforce.com/services/Soap/u/48.0
If MyDomain is enabled for your Salesforce instance: https://<MyDomain>.my.salesforce.com/services/Soap/u/48.0, where <MyDomain> is replaced with the My Domain name of your company.
Note – Notice the “/u/” in the URL. This denotes the use of the Partner WSDL. The Salesforce adapter will not work if you change this to “/c/”, which is used with the Enterprise WSDL.
If the OAuth Connection is set to True, the default value is the login URL for the REST API. Just like the SOAP login URL, this value may need to be modified depending on the instance:
Sandbox: https://test.salesforce.com/services/oauth2/token
Production: https://login.salesforce.com/services/oauth2/token
If MyDomain is enabled for your Salesforce instance: https://<MyDomain>.my.salesforce.com/services/oauth2/token, where <MyDomain> is replaced with the My Domain name of your company.
Unlike the SOAP API login URL there isn’t a partner vs. enterprise option.
Concurrent Connections
The number of allowable concurrent connections to Salesforce. This value is used to limit the number of concurrent connections maintained with Salesforce when in subscribe mode.
Username
The Salesforce username for logging-in. To access the SOAP or REST APIs, this user must have the API Enabled permission in Salesforce. This user must also have the correct permissions to query or access any objects via the SOAP or REST APIs.
Password
The Salesforce password for logging-in.
Security Token
The Salesforce security token. Every time a user’s password is changed, a new security token is generated and sent to the email address on the user’s Salesforce record. This security token is required for connecting via an API.
Consumer Key
The consumer key that was generated when you create a Connected App with OAuth enabled. This property is only available when OAuth Connection is set to True.
Consumer Secret
The consumer secret that was generated when you created a Connected App with OAuth enabled. This property is only available when OAuth Connection is set to True.
For more information on Connected Apps, see https://help.salesforce.com/articleView?id=connected_app_overview.htm&type=0
Proxy Server
Allows you connect to Salesforce via a proxy server. By default this value is set to System Default. Changing the value to custom will expose additional properties:
- Address – The URL address to the proxy server
- Port – The port for the proxy server address
- Use Custom Credentials – By default this is set to false and will use the credentials that the Neuron ESB instance is running under. Changing this value to True will allow you to select a stored credential from Neuron ESB.
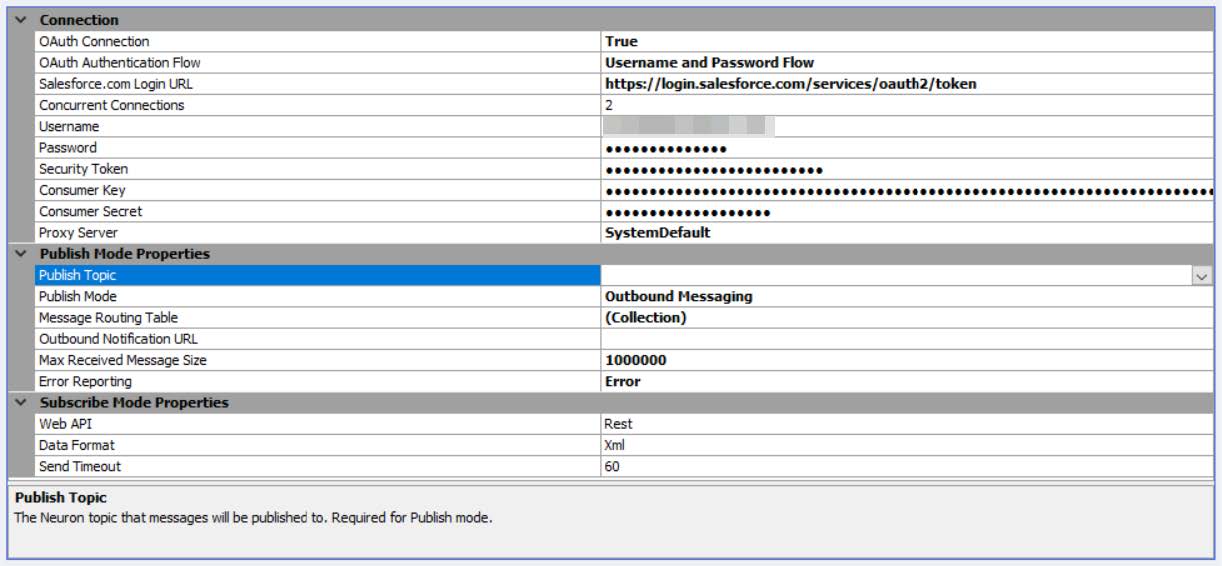
Publish Mode Properties
Publish Mode properties are used to provide a URL for Salesforce to send outbound messages to and which topic Neuron should publish those messages to.
Publish Topic
The default topic that outbound messages received from Salesforce will be published to. This property is required for publish mode.
Publish Mode
Used to determine whether the adapter endpoint will receive Outbound Messages or Streaming Events from Salesforce.
Message Routing Table
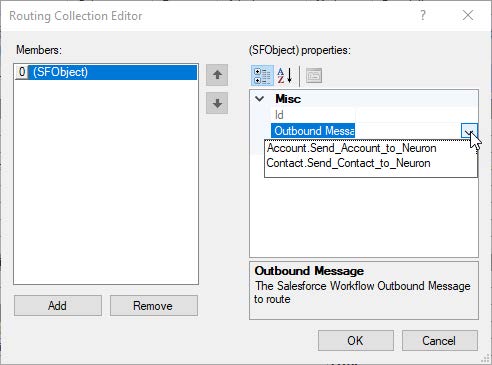
Available only when Publish Mode is set to Outbound Messaging. This property can be used to route different outbound messages to different topics. For example, if you have an outbound message defined for contacts and another outbound message defined for accounts, you can have a single adapter endpoint defined to receive both of these outbound messages and use this property to route each outbound message type to a different topic:

To configure this dialog, click on the ellipsis button next to the Message Routing Table property and the above dialog will appear. Click the Add button on the dialog, then click the down arrow next to the Outbound Message property. Neuron will connect to Salesforce using the configured credentials and retrieve a list of configured outbound messages. Select the outbound message you want to route to a specific topic, then select which topic to publish to from the Topic dropdown list. Note – the Topic dropdown list only displays topics that he configured publisher has send rights to.
An outbound message that is not defined in this routing table will automatically be published to the Publish Topic defined in the adapter endpoint property grid.
Outbound Notification URL
Available only when Publish Mode is set to Outbound Messaging. This is the URL that Salesforce will send outbound messages to. This URL is hosted by Neuron ESB and will always use “localhost” as the machine name. The important part of the URL to define is the port and the local path (i.e. http://localhost:8080/SFNotifications). You will have to expose this URL to the Internet so that it can be reached by Salesforce. This could be accomplished by using a reverse proxy server to forward the requests from the Internet to the Neuron ESB server.
Streaming API Version
Available only when Publish Mode is set to Streaming API. This is the version of the Streaming API that will be used to the adapter endpoint subscribes to events.
Subscription Channels
Available only when Publish Mode is set to Streaming API. A semi-colon separated list of the channels the adapter endpoint should subscribe to. A channel is a stream of events that are send to the adapter endpoint (i.e. /data/ChangeEvents).
Durable Messaging
Available only when Publish Mode is set to Streaming API. When set to true, the adapter will save the replay ID from the most recently received event from each subscribed channel. If the Neuron ESB service or the Salesforce adapter endpoint is restarted, the adapter will request any events that were created after the last received replay ID (for each channel the adapter subscribes to). Salesforce will only save events for either 24 or 72 hours, depending on the event type. For more information regarding message durability with the Streaming API, see https://developer.salesforce.com/docs/atlas.en-us.api_streaming.meta/api_streaming/using_streaming_api_durability.htm. When this property is set to false, the adapter endpoint will only receive new events created from each time the adapter endpoint starts.
Error Reporting
When errors occur with the adapter endpoint in publish mode, this property determines how those errors are reported in the Event Log and Neuron log files – as Errors, Warnings or Informational.
Subscribe Mode Properties
Subscribe Mode properties allow you to define the data format and timeouts when sending requests to Salesforce.
Web API
When OAuth Connection is set to True, this property allows you to select Salesforce’s Rest or Bulk API.
Data Format
When using the REST or Bulk API, you have multiple choices for the data format to send to Salesforce. The most common data formats are Xml and Json. However, when sending binary data to Salesforce you can select Image or ByteArrayContent. Also supported are FormUrlEncodedContent, MultipartContent and MultipartFormDataContent.
Send Timeout
The amount of time, in seconds, after which a call to Salesforce should timeout. The default value is 60 seconds. This should be increased when uploading large amounts of data to Salesforce, such as images.
Using the Salesforce Adapter
The Salesforce Adapter can be used to call any operation exposed with both the SOAP and REST APIs. Here are a few examples of the types of calls that can be made:
- Create, Update and Delete Salesforce objects
- Receive outbound messages that are sent from Salesforce
- Receive event notifications from Salesforce
- Core operations such as Retrieve, Query and Search
- Describe operations that will retrieve information about Salesforce, such as metadata for a Salesforce object
- Utility operations such as getting the server timestamp or send email
- Query, insert, update, upsert, or delete a large number of records asynchronously
- Custom Apex methods exposed as SOAP or REST Web services
The message formats for the above commands can be retrieved using the Metadata Generation Wizard.
When making calls to Salesforce using the adapter, creating the request messages can be done in many ways. You can use a C# or C# Class step in a process or workflow. You can also use the Transform – XSLT process step for SOAP API calls or the Http Client Utility process step for REST or Bulk API calls. You can also pass-thru a SOAP request received by a client connector and route it to a Salesforce endpoint. This document will demonstrate how to:
- Create SOAP API requests with a C# step in a process
- Create REST API calls with the Http Client Utility
- Receive outbound messages from Salesforce
- Receive events from Salesforce
Security
As noted previously, the adapter requires Salesforce credentials when making calls to Salesforce. These credentials are saved with the adapter endpoint, allowing the adapter to handle all the security requirements at runtime. When you’re constructing a request message to send to Salesforce you do not need to worry about setting credentials in your code.
Requirements
Each tutorial in this guide has the following requirements:
- A Salesforce developer edition organization. You can use a different edition, but the walkthroughs in this guide depend on the demo data that is included with a developer edition organization. You can get a free developer edition organization by going to http://developer.salesforce.com/signup and follow the instructions.
- Neuron ESB 3.7, build 634 or later installed.
- Each of the following walk-throughs can be completed using the same Neuron solution. Create a new Neuron solution with the following items:
- 1 Topic – CRM
- Two subtopics:
- Account
- Contact
- Two subtopics:
- 3 Publishers:
- Account Publisher, with a send subscription to the CRM.Account topic
- Outbound Message Publisher, with send subscriptions to CRM and CRM.Contact
- Event Publisher, with a send subscription to CRM
- 3 Subscribers:
- CRM Subscriber, with a receive subscription to CRM (not a wildcard or subtopics)
- Account Subscriber, with a receive subscription to CRM.Account
- Contact Subscriber, with a receive subscription to CRM.Contact
Calling the SOAP API
This tutorial will walk you through using the Salesforce adapter to call the Salesforce SOAP API. You will learn how to create an adapter endpoint and all the options available when calling the SOAP API.
Creating an Adapter Endpoint
- If you completed any of the other walk-throughs, you must disable the adapter endpoint(s) created.
- In Neuron Explorer, navigate to Connections->Adapter Endpoints and click New. Set the name of the adapter endpoint to Salesforce SOAP Endpoint, select Salesforce from the Adapter drop-down list, Subscribe from the Mode drop-down list and select Account Subscriber from the Party Id drop-down list.
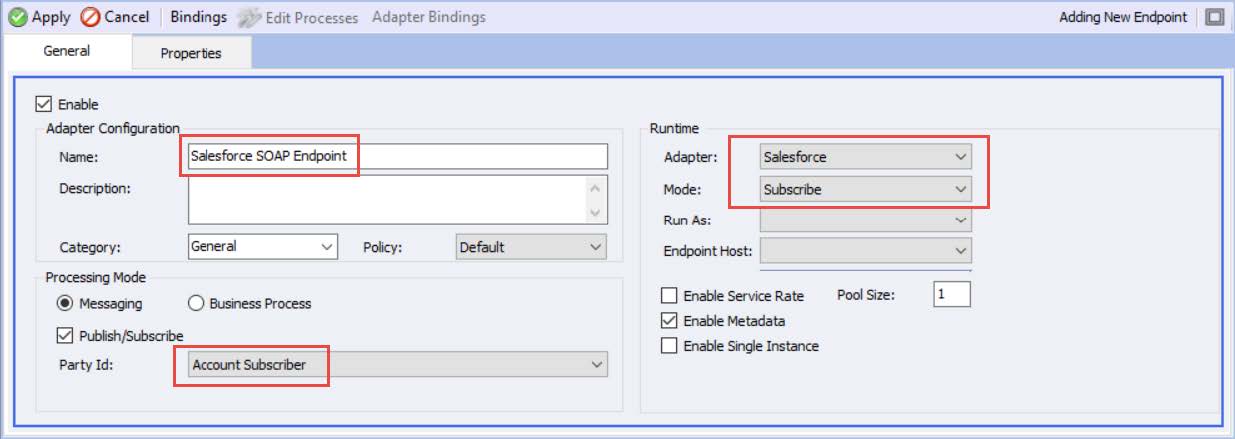
- Click on the Properties tab and set the properties as described below.
- OAuth Connection – False
- SOAP API Version – 48.0
- Salesforce Login URL:
- For production instances (and developer accounts): https://login.salesforce.com/services/Soap/u/48.0
- For sandbox instances: https://test.salesforce.com/services/Soap/u/48.0
- For accounts with MyDomain enabled: https://<MyDomain>.my.salesforce.com/services/Soap/u/48.0, where <MyDomain> is replaced with the My Domain name of your company.
- Concurrent Connections – 2
- Username – Set the Salesforce account username
- Password – Set the Salesforce account password
- Security Token – Set the Salesforce account security token you receive when you set/reset the account password
- Proxy Server – If needed, change this per your network policies
- Publish Mode Properties – you do not need to set/modify any properties in this group
- Data Format – Xml
- Send Timeout – 60
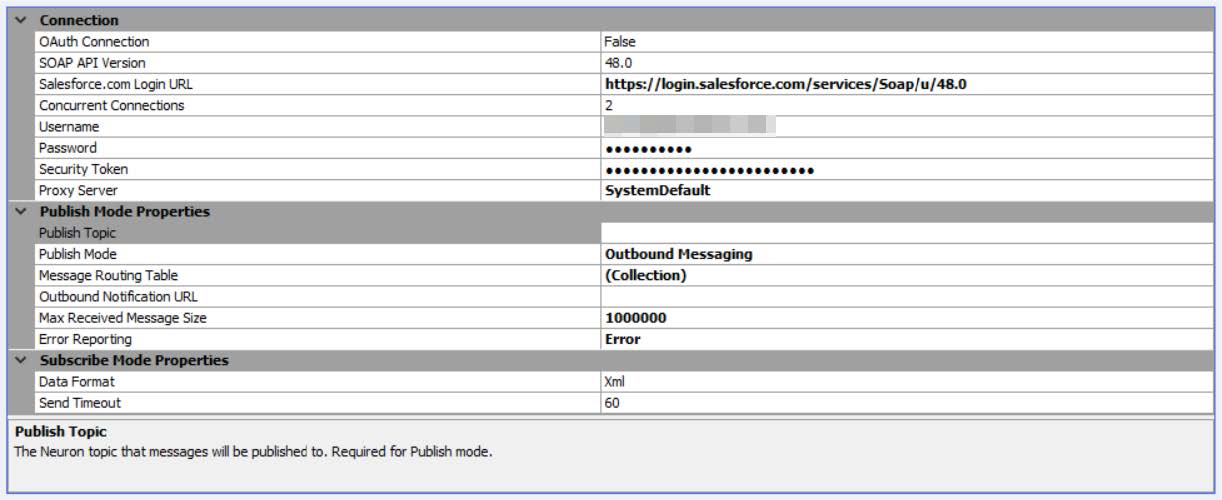
4. Click the Apply button.
In the next walk-through, you will use this adapter endpoint in the Metadata Generation Wizard to retrieve schemas and sample XML messages.
Request and Response Message Formats
When utilizing the SOAP API, the Salesforce adapter only supports XML content for request and response messages. The request and response message formats depend on the service operation being called. You can retrieve request and response message schemas, as well as XML samples, using the Metadata Generation Wizard described below.
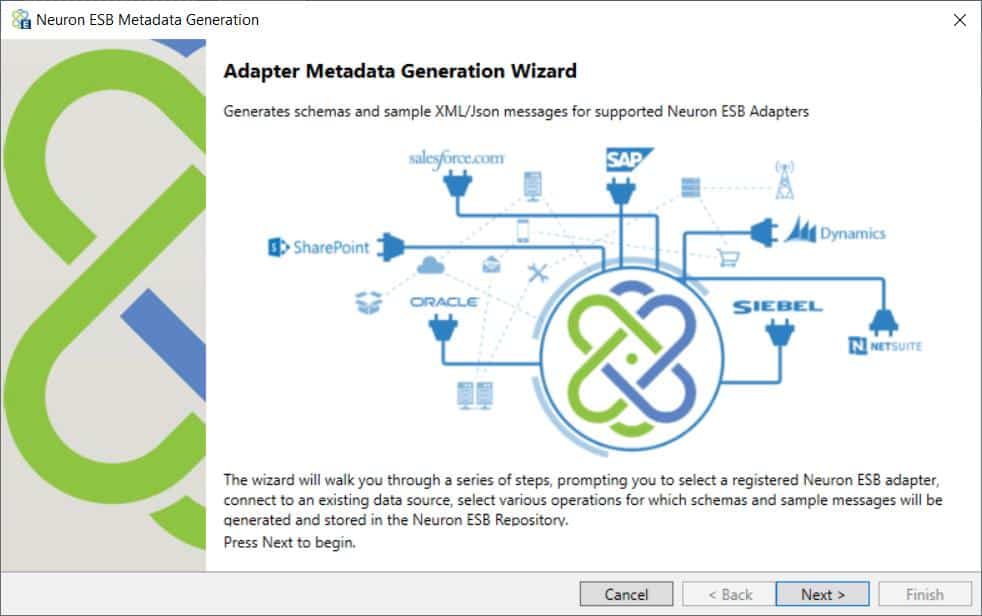
Generating Metadata
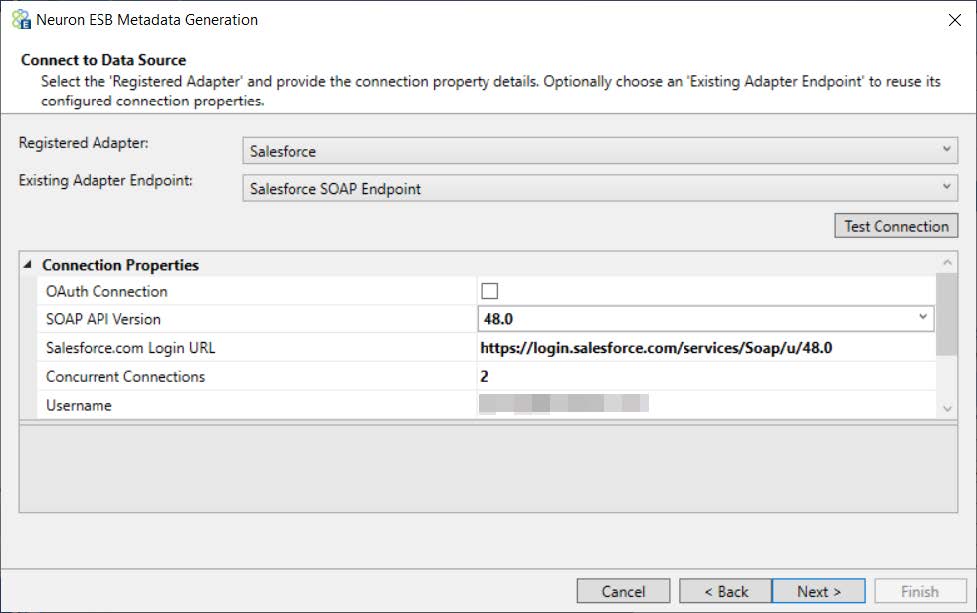
The Metadata Generation Wizard is a tool that is used to generate sample messages and schema definitions for certain adapters and their operations. The Metadata Generation Wizard can be used to generate sample XML request and response messages for the Salesforce Adapter. The following guide assumes you have already completed the first part of this walk-though – Creating an Adapter Endpoint.
- First, in Neuron ESB Explorer navigate to Repository->Xml Documents:
- Next, click the Generate button:
- The Generate button can be accessed from any of the following menus:
- In the “Repository” tab in:
- XML Schemas
- Json Schemas
- XSL Transformations
- XML Documents
- Text Documents
- Json Documents
- Swagger Documents
- In the Connections tab in:
- Adapter Registration
- Adapter Endpoints
- The Generate button can be accessed from any of the following menus:
- On the Welcome page, click Next

- On the Connect to Data Source page choose an adapter and adapter endpoint. In this case, choose the Salesforce adapter and the adapter endpoint created in the first part of this walk-through. Click Next:
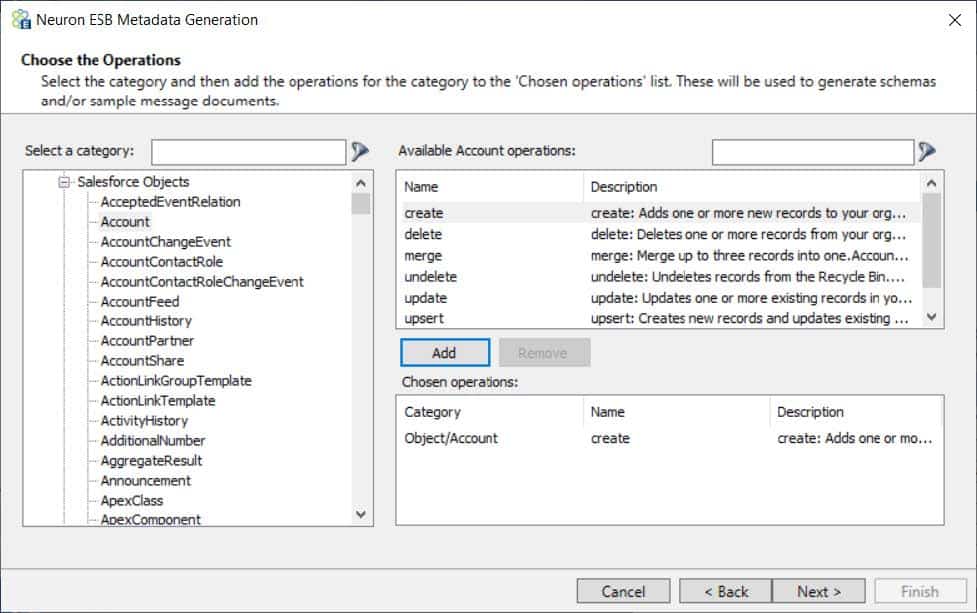
- For the Salesforce adapter, the Category will contain the four different types of calls that are available in the SOAP API (Note: The Salesforce adapter does not support metadata generation for the REST, Bulk or Streaming API). Expand the Salesforce Objects category and select the Account object and then select the create operation from the list Available Account operations. Add it to the list of Chosen Operations by clicking the Add button. More than one operation can be added by choosing each operation and adding it to the list. Click Next:
- Choose whether to generate sample messages (chosen by default) and whether to overwrite the existing documents, if they have already been added, by clicking on the appropriate boxes. Click Next:
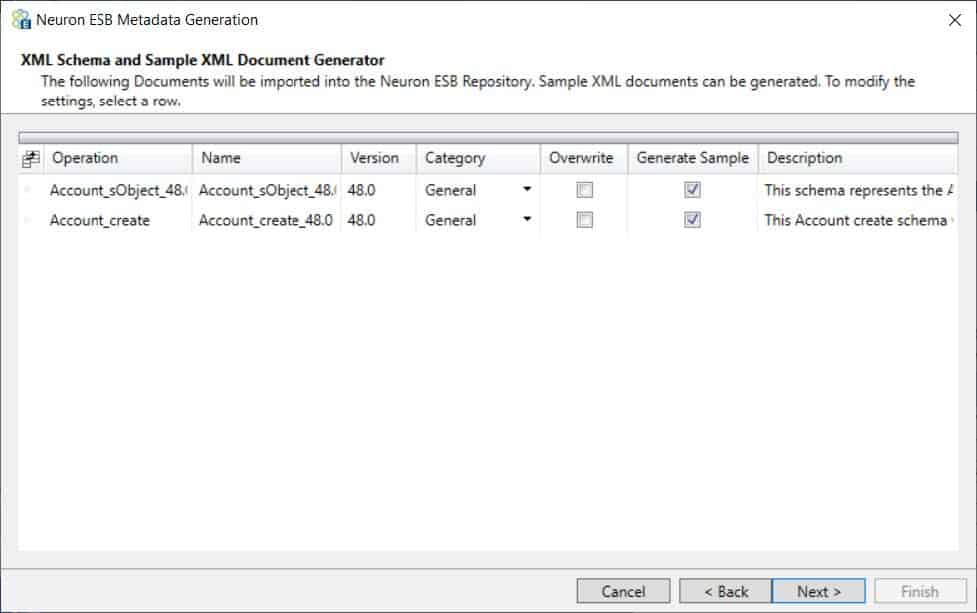
- Finally, click Finish to generate the documents:
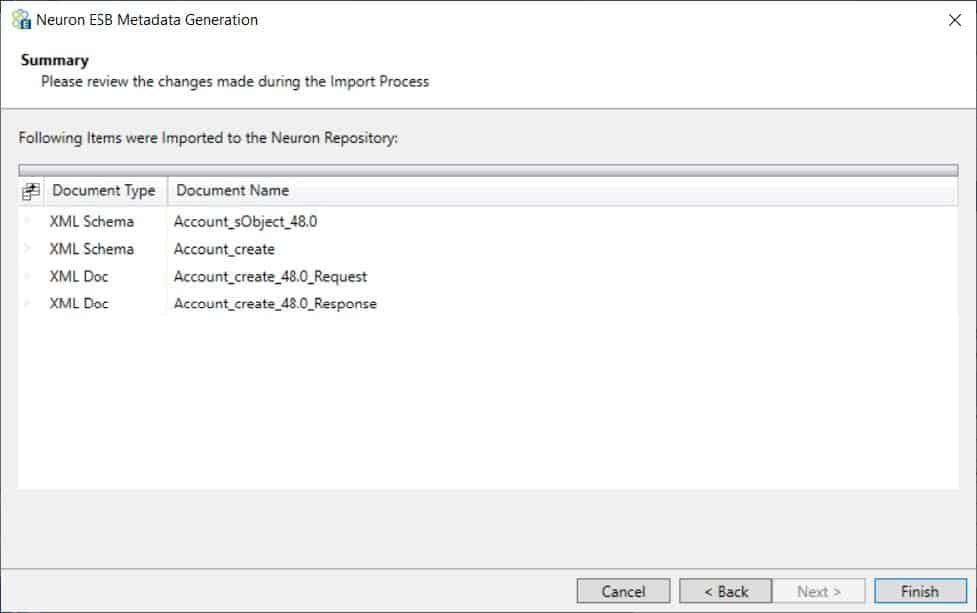
To see the sample request and response messages, navigate to the Xml Documents Repository and select the document Account_create_48.0_Request or Account_create_48.0_Response. If you are already in the XML Documents Repository and do not see the documents, navigate to a different repository and then back. They should appear this time. This is a partial example of a Save or Update request:
<create xmlns:xsi="http://www.w3.org/2001/XMLSchema-instance" xmlns="urn:partner.soap.sforce.com">
  <sObjects>
    <type xmlns="urn:sobject.partner.soap.sforce.com">type1</type>
    <fieldsToNull xmlns="urn:sobject.partner.soap.sforce.com">fieldsToNull1</fieldsToNull>
    <AccountNumber xmlns="urn:sobject.partner.soap.sforce.com">AccountNumber1</AccountNumber>
    <AccountSource xmlns="urn:sobject.partner.soap.sforce.com">AccountSource1</AccountSource>
    <Active__c xmlns="urn:sobject.partner.soap.sforce.com">Active__c1</Active__c>
    <AnnualRevenue xmlns="urn:sobject.partner.soap.sforce.com">1</AnnualRevenue>
    <BillingAddress xmlns="urn:sobject.partner.soap.sforce.com">
      <latitude xmlns="urn:partner.soap.sforce.com">1</latitude>
      <longitude xmlns="urn:partner.soap.sforce.com">1</longitude>
      <city xmlns="urn:partner.soap.sforce.com">city1</city>
      <country xmlns="urn:partner.soap.sforce.com">country1</country>
      <countryCode xmlns="urn:partner.soap.sforce.com">countryCode1</countryCode>
      <postalCode xmlns="urn:partner.soap.sforce.com">postalCode1</postalCode>
      <state xmlns="urn:partner.soap.sforce.com">state1</state>
      <stateCode xmlns="urn:partner.soap.sforce.com">stateCode1</stateCode>
      <street xmlns="urn:partner.soap.sforce.com">street1</street>
    </BillingAddress>
You can use these XML samples to guide your development when creating integrations to Salesforce. The XML schemas and samples created by the Metadata Generation Wizard reflect the bodies of the SOAP request and response message types. The Salesforce adapter supports all the features of the SOAP API. To fully understand how to use a specific object and operation in the SOAP API, please refer to the Salesforce SOAP API documentation referenced at the beginning of this document.
Testing the Salesforce SOAP API Endpoint
This walk-through will show you how to use the Salesforce Adapter to call the SOAP API at runtime. This assumes you completed the previous steps in this section and the Neuron ESB Service is configured to host the Neuron configuration you’ve been working on.
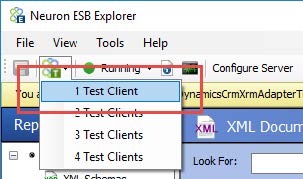
- If you haven’t already done so, save your Neuron Configuration.
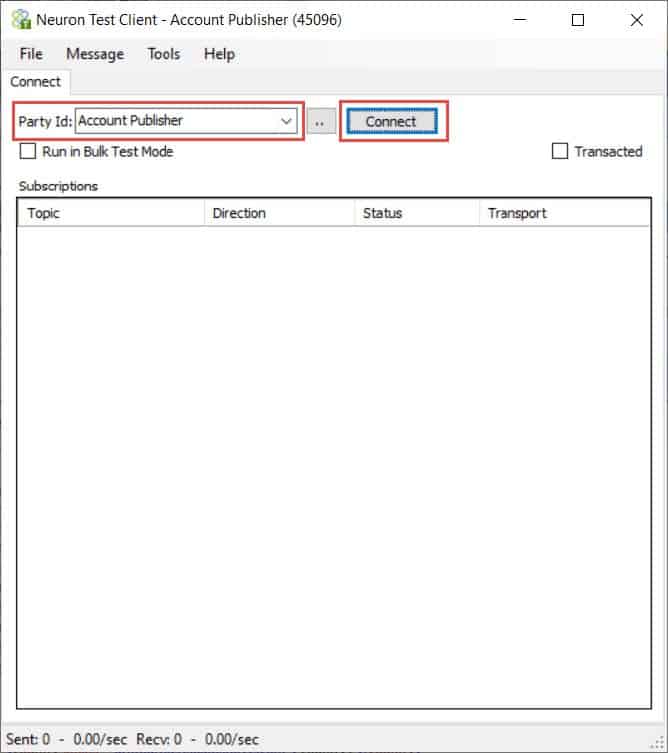
- Open a Neuron Test Client by clicking on the Test Client icon in the Neuron ESB Toolbar and select 1 Test Client:
- When the Neuron Test Client open, select Account Publisher from the Party Id drop-down list and click the Connect button:
- In the Neuron Test Client, click on the Send tab. Set the Semantic to Request and paste this XML to the Message text area:<create xmlns:xsi=”http://www.w3.org/2001/XMLSchema-instance” xmlns=”urn:partner.soap.sforce.com”> <sObjects> <type xmlns=”urn:sobject.partner.soap.sforce.com”>Account</type> <Name xmlns=”urn:sobject.partner.soap.sforce.com”>Neudesic</Name> <Phone xmlns=”urn:sobject.partner.soap.sforce.com”>(800) 805-1805</Phone> <BillingStreet xmlns=”urn:sobject.partner.soap.sforce.com”>200 Spectrum Center Drive, Suite 2000</BillingStreet> <BillingCity xmlns=”urn:sobject.partner.soap.sforce.com”>Irvine</BillingCity> <BillingState xmlns=”urn:sobject.partner.soap.sforce.com”>CA</BillingState> <BillingPostalCode xmlns=”urn:sobject.partner.soap.sforce.com”>92618</BillingPostalCode> <BillingCountry xmlns=”urn:sobject.partner.soap.sforce.com”>US</BillingCountry> <ShippingStreet xmlns=”urn:sobject.partner.soap.sforce.com”>200 Spectrum Center Drive, Suite 2000</ShippingStreet> <ShippingCity xmlns=”urn:sobject.partner.soap.sforce.com”>Irvine</ShippingCity> <ShippingState xmlns=”urn:sobject.partner.soap.sforce.com”>CA</ShippingState> <ShippingPostalCode xmlns=”urn:sobject.partner.soap.sforce.com”>92618</ShippingPostalCode> <ShippingCountry xmlns=”urn:sobject.partner.soap.sforce.com”>US</ShippingCountry> <Website xmlns=”urn:sobject.partner.soap.sforce.com”>https://www.neudesic.com/</Website> </sObjects> </create>
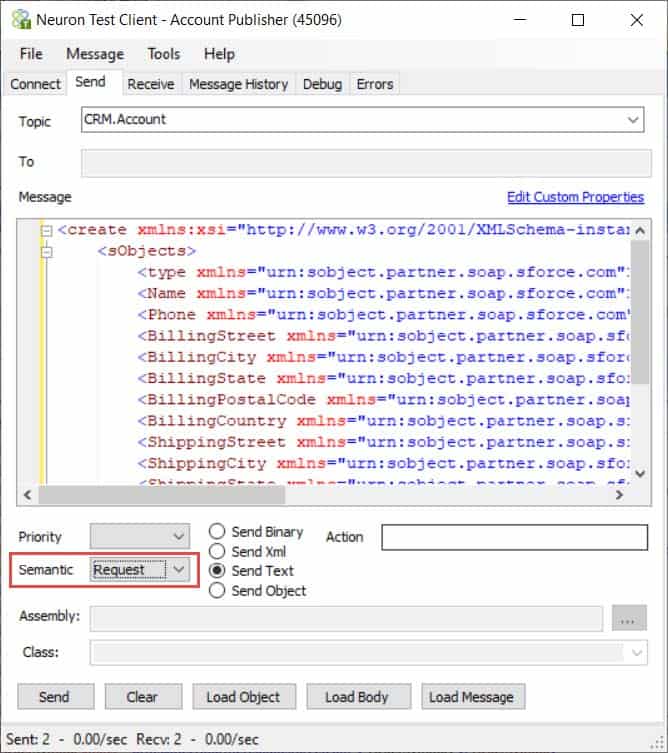
The XML above was created using the sample generated by the Metadata Generation Wizard. The sample values are replaced with real data for the elements we want to set in the new account and the unneeded elements were removed. One element you must set is the <type> element under <sObjects>. This needs to be set to the Salesforce object type that <sObjects> element represents. For this example, the value is Account. You can have multiple <sObjects> elements in a single request, each with a different type. For example, you can create a Contact and an Account in the same request. However, these are considered independent create operations. If you were to create a contact and an account in a single call, Salesforce does not automatically associate the contact with the account. - Click the Send button. If everything works correctly, you should see the Recv: counter at the bottom of the Test Client increase by one. Navigate to the Receive tab to see the response message:
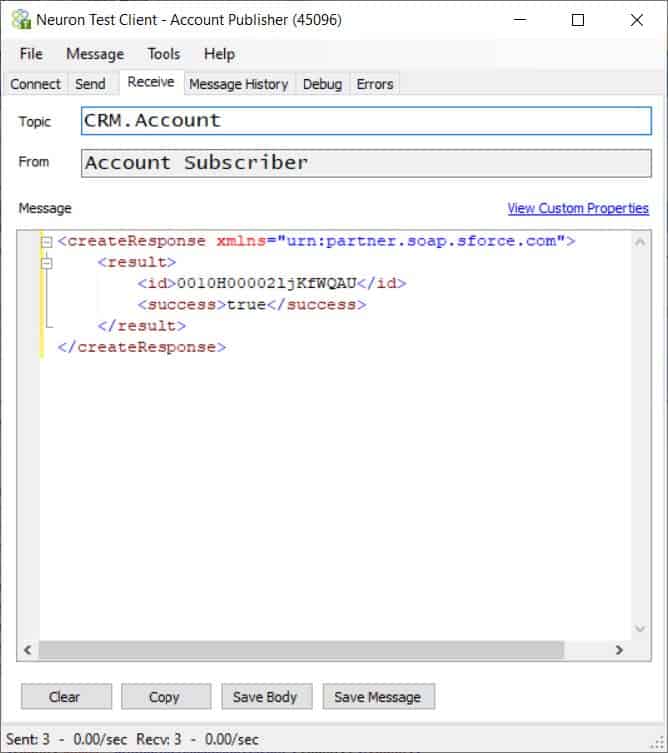 This operation returns a success flag and the internal Salesforce ID of the account created.
 - Open a web browser and log-into your Salesforce account. Navigate to Accounts and view the list of accounts that are New This Week (or another appropriate view). You should see your newly created account in this list!
Calling the REST API
This tutorial will walk you through using the Salesforce adapter to call the Salesforce REST API. You will learn how to create an adapter endpoint and all the options available when calling the REST API.
To use the REST API, you will need to configure a Connected App in Salesforce with OAuth settings enabled for API integration. The minimum OAuth scopes required for the Salesforce adapter are:
- Access and manage your data (api)
- Perform requests on your behalf at any time (refresh_token, offline_access)
- Provide access to your data via the Web (web)
For more information on creating a Connected App, see https://developer.salesforce.com/docs/atlas.en-us.api_rest.meta/api_rest/intro_oauth_and_connected_apps.htm
Creating an Adapter Endpoint
- If you completed any of the other walk-throughs, you must disable the adapter endpoint(s) created.
- In Neuron Explorer, navigate to Connections->Adapter Endpoints and click New. Set the Name of the adapter endpoint to Salesforce REST Endpoint, select Salesforce from the Adapter drop-down list, Subscribe from the Mode drop-down list and select Account Subscriber from the Party Id drop-down list.
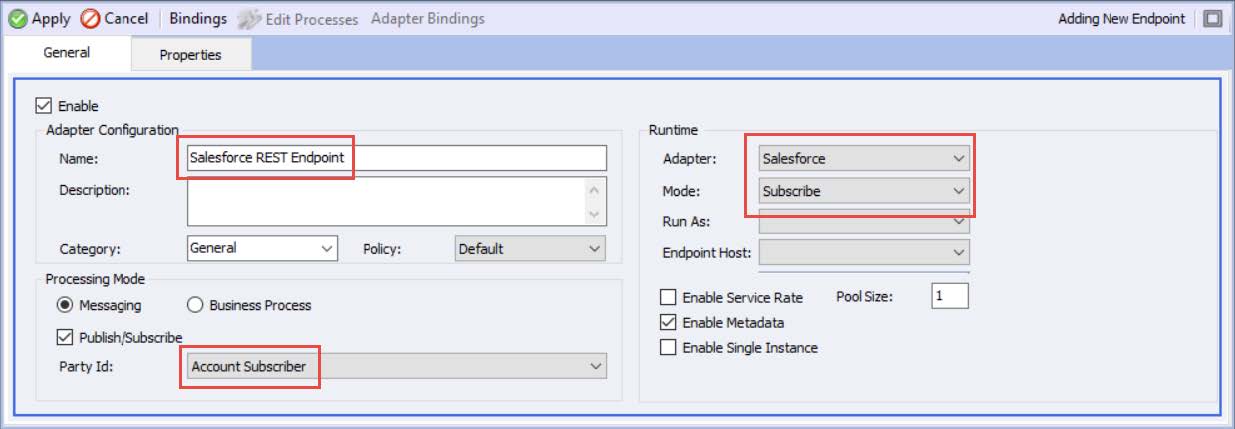
- Click on the Properties tab and set the properties as described below.
- OAuth Connection – True
- OAuth Authentication Flow – Username and Password Flow
- Salesforce Login URL:
- For production instances (and developer accounts): https://login.salesforce.com/services/oauth2/token
- For sandbox instances: https://test.salesforce.com/services/oauth2/token
- For accounts with MyDomain enabled: https://<MyDomain>.my.salesforce.com/services/oauth2/token, where <MyDomain> is replaced with the My Domain name of your company.
- Concurrent Connections – 2
- Username – Set the Salesforce account username
- Password – Set the Salesforce account password
- Security Token – Set the Salesforce account security token you receive when you set/reset the account password
- Consumer Key – The consumer key from your Connected App in Salesforce
- Consumer Secret – The consumer secret from you Connected App in Salesforce
- Proxy Server – If needed, change this per your network policies
- Publish Mode Properties – you do not need to set/modify any properties in this group
- Web API – Rest
- Data Format – Xml or Json (examples of both will be given later)
- Send Timeout – 60
- Click the Apply button.
Request and Response Message Formats
When utilizing the REST API, the Salesforce adapter supports multiple content types for request and response messages. Xml and Json are the two most common types.
Currently, the Metadata Generation Wizard does not support generating schemas and samples for the REST API. The request and response messages reflect the payloads that are sent to and received from Salesforce when making calls. To understand the structure of these payloads, review the REST API Reference here: https://developer.salesforce.com/docs/atlas.en-us.api_rest.meta/api_rest/resources_list.htm.
Testing the Salesforce REST API Endpoint
This walk-through will show you how to use the Salesforce Adapter to call the REST API at runtime. This assumes you completed the previous steps in this section and the Neuron ESB Service is configured to host the Neuron configuration you’ve been working on.
When calling the REST API, you will need to set some Neuron ESB message-level properties that are specific to making REST calls. To do that you will create a Business Process. These steps assume you are familiar with developing Business Processes in Neuron Explorer. For more information, see https://www.neuronesb.com/documentation/doc-development-business-processes.
- Create a new Business Process:
- In Neuron Explorer, navigate to Processes and create a new process.
- Set the name of the process to Create Account.
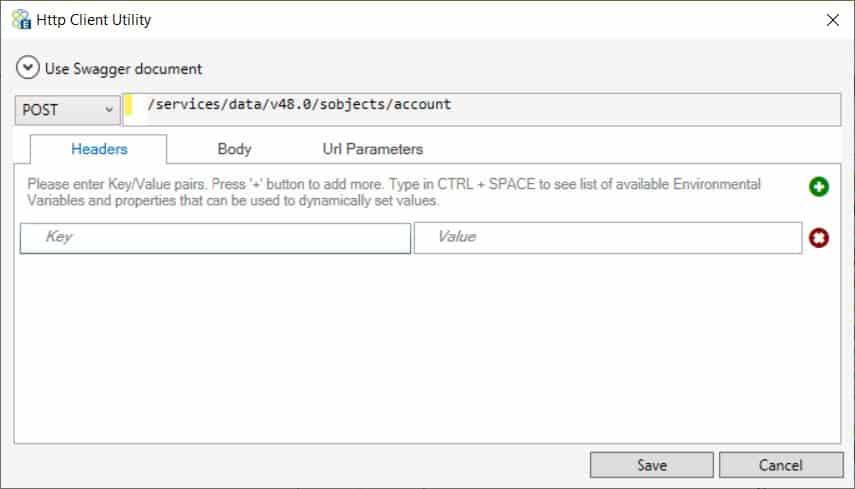
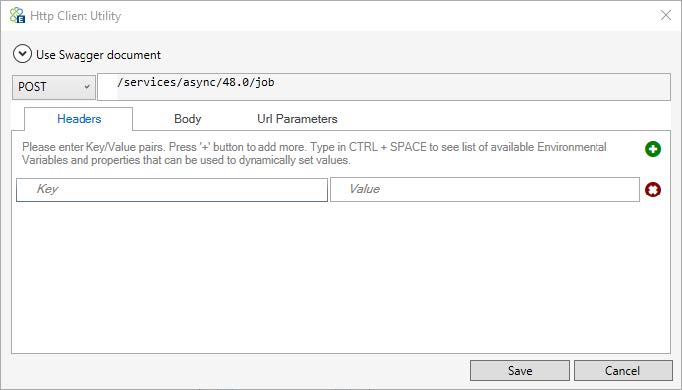
- Add an Http Client Utility step to the design surface. Double-click the Http Client Utility step to configure it.
- Select POST from the list of methods
- Set the local path in the URL text box to /services/data/v46.0/sobjects/Account
- You do not need to add any additional Headers
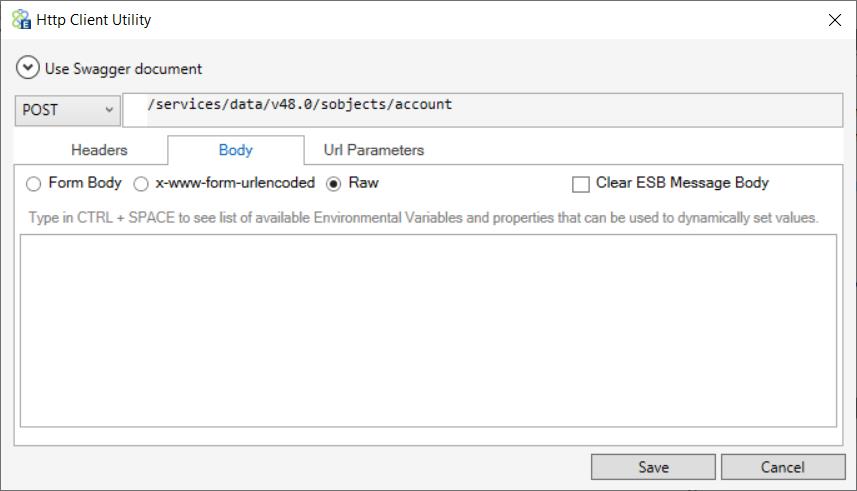
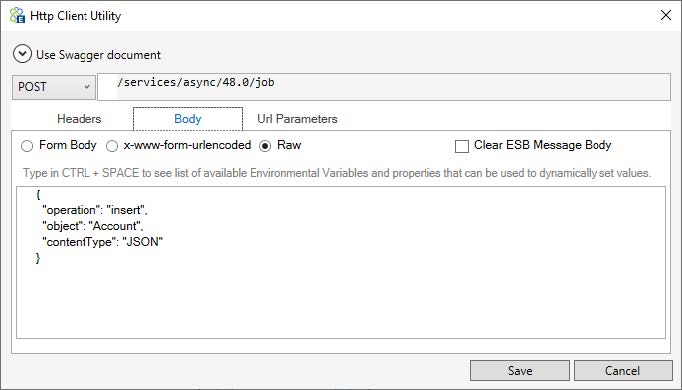
- Click on the Body tab, select Raw as the body type (DO NOT check the Clear ESB Message Body checkbox):
- Click Save
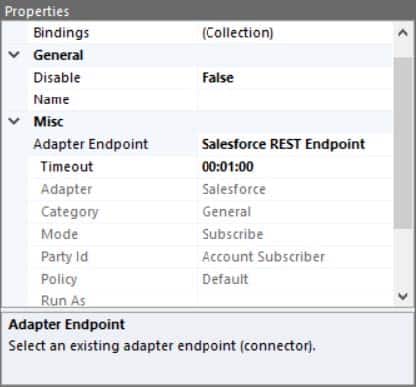
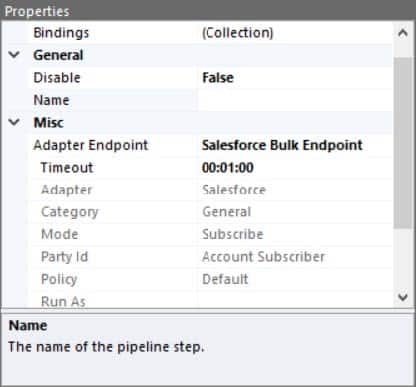
- Add an Adapter Endpoint step to the design surface, after the Http Client Utility step. Set the Adapter Endpoint property to Salesforce REST Endpoint:
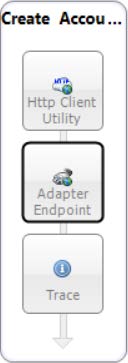
- Add a Trace step to the design surface, after the Adapter Endpoint step.
- The completed process should look like this:
- Make sure you Apply the changes to the process!
- Save your Neuron ESB solution and make sure the Neuron ESB Service is started
- The process you just created can be tested directly from Neuron Explorer
- In the Process Designer, click the Play button:

- In the Edit Test Message dialog, enter the following data into the message area:{ “Name”: “Neudesic”, “Phone”: “(800) 805-1805”, “BillingStreet”: “200 Spectrum Center Drive, Suite 2000”, “BillingCity”: “Irvine”, “BillingState”: “CA”, “BillingPostalCode”: “92618>”, “BillingCountry”: “US”, “ShippingStreet”: “200 Spectrum Center Drive, Suite 2000”, “ShippingCity”: “Irvine”, “ShippingState”: “CA”, “ShippingPostalCode”: “92618”, “ShippingCountry”: “US”, “Website”: “https://www.neudesic.com/” }If you select Xml as the Data Format in the Salesforce REST Endpoint:<sObjects> <Name>Neudesic</Name> <Phone>(800) 805-1805</Phone> <BillingStreet>200 Spectrum Center Drive, Suite 2000</BillingStreet> <BillingCity>Irvine</BillingCity> <BillingState>CA</BillingState> <BillingPostalCode>92618</BillingPostalCode> <BillingCountry>US</BillingCountry> <ShippingStreet>200 Spectrum Center Drive, Suite 2000</ShippingStreet> <ShippingCity>Irvine</ShippingCity> <ShippingState>CA</ShippingState> <ShippingPostalCode>92618</ShippingPostalCode> 25 <ShippingCountry>US</ShippingCountry> <Website>https://www.neudesic.com/</Website> </sObjects>
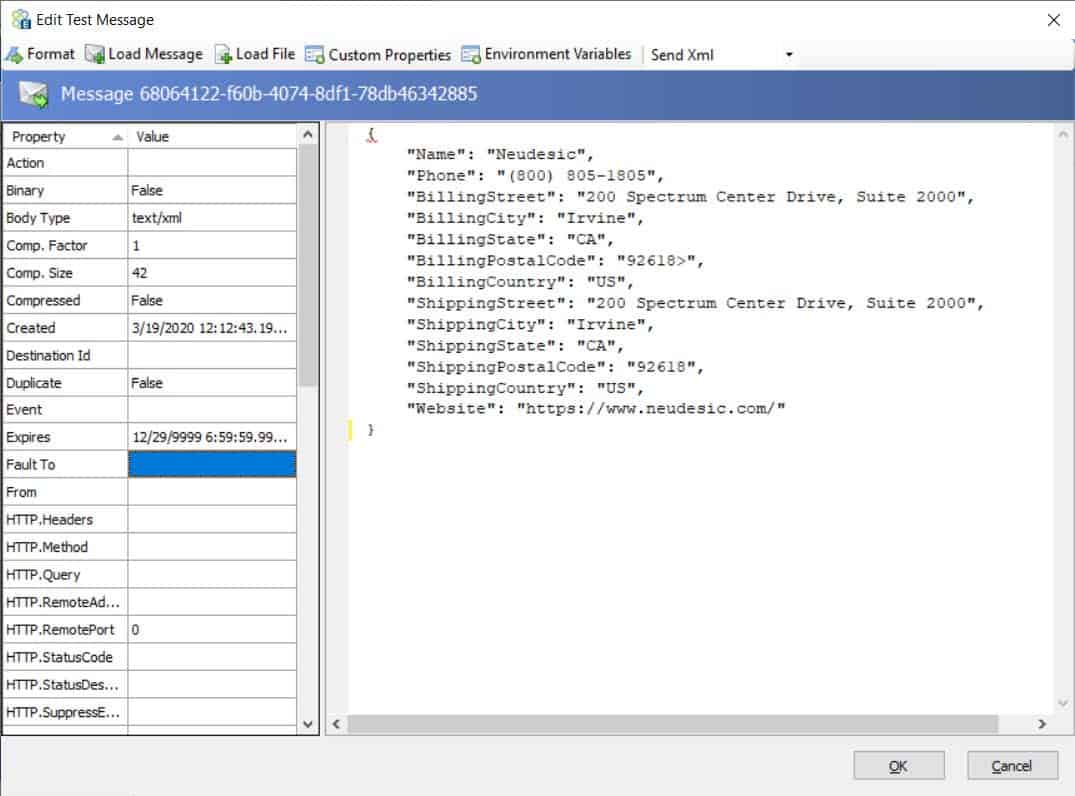
- Click the OK button and the process will execute.
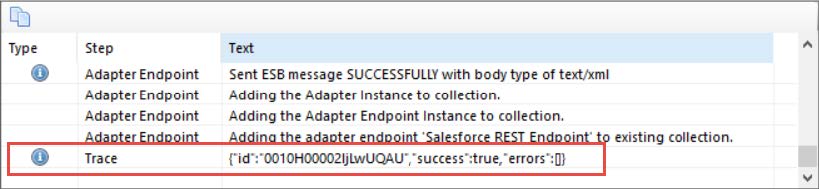
- Search the output windows for any errors and attempt to correct them. If there are no errors, the last few entries should look like this:
- You can double-click on the last line in the output window to see the response JSON.
- In the Process Designer, click the Play button:
- Open a web browser and log-into your Salesforce account. Navigate to Accounts and view the list of accounts that are New This Week (or another appropriate view). You should see your newly created account in this list!
Calling the Bulk API
This tutorial will walk you through using the Salesforce adapter to call the Salesforce Bulk API. You will learn how to create an adapter endpoint and all the options available when calling the Bulk API.
To use the Bulk API, you will need to configure a Connected App in Salesforce with OAuth settings enabled for API integration. If you have already created one for the REST API walk-through, you can use the same Connected App properties for this walk-through. The minimum OAuth scopes required for the Salesforce adapter are:
- Access and manage your data (api)
- Perform requests on your behalf at any time (refresh_token, offline_access)
- Provide access to your data via the Web (web)
For more information on creating a Connected App, see https://developer.salesforce.com/docs/atlas.en-us.api_rest.meta/api_rest/intro_oauth_and_connected_apps.htm
Creating an Adapter Endpoint
- If you completed any of the other walk-throughs, you must disable the adapter endpoint(s) created.
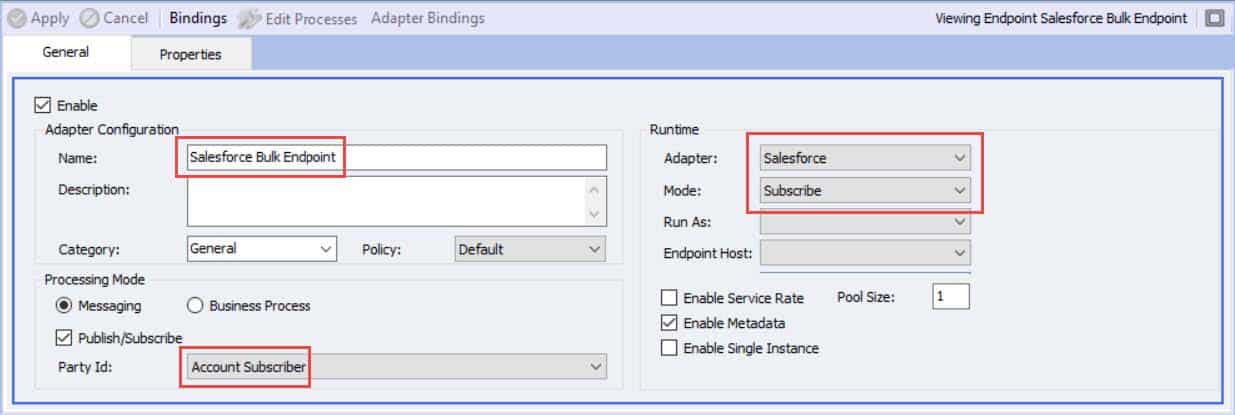
- In Neuron Explorer, navigate to Connections->Adapter Endpoints and click New. Set the Name of the adapter endpoint to Salesforce Bulk Endpoint, select Salesforce from the Adapter drop-down list, Subscribe from the Mode drop-down list and select Account Subscriber from the Party Id drop-down list.Note – You could just copy the Salesforce REST Endpoint, change the name to Salesforce Bulk Endpoint, and change the Web API property to Bulk if you don’t want to create a whole new endpoint.
- Click on the Properties tab and set the properties as described below.
- OAuth Connection – TrueOAuth Authentication Flow – Username and Password Flo
- Salesforce Login URL:
- For production instances (and developer accounts): https://login.salesforce.com/services/oauth2/token
- For sandbox instances: https://test.salesforce.com/services/oauth2/token
- For accounts with MyDomain enabled: https://<MyDomain>.my.salesforce.com/services/oauth2/token, where <MyDomain> is replaced with the My Domain name of your company.
- Concurrent Connections – 2
- Username – Set the Salesforce account username
- Password – Set the Salesforce account password
- Security Token – Set the Salesforce account security token you receive when you set/reset the account password
- Consumer Key – The consumer key from your Connected App in Salesforce
- Consumer Secret – The consumer secret from you Connected App in Salesforce
- Proxy Server – If needed, change this per your network policies
- Publish Mode Properties – you do not need to set/modify any properties in this group
- Web API – Bulk
- Data Format – Xml or Json (examples of both will be given later)
- Send Timeout – 60
- Click the Apply button.
Request and Response Message Formats
When utilizing the Bulk API, the Salesforce adapter supports both Xml and Json content types for request and response messages.
Currently, the Metadata Generation Wizard does not support generating schemas and samples for the Bulk API. The request and response messages reflect the payloads that are sent to and received from Salesforce when making calls. To understand the structure of these payloads, review the Bulk API documentation.
Bulk API Call Basics
When using the Bulk API, you are responsible for all the calls required for creating and closing a job, as well as adding batches to the job. The basic order of calls is:
You may also want to use these calls:
Each of the calls above is a link to the Salesforce documentation to that call. There are many other calls you can take advantage of. Please refer to the Salesforce documentation about which additional calls are available. This walk-through will only cover Create a Job, Add Batches to a Job and Close a Job.
Create a Job
When using the Bulk API, the first call you need to make before uploading data is to create a job. This is a simple call with three elements.
Method – POST
Local Path: /services/async/<API Version>/job (i.e. /services/async/46.0/job)
Properties:
- object – The type of Salesforce object that will be used in this job
- operation – valid values are query, queryAll, insert, update, upsert or delete
- contentType – valid values are JSON, XML or CSV
Sample Request XML:
<jobInfo xmlns="http://www.force.com/2009/06/asyncapi/dataload">

   <operation>insert</operation>

   <object>Account</object>

   <contentType>XML</contentType>

</jobInfo>
Sample Request JSON:
{

  "operation": "insert",

  "object": "Account",

  "contentType": "JSON"

}
The response is the Salesforce JobInfo object. You will need to save the id property value for use in the other calls to Salesforce that are part of this same job. For more information on JobInfo, see https://developer.salesforce.com/docs/atlas.en-us.218.0.api_asynch.meta/api_asynch/asynch_api_reference_jobinfo.htm.
Sample Response XML:
<jobInfo xmlns="http://www.force.com/2009/06/asyncapi/dataload">

  <id>750D00000004SkLIAU</id>

  <operation>insert</operation>

  <object>Account</object>

  <createdById>005D0000001b0fFIAQ</createdById>

  <createdDate>2015-12-15T21:41:45.000Z</createdDate>

  <systemModstamp>2015-12-15T21:41:45.000Z</systemModstamp>

  <state>Open</state>

  <concurrencyMode>Parallel</concurrencyMode>

  <contentType>CSV</contentType>

  <numberBatchesQueued>0</numberBatchesQueued>

  <numberBatchesInProgress>0</numberBatchesInProgress>

  <numberBatchesCompleted>0</numberBatchesCompleted>

  <numberBatchesFailed>0</numberBatchesFailed>

  <numberBatchesTotal>0</numberBatchesTotal>

  <numberRecordsProcessed>0</numberRecordsProcessed>

  <numberRetries>0</numberRetries>

  <apiVersion>46.0</apiVersion>

  <numberRecordsFailed>0</numberRecordsFailed>

  <totalProcessingTime>0</totalProcessingTime>

  <apiActiveProcessingTime>0</apiActiveProcessingTime>

  <apexProcessingTime>0</apexProcessingTime>

</jobInfo>
Sample Response JSON:
{

  "apexProcessingTime": 0,

  "apiActiveProcessingTime": 0,

  "apiVersion": 46.0,

  "concurrencyMode": "Parallel",

  "contentType": "JSON",

  "createdById": "005D0000001b0fFIAQ",

  "createdDate": "2015-12-15T20:45:25.000+0000",

  "id": "750D00000004SkGIAU",

  "numberBatchesCompleted": 0,

  "numberBatchesFailed": 0,

  "numberBatchesInProgress": 0,

  "numberBatchesQueued": 0,

  "numberBatchesTotal": 0,

  "numberRecordsFailed": 0,

  "numberRecordsProcessed": 0,

  "numberRetries": 0,

  "object": "Account",

  "operation": "insert",

  "state": "Open",

  "systemModstamp": "2015-12-15T20:45:25.000+0000",

  "totalProcessingTime": 0

}
Add Batches to a Job
A batch is a collection of Salesforce objects that the job will perform operations on. You can add as many batches to a job that are necessary. The job ID returned when you create a job is passed as part of the URL when adding the batch. The payload doesn’t have any properties, just the sobjects to load.
Method – POST
Local Path: /services/async/<API Version>/job/<Job ID>/batch (i.e. /services/async/46.0/job/750D00000004SkGIAU/batch)
Sample Request XML
<sObjects xmlns="http://www.force.com/2009/06/asyncapi/dataload">

 <sObject>

  <description>Created from Bulk API</description>

  <name>[Bulk API] Account 0 (batch 0)</name>

 </sObject>

 <sObject>

  <description>Created from Bulk API</description>

  <name>[Bulk API] Account 1 (batch 0)</name>

 </sObject>

</sObjects>
Sample Request JSON
[

 {

  "Name":"[Bulk API] Account 0 (batch 0)",

  "description": "Created from Bulk API"

 },

 {

  "Name":"[Bulk API] Account 1 (batch 0)",

  "description": "Created from Bulk API"

 }

]
The response contains a number of properties that are part of the Salesforce BatchInfo. Properties you might want to monitor are state and stateMessage. The stateFailed property will only be available if the state is Failed. For more information on BatchInfo, see https://developer.salesforce.com/docs/atlas.en-us.218.0.api_asynch.meta/api_asynch/asynch_api_reference_batchinfo.htm.
Sample Response XML
<batchInfo xmlns="http://www.force.com/2009/06/asyncapi/dataload">

 <id>751D0000000004rIAA</id>

 <jobId>750D0000000002lIAA</jobId>

 <state>Queued</state>

 <createdDate>2009-04-14T18:15:59.000Z</createdDate>

 <systemModstamp>2009-04-14T18:15:59.000Z</systemModstamp>

 <numberRecordsProcessed>0</numberRecordsProcessed>

 <numberRecordsFailed>0</numberRecordsFailed>

 <totalProcessingTime>0</totalProcessingTime>

 <apiActiveProcessingTime>0</apiActiveProcessingTime>

 <apexProcessingTime>0</apexProcessingTime>

</batchInfo>
Sample Response JSON
{

 "apexProcessingTime":0,

 "apiActiveProcessingTime":0,

 "createdDate":"2015-12-15T21:56:43.000+0000",

 "id":"751D00000004YGZIA2",

 "jobId":"750D00000004SkVIAU",

 "numberRecordsFailed":0,

 "numberRecordsProcessed":0,

 "state":"Queued",

 "systemModstamp":"2015-12-15T21:56:43.000+0000",

 "totalProcessingTime":0

}
Close a Job
After you have finished adding batches to the job you must close it. Once a job is closed you cannot add any more batches to it.
Method – POST
Local Path: /services/async/<API Version>/job/<Job ID> (i.e. /services/async/46.0/job/750D00000004SkGIAU)
Sample Request XML
<jobInfo xmlns="http://www.force.com/2009/06/asyncapi/dataload">

 <state>Closed</state>

</jobInfo>
Sample Request JSON
{

 "state" : "Closed"

}
The response is the Salesforce JobInfo object. This is the same object returned when you created the job, but more of the properties may have been updated based on how many of the records have been processed. For more information on JobInfo, see https://developer.salesforce.com/docs/atlas.en-us.218.0.api_asynch.meta/api_asynch/asynch_api_reference_jobinfo.htm.
Sample Response XML
<jobInfo xmlns="http://www.force.com/2009/06/asyncapi/dataload">

 <id>750D0000000002lIAA</id>

 <operation>insert</operation>

 <object>Account</object>

 <createdById>005D0000001ALVFIA4</createdById>

 <createdDate>2009-04-14T18:15:59.000Z</createdDate>

 <systemModstamp>2009-04-14T18:15:59.000Z</systemModstamp>

 <state>Closed</state>

 <concurrencyMode>Parallel</concurrencyMode>

 <contentType>XML</contentType>

 <numberBatchesQueued>0</numberBatchesQueued>

 <numberBatchesInProgress>0</numberBatchesInProgress>

 <numberBatchesCompleted>1</numberBatchesCompleted>

 <numberBatchesFailed>0</numberBatchesFailed>

 <numberBatchesTotal>1</numberBatchesTotal>

 <numberRecordsProcessed>2</numberRecordsProcessed>

 <numberRetries>0</numberRetries>

 <apiVersion>46.0</apiVersion>

 <numberRecordsFailed>0</numberRecordsFailed>

 <totalProcessingTime>3647</totalProcessingTime>

 <apiActiveProcessingTime>2136</apiActiveProcessingTime>

 <apexProcessingTime>0</apexProcessingTime>

</jobInfo>
Sample Response JSON
{

 "apexProcessingTime" : 0,

 "apiActiveProcessingTime" : 5059,

 "apiVersion" : 46.0,

 "concurrencyMode" : "Parallel",

 "contentType" : "JSON",

 "createdById" : "005xx000001SyhGAAS",

 "createdDate" : "2015-11-19T01:45:03.000+0000",

 "id" : "750xx000000000GAAQ",

 "numberBatchesCompleted" : 10,

 "numberBatchesFailed" : 0,

 "numberBatchesInProgress" : 0,

 "numberBatchesQueued" : 0,

 "numberBatchesTotal" : 10,

 "numberRecordsFailed" : 0,

 "numberRecordsProcessed" : 100,

 "numberRetries" : 0,

 "object" : "Account",

 "operation" : "insert",

 "state" : "Closed",

 "systemModstamp" : "2015-11-19T01:45:03.000+0000",

 "totalProcessingTime" : 5759

}
Testing the Salesforce Bulk API Endpoint
This walk-through will show you how to use the Salesforce Adapter to call the Bulk API at runtime. This assumes you completed the previous steps in this section and the Neuron ESB Service is configured to host the Neuron configuration you’ve been working on.
When calling the Bulk API, you will need to set some Neuron ESB message-level properties that are specific to making REST calls. To do that you will create a Business Process. These steps assume you are familiar with developing Business Processes in Neuron Explorer. For more information, see https://www.neuronesb.com/documentation/doc-development-business-processes.
- Create a new Business Process:
- In Neuron Explorer, navigate to Processes and create a new process.
- Set the Name of the process to Load Batch.
- First, drag an Exception step to the design surface. The code you add later will throw exceptions when calls don’t succeed as expected. All the remaining steps, except for the Rethrow step at the end, will be placed inside the Try block of this step.
- Add an Http Client Utility step to the design surface and name it Create Job. Double-click the Http Client Utility step to configure it.
- Select POST from the list of methods
- ii. Set the local path in the URL text box to /services/async/48.0/job
- iii. You do not need to add any additional Headers
- Click on the Body tab, select Raw as the body type. Copy the JSON below and paste it into the text area.{ “operation”: “insert”, “object”: “Account”, “contentType”: “JSON” }
- Click Save
- Add an Adapter Endpoint step to the design surface, after the Http Client Utility step, and name it Call Salesforce. Set the Adapter Endpoint property to Salesforce Bulk Endpoint:
- Add a Trace step to the design surface, after the Adapter Endpoint step. The first two steps are used to create a job. The trace step is only there for you to see the response from Salesforce. Next, you will need to verify the job was successfully created, and if it was, capture the ID of the created job. This id will be used when adding batches and closing the job.
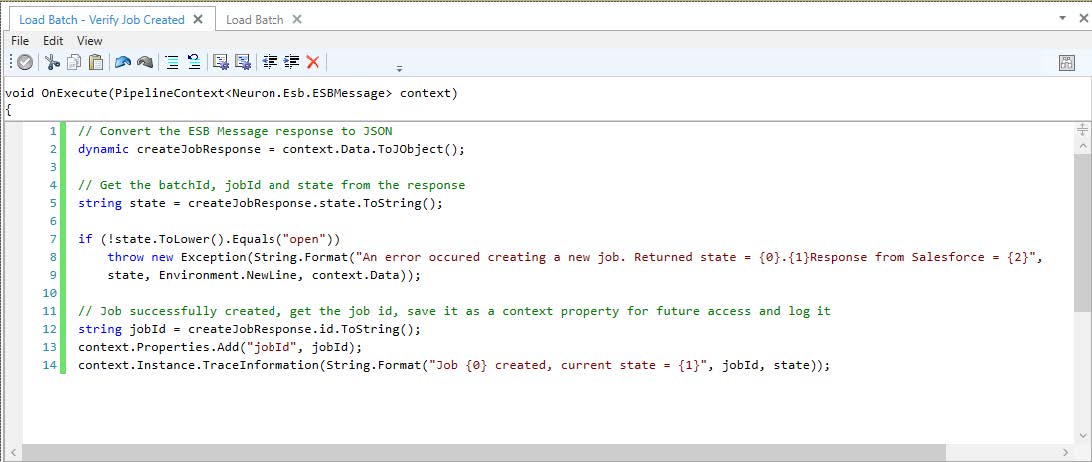
- Add a C# directly after the Trace step and name it Verify Job Created. Double-click the C# step to open the code editor. Copy the C# code below and paste it into the code editor:// Convert the ESB Message response to JSONdynamic createJobResponse = context.Data.ToJObject();// Get the batchId, jobId and state from the responsestring state = createJobResponse.state.ToString();if (!state.ToLower().Equals(“open”))throw new Exception(String.Format(“An error occured creating a new job. Returned state = {0}.{1}Response from Salesforce = {2}”, state, Environment.NewLine, context.Data));// Job successfully created, get the job id, save it as a context property for future access and log itstring jobId = createJobResponse.id.ToString();context.Properties.Add(“jobId”, jobId);context.Instance.TraceInformation(String.Format(“Job {0} created, current state = {1}”, jobId, state));
 Don’t forget to click the “Apply” icon in the code editor’s toolbar!
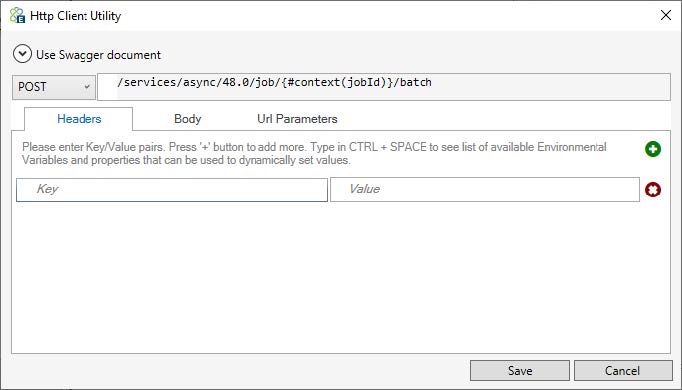
 - Add another Http Client Utility step to the design surface after the C# step “Verify Job Created” and name it “Create Batch”. Double-click the Http Client Utility step to configure it.
- Select POST from he list of methods
- Set the local path in the URL text box to /services/async/48.0/job/{#context(jobld)}batch
- You do not need to add any additional Headers
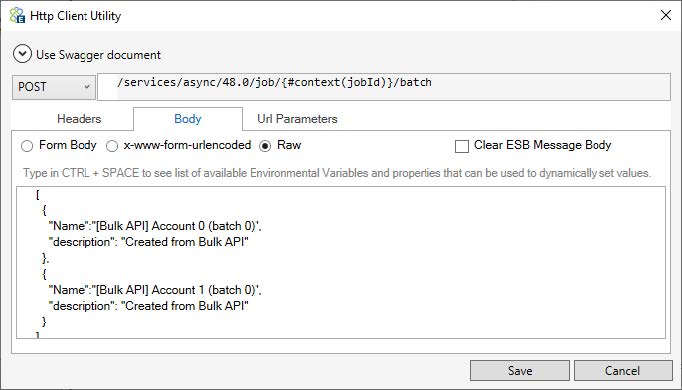
- Click on the Body tab, select “Raw” as the body type. Copy the JSON below and paste it into the text area:[ { “Name”:”[Bulk API] Account 0 (batch 0)”, “description”: “Created from Bulk API” }, { “Name”:”[Bulk API] Account 1 (batch 0)”, “description”: “Created from Bulk API” } ]
- Click Save
- Add another Adapter Endpoint step to the design surface, after the Http Client Utility step, and name it “Call Salesforce”. Set the Adapter Endpoint property to Salesforce Bulk Endpoint:

- Add a Trace step to the design surface, after the Adapter Endpoint step, to see the response from Salesforce. Next, you will need to verify the batch was added.
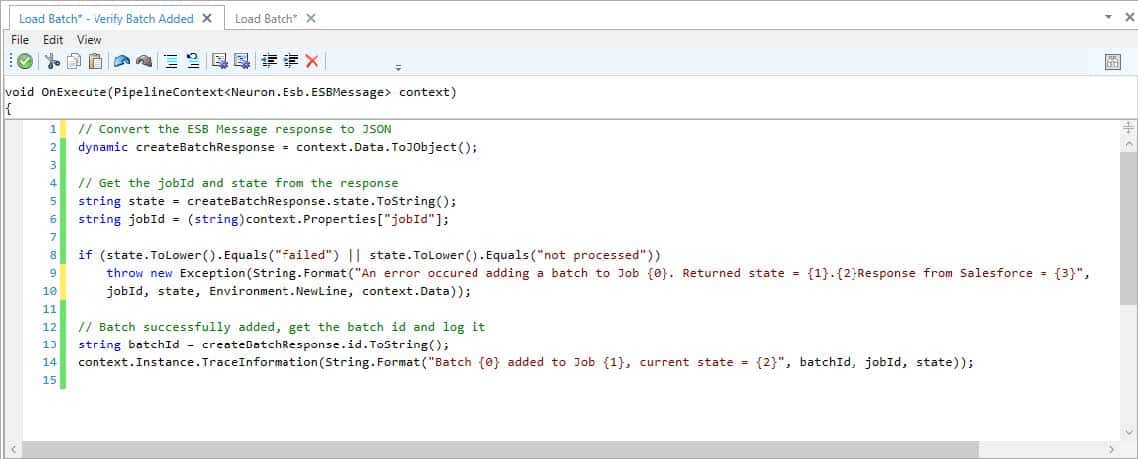
- Add a C# directly after the Trace step and name it “Verify Batch Added”. Double-click the C# step to open the code editor. Copy the C# code below and paste it into the code editor:// Convert the ESB Message response to JSON dynamic createBatchResponse = context.Data.ToJObject(); // Get the jobId and state from the response string state = createBatchResponse.state.ToString(); string jobId = (string)context.Properties[“jobId”]; if (state.ToLower().Equals(“failed”) || state.ToLower().Equals(“not processed”)) throw new Exception(String.Format(“An error occured adding a batch to Job {0}. Returned state = {1}.{2}Response from Salesforce = {3}”, jobId, state, Environment.NewLine, context.Data)); // Batch successfully added, get the batch id and log it string batchId = createBatchResponse.id.ToString(); context.Instance.TraceInformation(String.Format(“Batch {0} added to Job {1}, current state = {2}”, batchId, jobId, state));
Don’t forget to click the “apply” Icon in the code editor’s toolbar! - Add one more Http Client Utility step to the design surface after the C# step “Verify Batch Added” and name it “Close Job”. Double-click the Http Client Utility step to configure it.
- Select POST from the list of methods
- Set the local path in the URL text box to /services/async/48.0/job/{#context(jobId)}
- You do not need to add any additional Headers
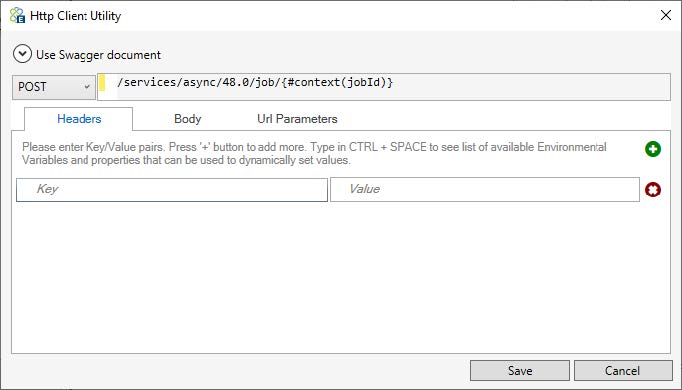
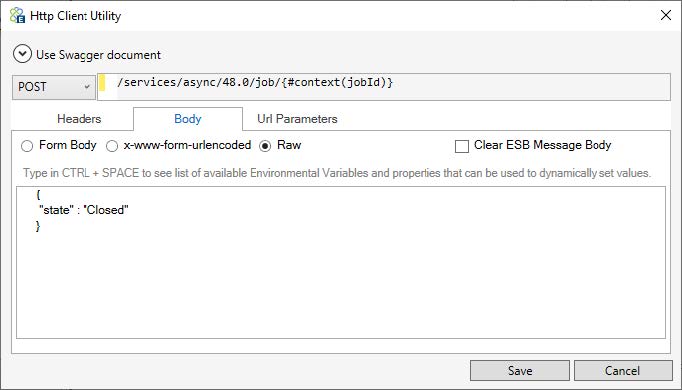
- Click on the Body tab, select “Raw” as the body type. Copy the JSON below and paste it into the text area:{ “state” : “Closed” }
 Click Save
- Add one more Adapter Endpoint step to the design surface, after the Http Client Utility step, and name it “Call Salesforce”. Set the Adapter Endpoint property to Salesforce Bulk Endpoint:

- Add a Trace step to the design surface, after the Adapter Endpoint step, to see the response from Salesforce. Next, you will need to verify the job was closed.
- Add a C# directly after the Trace step and name it “Verify Job Closed”. Double-click the C# step to open the code editor. Copy the C# code below and paste it into the code editor:// Get the stored jobId string jobId = (string)context.Properties[“jobId”]; // Convert the ESB Message response to JSON dynamic closeBatchResponse = context.Data.ToJObject(); // Get the state from the response string state = closeBatchResponse.state.ToString(); if (!state.ToLower().Equals(“closed”)) throw new Exception(String.Format(“Failed to close Salesforce Job ID {0}.{1}Response from Salesforce = {2}”, jobId, Environment.NewLine, context.Data)); // The job was successfully closed, so log it context.Instance.TraceInformation(String.Format(“Closed Job with ID {0}”, jobId));
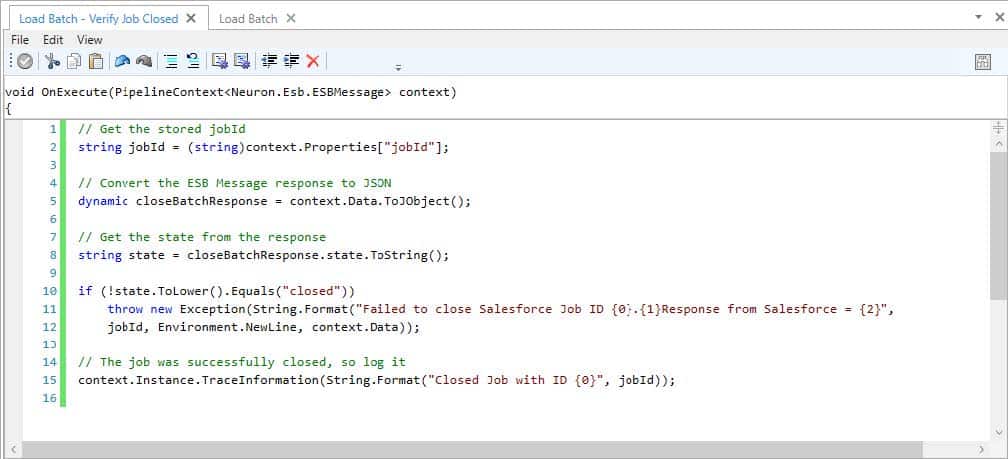 Don’t forget to click the “Apply” icon in the code editor’s toolbar! It’s outlined in red in the above image.
 - In the Catch block of the Exception shape you would normally put in here your normal exception handling logic. For this walk-through we are just going to add a Rethrow step.
- The completed process should look like this:

- Make sure you Apply the changes to the process!
- Save your Neruon ESB solution and make sure the Neuron ESB Service is started
- The process you just created can be tested directly from Neuron Explorer.
- In the Process Designer, click the Play button:
- In the Edit Test Message dialog, you do not need to enter any data into the message area. The Http Client Utility steps will set the request message bodies for you (normally you would have to provide the data used for “Create Batch”, but for simplicity, we are hard-coding the accounts to be created. Delete any data in the message area:
- Click the OK button and the process will execute.
- Search the output windows for any errors and attempt to correct them. If there are no errors, the last few entries should look like this:

- You can double-click on the second-to-last line in the output window to see the response JSON for the Close Job call. Scroll through the output window to see the results from the other calls to Salesforce.
- In the Process Designer, click the Play button:
- Open a web browser and log-into your Salesforce account. Navigate to Accounts and view the list of accounts that are New This Week (or another appropriate view). You should see your newly created accounts in this list!
Receiving Outbound Messages
This tutorial will walk you through using the Salesforce adapter to receive outbound messages from Salesforce. You will learn how to create an adapter endpoint and all the options available when receiving outbound messages.
Receiving outbound messages from Salesforce requires three main steps:
- Create a publicly available URL that will forward Salesforce outbound messages to a Salesforce adapter endpoint hosted in Neuron ESB.
- Define an outbound message in Salesforce.
- Configure a Salesforce adapter endpoint to receive outbound notifications
Create Public URL
The Salesforce adapter receives outbound messages from Neuron over http or https. One of the configuration properties in the Salesforce adapter is the Outbound Notification URL. This URL is the address of a Web service hosted by the Neuron ESB runtime. A typical Neuron ESB solution is deployed behind corporate firewalls, and any Web service hosted by the Neuron ESB runtime is not accessible directly from the internet. Because of this, a public URL must be created that can be called by the Salesforce outbound messaging subsystem, which will then forward the outbound message to the Web service hosted by Neuron ESB. Think of this like a typical Web server that sits behind the firewall.
For example, you will need two URLs during this tutorial:
- Public URL which will be called by Salesforce to send outbound messages. For this tutorial we will use http://neurondemo.com/salesforce
- The Salesforce Adapter Endpoint’s URL that the outbound messages will be forwarded to. For this tutorial we will use http://localhost/salesforce.
Set-up Outbound Messaging in Salesforce
The first step to receiving outbound messages from Salesforce is to set-up and define an outbound message in Salesforce. This tutorial will not teach you everything you should know about outbound messaging in Salesforce. For this tutorial we will walk you defining an outbound message that will send account notifications to Neuron.
For information about outbound messaging in Salesforce, see https://developer.salesforce.com/docs/atlas.en-us.api.meta/api/sforce_api_om_outboundmessaging_setting_up.htm
Define a Workflow Rule and Outbound Message:
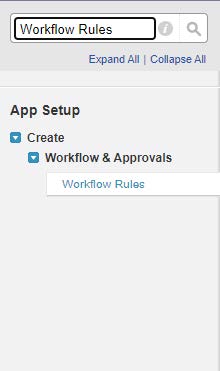
- Log-into your Salesforce account and navigate to Setup.
- Enter Workflow Rules in the Quick Find box, then select Workflow Rules:
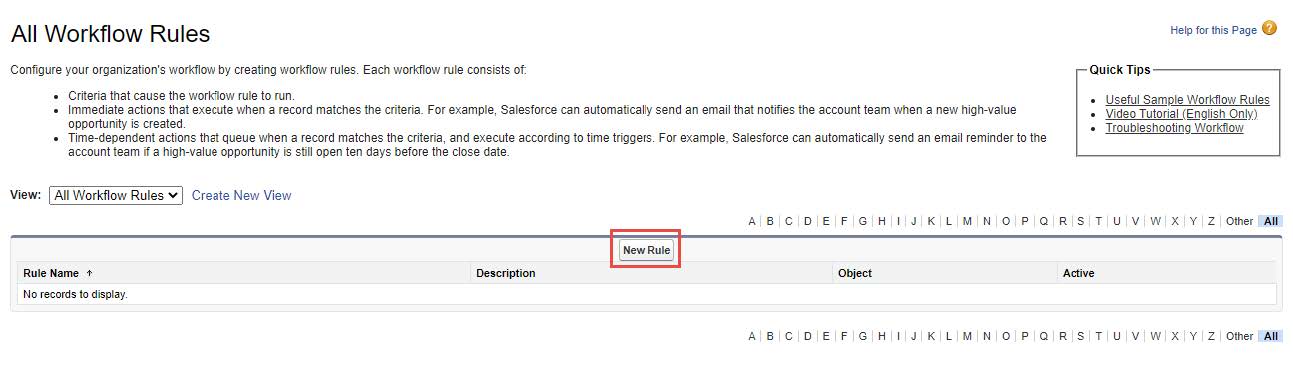
- Click New Rule:
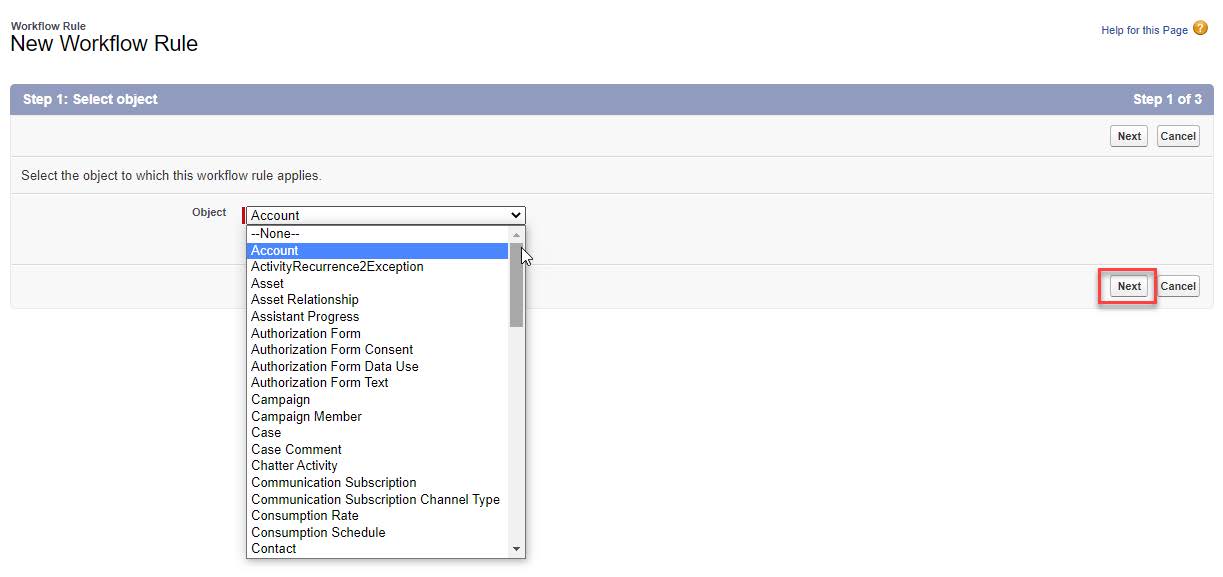
- Select Account from the list of Objects and click Next:
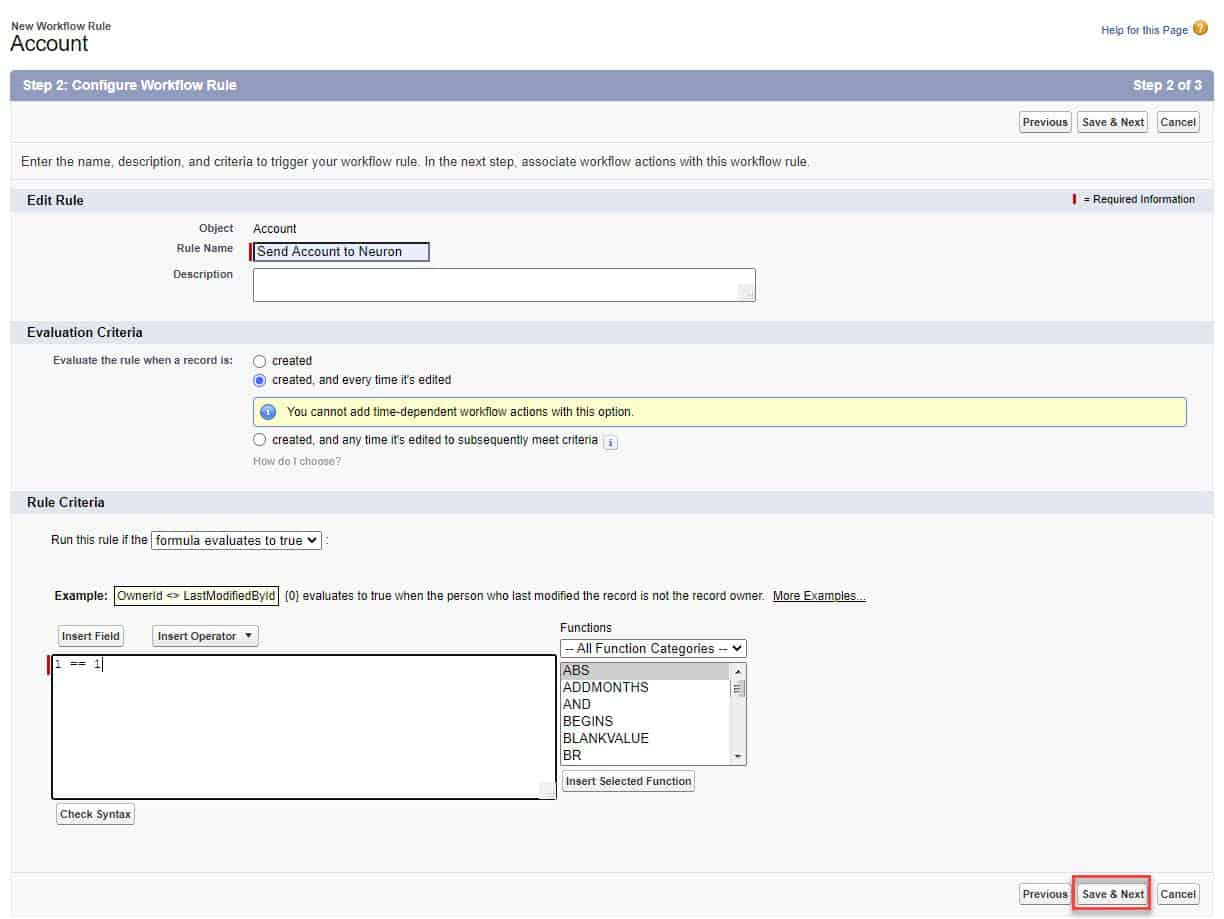
- Configure the New Workflow Rule:
- Rule Name – Send Account to Neuron
- Evaluation Criteria – select the option “created, and every time it’s edited”
- Under Rule Criteria, select Run this rule if the formula evaluates to true.
- In the formula text box, enter 1 == 1. This ensures the workflow rule will execute whenever an account is created or edited. If you want you could set actual criteria in this field.
- Click Save and Next:
- In the Edit Rule Send Account to Neuron page, select New Outbound Message in the Add Workflow Action dropdown list:
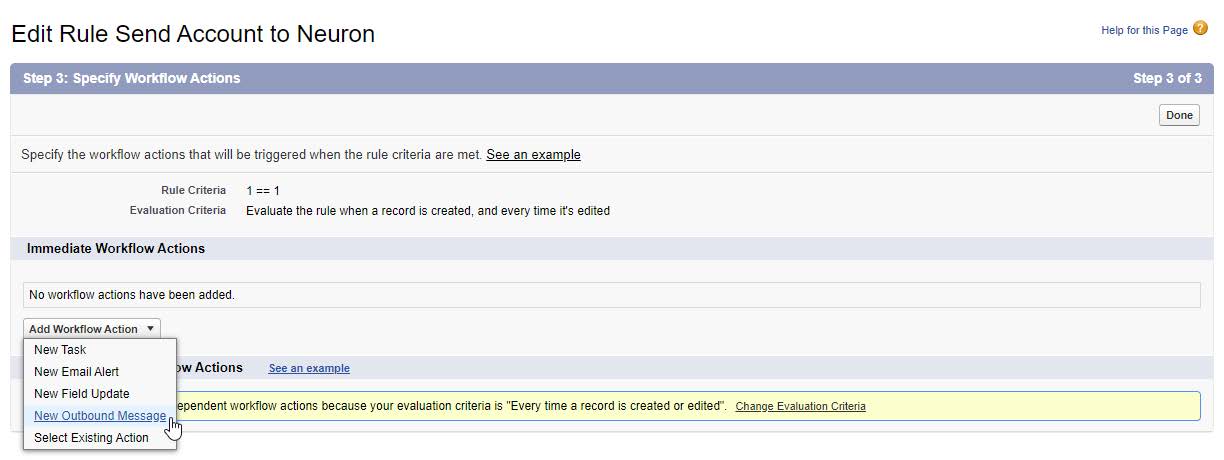
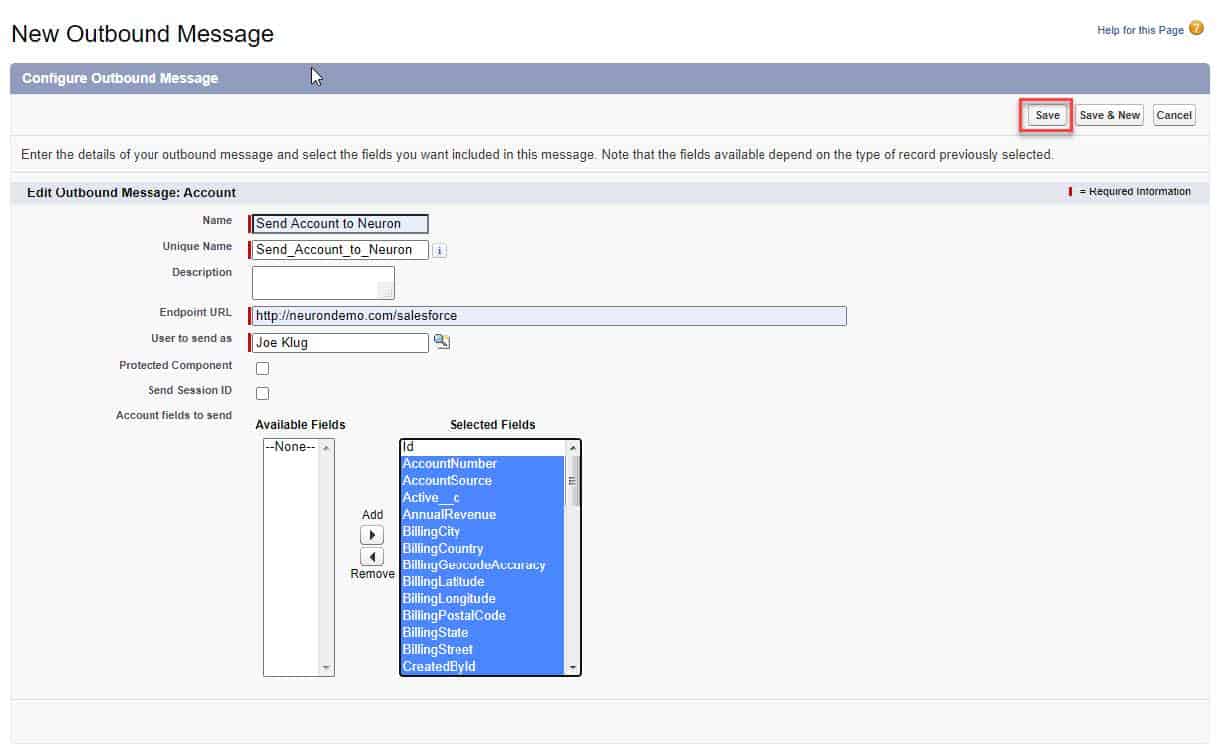
- Configure the New Outbound Message:
- Name – Send Account to Neuron (the Unique Name field will auto-populate)
- Endpoint URL – Enter the public URL you created above, i.e. http://neurondemo.com/salesforce
- Select the Salesforce user to use when sending the message by specifying a username in the User to send as field. The chosen user controls data visibility for the message that is sent to the endpoint.
- Check the box for Send Session ID
- Select the fields you want included in the outbound message and click Add.
- Click Save
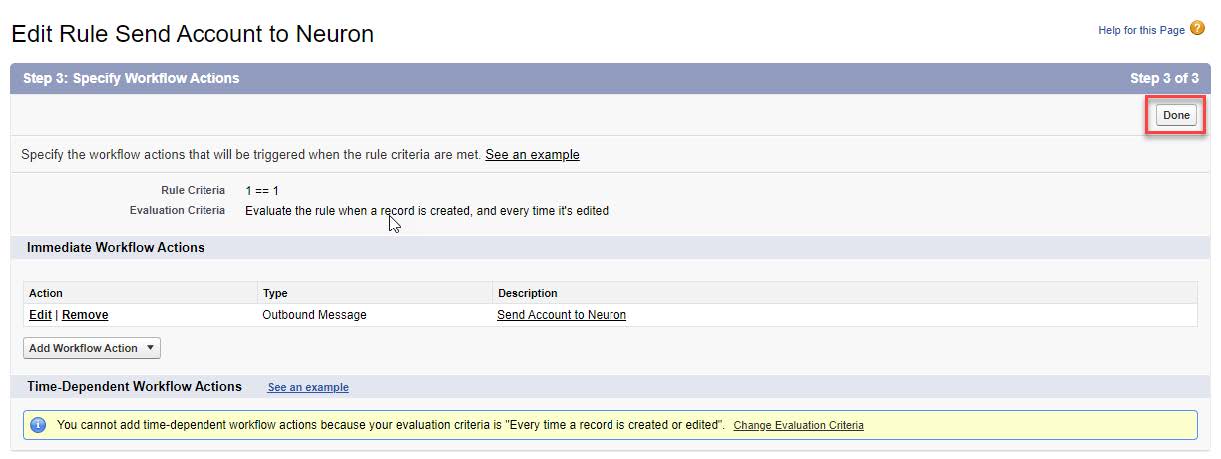
- Review the Edit Rule Send Account to Neuron page and click Done:
- On the Send Account to Neuron Workflow Rule page, click Activate:
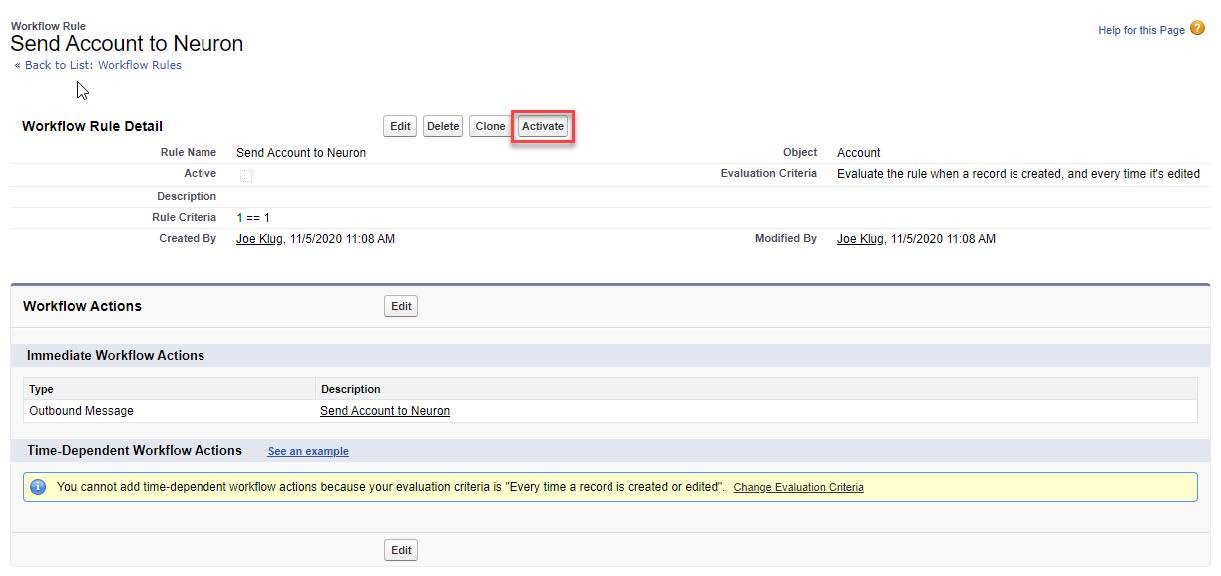
You now have a workflow rule that will be triggered every time an account is created or edited. The workflow will send an outbound notification to the URL http://neurondemo.com/salesforce. Assuming this URL is configured to forward this request to the URL http://localhost/salesforce which will be hosted by the Neuron ESB runtime, you are ready to configure a Salesforce Adapter Endpoint to receive outbound messages.
Creating an Adapter Endpoint
- If you completed any of the other walk-throughs, you must disable the adapter endpoint(s) created.
- In Neuron Explorer, navigate to Connections->Adapter Endpoints and click New. Set the name of the adapter endpoint to Salesforce Outbound Messaging, select Salesforce from the Adapter drop-down list, Publish from the Mode drop-down list and select Outbound Message Publisher from the Party Id drop-down list.
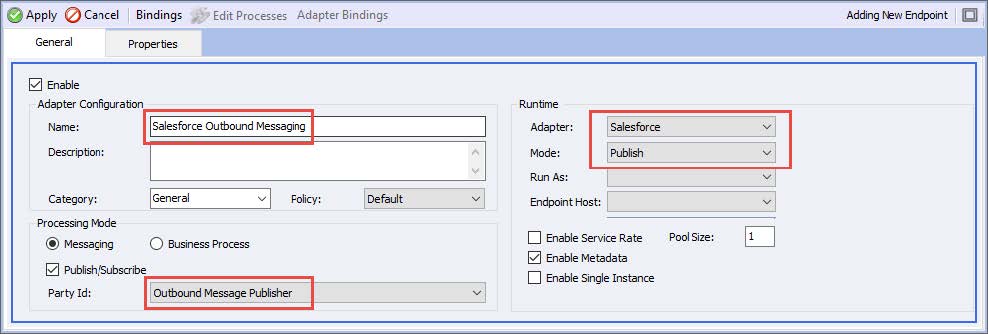
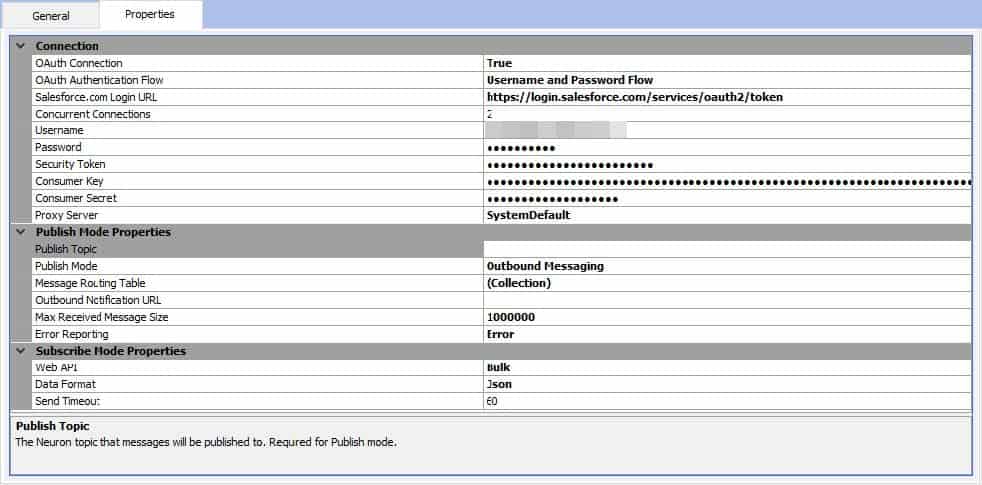
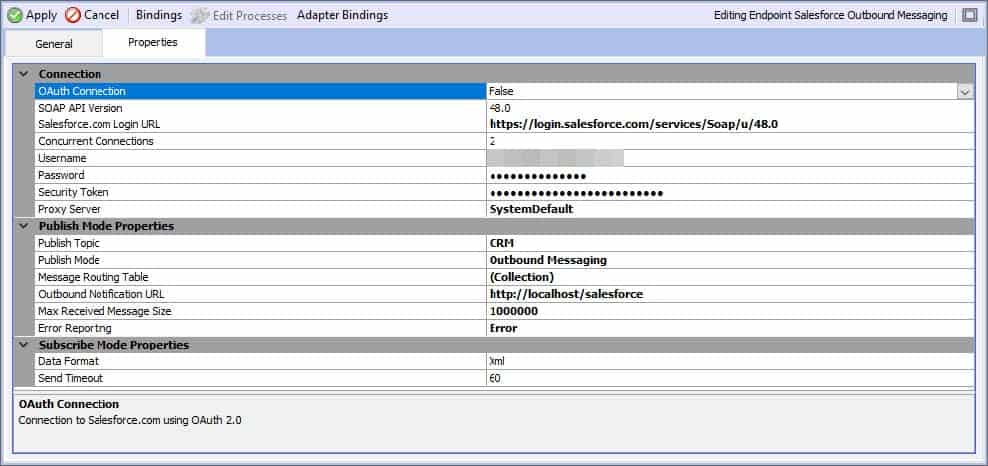
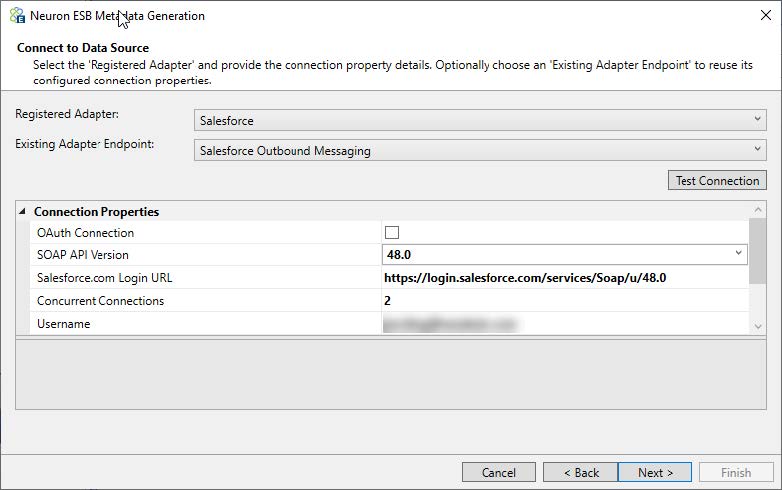
- Click on the Properties tab and set the properties as described below. Note – The Connection properties are only necessary if you want to use this endpoint for metadata generation. If you plan to only use this endpoint for runtime purposes, you do not need to set these fields.
- OAuth Connection – False
- SOAP API Version – 48.0
- Salesforce Login URL
- Concurrent Connections – 2
- Username – Set the Salesforce account username
- Password – Set the Salesforce account password
- Security Token – Set the Salesforce account security token you receive when you set/reset the account password
- Proxy Server – if needed, change this per your network policies
- Publish Topic – CRM
- Publish Mode – Outbound Messaging
- Message Routing Table – You do not have to use this property. A description fo using this property is available at the end of this tutorial
- Outbound Notification URL – enter the salesforce adapter endpoint’s URL you defined earlier, I.E. HTTP://localhost/salesforce
- Max received message size – 1000000
- Error reporting – error
- Subscribe Mode Properties – you do not need to set/modify any properties in this group
- Click the Apply button.
In the next walk-through, you will use this adapter endpoint in the Metadata Generation Wizard to retrieve schemas and sample XML messages.
Request and Response Message Formats
When utilizing the SOAP API, the Salesforce adapter only supports XML content for request and response messages. The request and response message formats depend on the service operation being called. You can retrieve request and response message schemas, as well as XML samples, using the Metadata Generation Wizard described below.
Generating Metadata
The Metadata Generation Wizard is a tool that is used to generate sample messages and schema definitions for certain adapters and their operations. The Metadata Generation Wizard can be used to generate sample XML request and response messages for the Salesforce Adapter. The following guide assumes you have already completed the first walk-though – Creating an Adapter Endpoint.
- First, in Neuron ESB Explorer navigate to Repository->Xml Documents:
- Next, click the Generate button:
 The Generate button can be accessed from any of the following menus:In the “Repository” tab in:XML SchemasJson SchemasXSL TransformationsXML DocumentsText DocumentsJson Documents 51Swagger DocumentsIn the Connections tab in:Adapter RegistrationAdapter Endpoints
 - On the Welcome Page, click Next:
- On the Connect to Data Source page choose an adapter and adapter endpoint. In this case, choose the Salesforce adapter and the adapter endpoint created in the first walk-through. Click Next:
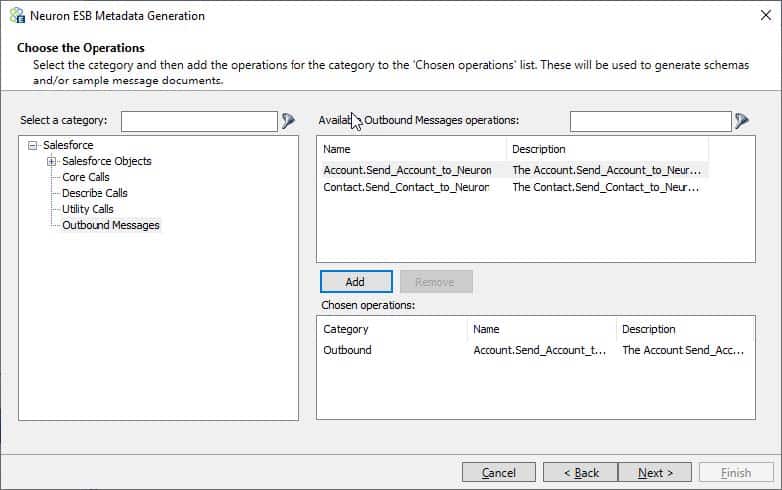
- Select Outbound Messages category and Account.Send_Account_to_Neuron operation. Add it to the list of Chosen Operations by clicking the Add button. More than one operation can be added by choosing each operation and adding it to the list. Click Next:
- Choose whether to generate sample messages (chosen by default) and whether to overwrite the existing documents, if they have already been added, by clicking on the appropriate boxes. Click Next:

- Finally, click Finish to generate the documents:
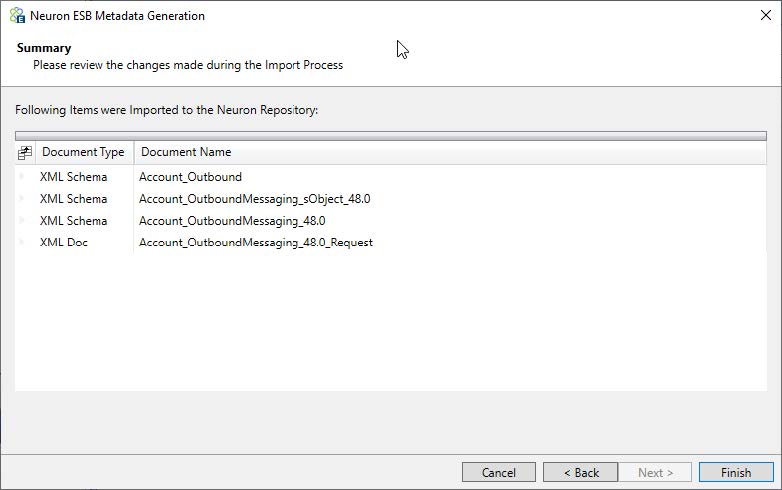 There will only be one schema and sample message for each outbound message. To see the sample request message, navigate to the Xml Documents Repository and select the document Account_OutboundMessaging_48.0_Request. If you are already in the XML Documents Repository and do not see the documents, navigate to a different repository and then back. They should appear this time. This is an example an outbound message:
<notifications xmlns:xsi="http://www.w3.org/2001/XMLSchema-instance" xmlns="http://soap.sforce.com/2005/09/outbound">

  <OrganizationId>OrganizationId___1</OrganizationId>

  <ActionId>ActionId_________1</ActionId>

  <SessionId>SessionId1</SessionId>

  <EnterpriseUrl>EnterpriseUrl1</EnterpriseUrl>

  <PartnerUrl>PartnerUrl1</PartnerUrl>

  <Notification>

    <Id>Id_______________1</Id>

    <sObject>

      <fieldsToNull xmlns="urn:sobject.enterprise.soap.sforce.com">fieldsToNull1</fieldsToNull>

      <Id xmlns="urn:sobject.enterprise.soap.sforce.com">Id_______________1</Id>

      <AccountNumber xmlns="urn:sobject.enterprise.soap.sforce.com">AccountNumber1</AccountNumber>

      <AccountSource xmlns="urn:sobject.enterprise.soap.sforce.com">AccountSource1</AccountSource>

      <Active__c xmlns="urn:sobject.enterprise.soap.sforce.com">Active__c1</Active__c>

      <AnnualRevenue xmlns="urn:sobject.enterprise.soap.sforce.com">1</AnnualRevenue>

      <BillingCity xmlns="urn:sobject.enterprise.soap.sforce.com">BillingCity1</BillingCity>

      <BillingCountry xmlns="urn:sobject.enterprise.soap.sforce.com">BillingCountry1</BillingCountry>

      <BillingGeocodeAccuracy xmlns="urn:sobject.enterprise.soap.sforce.com">BillingGeocodeAccuracy1</BillingGeocodeAccuracy>

      <BillingLatitude xmlns="urn:sobject.enterprise.soap.sforce.com">1</BillingLatitude>

      <BillingLongitude xmlns="urn:sobject.enterprise.soap.sforce.com">1</BillingLongitude>

      <BillingPostalCode xmlns="urn:sobject.enterprise.soap.sforce.com">BillingPostalCode1</BillingPostalCode>

      <BillingState xmlns="urn:sobject.enterprise.soap.sforce.com">BillingState1</BillingState>

      <BillingStreet xmlns="urn:sobject.enterprise.soap.sforce.com">BillingStreet1</BillingStreet>

      <CreatedById xmlns="urn:sobject.enterprise.soap.sforce.com">CreatedById______1</CreatedById>

      <CreatedDate xmlns="urn:sobject.enterprise.soap.sforce.com">1900-01-01T01:01:01.0000000-05:00</CreatedDate>

      <CustomerPriority__c xmlns="urn:sobject.enterprise.soap.sforce.com">CustomerPriority__c1</CustomerPriority__c>

      <Description xmlns="urn:sobject.enterprise.soap.sforce.com">Description1</Description>

      <ExternalID__c xmlns="urn:sobject.enterprise.soap.sforce.com">ExternalID__c1</ExternalID__c>

      <Fax xmlns="urn:sobject.enterprise.soap.sforce.com">Fax1</Fax>

      <Id xmlns="urn:sobject.enterprise.soap.sforce.com">Id_______________1</Id>

      <Industry xmlns="urn:sobject.enterprise.soap.sforce.com">Industry1</Industry>

      <IsDeleted xmlns="urn:sobject.enterprise.soap.sforce.com">true</IsDeleted>

      <Jigsaw xmlns="urn:sobject.enterprise.soap.sforce.com">Jigsaw1</Jigsaw>

      <JigsawCompanyId xmlns="urn:sobject.enterprise.soap.sforce.com">JigsawCompanyId1</JigsawCompanyId>

      <LastActivityDate xmlns="urn:sobject.enterprise.soap.sforce.com">1900-01-01</LastActivityDate>

      <LastModifiedById xmlns="urn:sobject.enterprise.soap.sforce.com">LastModifiedById_1</LastModifiedById>

      <LastModifiedDate xmlns="urn:sobject.enterprise.soap.sforce.com">1900-01-01T01:01:01.0000000-05:00</LastModifiedDate>

      <LastReferencedDate xmlns="urn:sobject.enterprise.soap.sforce.com">1900-01-01T01:01:01.0000000-05:00</LastReferencedDate>

      <LastViewedDate xmlns="urn:sobject.enterprise.soap.sforce.com">1900-01-01T01:01:01.0000000-05:00</LastViewedDate>

      <MasterRecordId xmlns="urn:sobject.enterprise.soap.sforce.com">MasterRecordId___1</MasterRecordId>

      <Name xmlns="urn:sobject.enterprise.soap.sforce.com">Name1</Name>

      <NumberOfEmployees xmlns="urn:sobject.enterprise.soap.sforce.com">1</NumberOfEmployees>

      <NumberofLocations__c xmlns="urn:sobject.enterprise.soap.sforce.com">1</NumberofLocations__c>

      <OwnerId xmlns="urn:sobject.enterprise.soap.sforce.com">OwnerId__________1</OwnerId>

      <Ownership xmlns="urn:sobject.enterprise.soap.sforce.com">Ownership1</Ownership>

      <ParentId xmlns="urn:sobject.enterprise.soap.sforce.com">ParentId_________1</ParentId>

      <Phone xmlns="urn:sobject.enterprise.soap.sforce.com">Phone1</Phone>

      <PhotoUrl xmlns="urn:sobject.enterprise.soap.sforce.com">PhotoUrl1</PhotoUrl>

      <Rating xmlns="urn:sobject.enterprise.soap.sforce.com">Rating1</Rating>

      <ShippingCity xmlns="urn:sobject.enterprise.soap.sforce.com">ShippingCity1</ShippingCity>

      <ShippingCountry xmlns="urn:sobject.enterprise.soap.sforce.com">ShippingCountry1</ShippingCountry>

      <ShippingGeocodeAccuracy xmlns="urn:sobject.enterprise.soap.sforce.com">ShippingGeocodeAccuracy1</ShippingGeocodeAccuracy>

      <ShippingLatitude xmlns="urn:sobject.enterprise.soap.sforce.com">1</ShippingLatitude>

      <ShippingLongitude xmlns="urn:sobject.enterprise.soap.sforce.com">1</ShippingLongitude>

      <ShippingPostalCode xmlns="urn:sobject.enterprise.soap.sforce.com">ShippingPostalCode1</ShippingPostalCode>

      <ShippingState xmlns="urn:sobject.enterprise.soap.sforce.com">ShippingState1</ShippingState>

      <ShippingStreet xmlns="urn:sobject.enterprise.soap.sforce.com">ShippingStreet1</ShippingStreet>

      <Sic xmlns="urn:sobject.enterprise.soap.sforce.com">Sic1</Sic>

      <SicDesc xmlns="urn:sobject.enterprise.soap.sforce.com">SicDesc1</SicDesc>

      <Site xmlns="urn:sobject.enterprise.soap.sforce.com">Site1</Site>

      <SLA__c xmlns="urn:sobject.enterprise.soap.sforce.com">SLA__c1</SLA__c>

      <SLAExpirationDate__c xmlns="urn:sobject.enterprise.soap.sforce.com">1900-01-01</SLAExpirationDate__c>

      <SLASerialNumber__c xmlns="urn:sobject.enterprise.soap.sforce.com">SLASerialNumber__c1</SLASerialNumber__c>

      <SystemModstamp xmlns="urn:sobject.enterprise.soap.sforce.com">1900-01-01T01:01:01.0000000-05:00</SystemModstamp>

      <TickerSymbol xmlns="urn:sobject.enterprise.soap.sforce.com">TickerSymbol1</TickerSymbol>

      <Type xmlns="urn:sobject.enterprise.soap.sforce.com">Type1</Type>

      <UpsellOpportunity__c xmlns="urn:sobject.enterprise.soap.sforce.com">UpsellOpportunity__c1</UpsellOpportunity__c>

      <Website xmlns="urn:sobject.enterprise.soap.sforce.com">Website1</Website>

    </sObject>

  </Notification>

</notifications>
You can use these XML samples to guide your development when creating integrations to Salesforce. The XML schemas and samples created by the Metadata Generation Wizard reflect the bodies of the SOAP request and response message types.
Testing the Salesforce Outbound Messaging Endpoint
This tutorial will show you how to use the Salesforce Adapter to receive outbound messages at runtime. This assumes you completed the previous steps in this section and the Neuron ESB Service is configured to host the Neuron configuration you’ve been working on.
- If you haven’t already done so, save your Neuron Configuration.
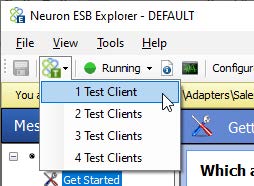
- Open a Neuron Test Client by clicking on the Test Client icon in the Neuron ESB Toolbar and select 1 Test Client:
- When the Neuron Test Client open, select CRM Subscriber form the Party Id drop-down list and click the Connect button:
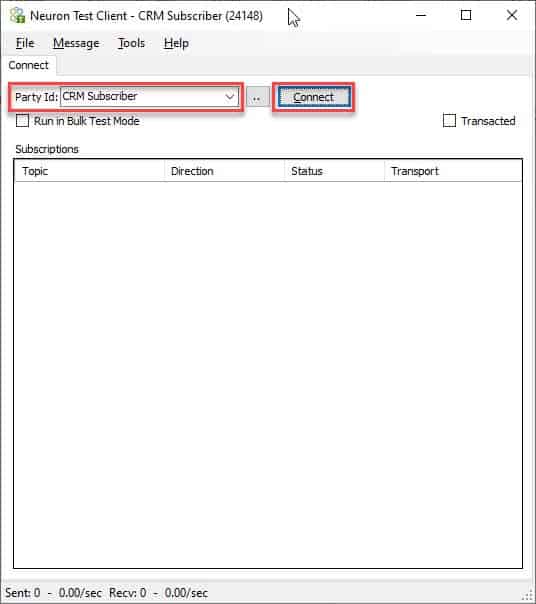
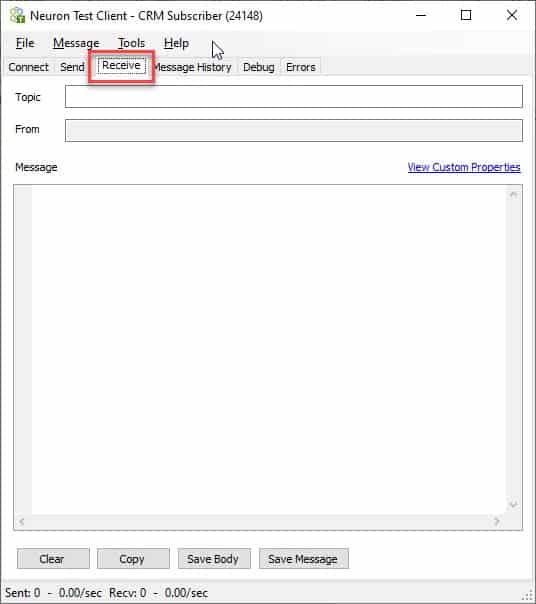
- In the Neuron Test Client, click on the Receive tab. The outbound messages sent from Salesforce will be displayed here.
- In a web browser, log-into to your Salesforce instance. Navigate to Accounts and click the New Button:
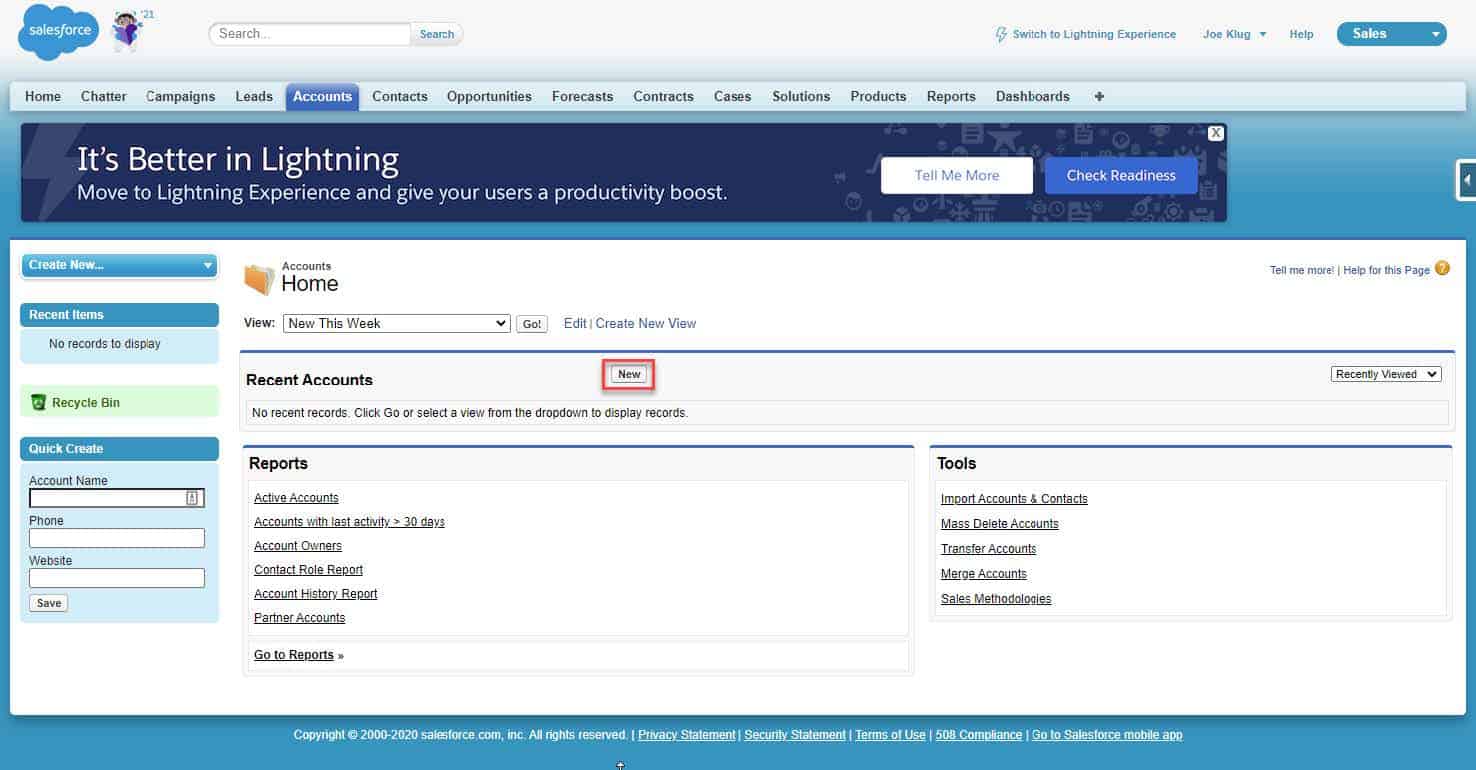
- Enter Neuron Demo in the Account Name field. Feel free to enter any additional account data you wish. Only the account name is required. Click the Save button:

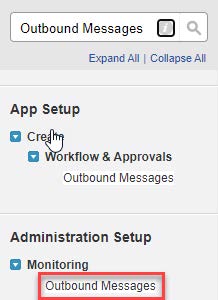
- Once you click the Save button, Salesforce will place a new message in the outbound messages queue to be delivered. To see the list of outbound messages, navigate to the Salesforce Setup, then type Outbound Messages in the Quick Find box, and select the Outbound Messages link under Monitoring:
- If everything is set-up correctly, you may not navigate to the Outbound Messages Delivery Status page quickly enough to see your newly created outbound message listed. If there were any issues, the outbound message will be listed here with a Delivery Failure Reason.
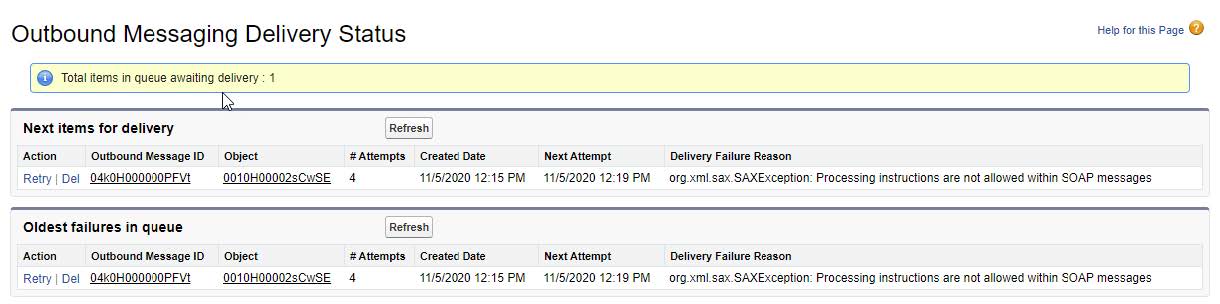
- Some reasons for failure
- Processing instructions are not allowed within SOAP messages – this usually means that the URL the outbound message was sent to returned HTML (i.e. a login page or something). This usually indicates that there is a configuration issue with your router.
- (404) Not Found – Salesforce was unable to resolve the URL you entered in the outbound message definition.
- Some reasons for failure
- Return to the test client. If everything worked correctly, you’ll see the outbound notification in the Receive tab:

If you do not see the outbound message in the test client, and there isn’t one listed is the Outbound Messaging Deliver Status page, then you may not have activated the workflow rule. Return to the Workflow Rules and verify it’s activated.
Using the Message Routing Table
The Salesforce Adapter has an additional feature that can be used to assist in message routing when receiving outbound messages. The Publish Mode Properties section contains a property called Message Routing Table:
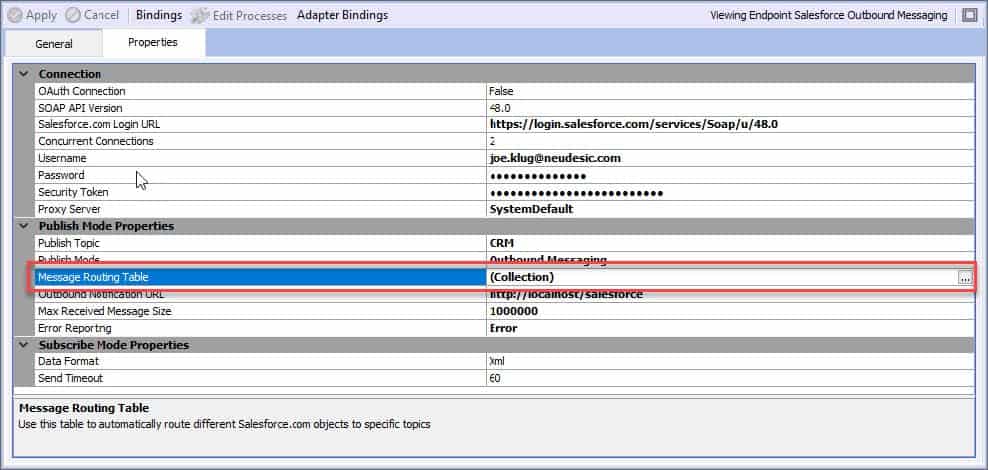
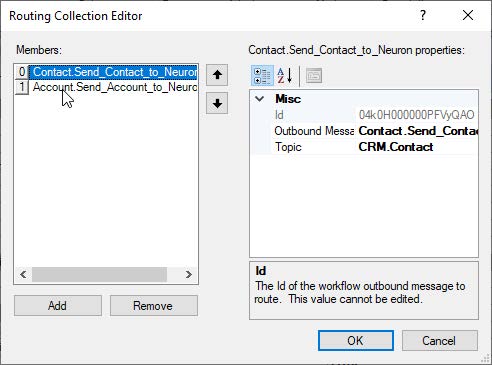
This property can be used to route different types of outbound messages to different topics. For example, if you want to receive two different Salesforce objects via outbound messages, Account and Contact, you might want to be published to different topics – CRM. Account and CRM.Contact. Instead of creating two outbound message adapter endpoints, you can use the Message Routing Table property to define which outbound messages are published to which topic. Click on the ellipsis for the Message Routing Table property to display the routing table:
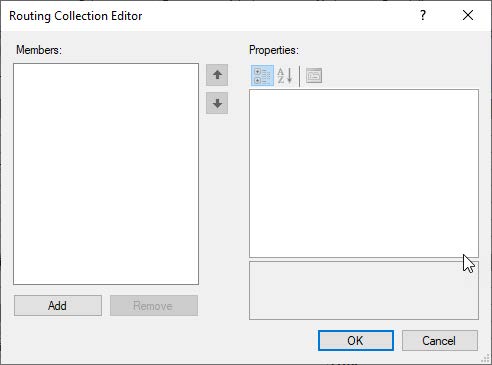
Click the Add button to add a new route:
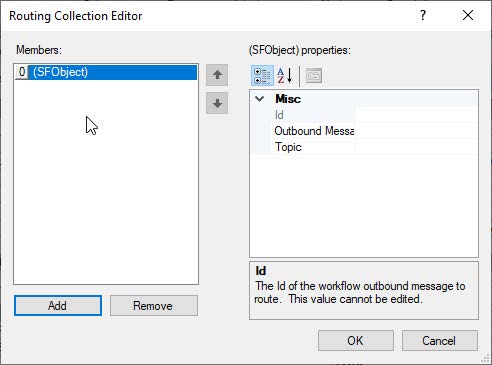
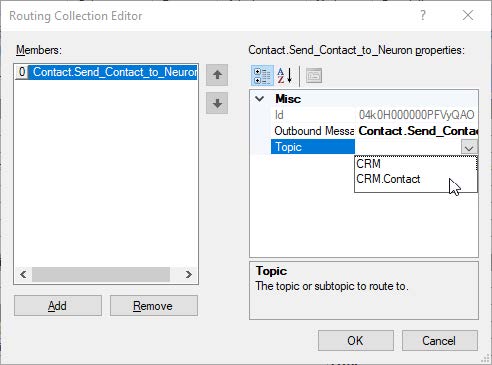
The message routing feature is based on the Outbound Messages defined in Salesforce. Expanding the dropdown list for the Outbound Message property will display a list of the outbound messages available for routing. The naming format is <sojbect>.<outbound_message_name>:
Select the outbound message you want to route, then select a Topic:
You can define as many routes in the table as your solution requires. Any outbound messages received by this Salesforce Adapter endpoint that are not defined in the message routing table will be published to the topic selected in the adapter endpoint’s Publish Topic property (i.e. that property becomes the “default” publish topic).
Receiving Streaming API Events
This tutorial will walk you through using the Salesforce adapter to receive events from the Salesforce Streaming API. You will learn how to create an adapter endpoint and all the options available when receiving events.
To receive events from Salesforce, the adapter initiates a long-polling connection to Salesforce using CometD and the Bayeux Protocol. Unlike outbound notifications, using the Streaming API does not require you to create a public URL.
The Salesforce Streaming API provides four types of events:
- Change Data Capture Events
- PushTopic Events
- Platform Events
- Generic Events
Read this article for an overview of the Streaming API:
The Streaming API also supports message durability. When events are created, they are available to subscribers for either 24 or 72 hours, depending on the event type. The adapter can be configured to receive events that are created while the adapter is offline by setting the Durable Messaging property to true. Durable message support in the Streaming API is only available in Neuron ESB version 3.7.5 and later.
Read this article for more information on Message Durability:
This tutorial will demonstrate how to receive Change Data Capture Events from Salesforce. The other event types have different setup requirements in Salesforce. Review the Salesforce documentation if you want to use one of the other event types. Receiving change data capture events from Salesforce requires two main steps:
- Select which Salesforce entities you want to generate events in Salesforce
- Configure a Salesforce adapter endpoint to receive the events
Select Objects for Change Notifications
- Log-into your Salesforce account and navigate to Setup.
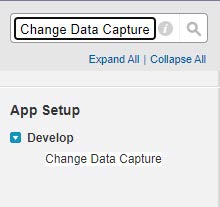
- Enter Change Data Capture in the Quick Find box, then select Change Data Capture:
- Select the Entities you want to trigger events from the list of Available Entities and click the right arrow button to move them into the list of Selected Entities. For this tutorial, select Account and Contact. Click Save:
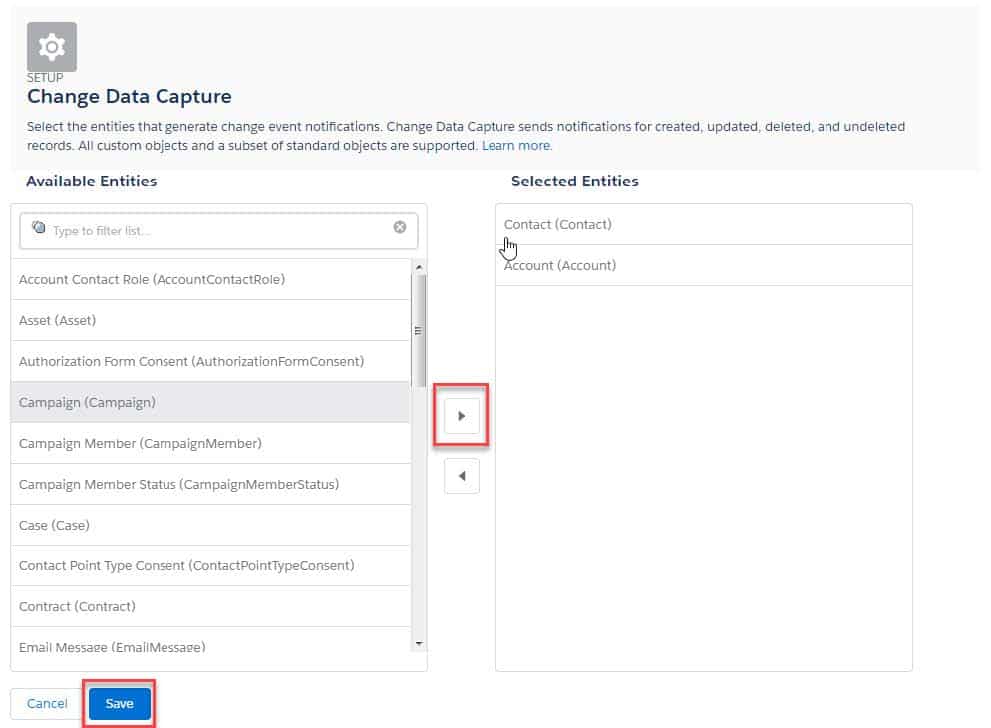
- That’s all you need to do to enable change data capture events!
Creating an Adapter Endpoint
- If you completed any of the other walk-throughs, you must disable the adapter endpoint(s) created.
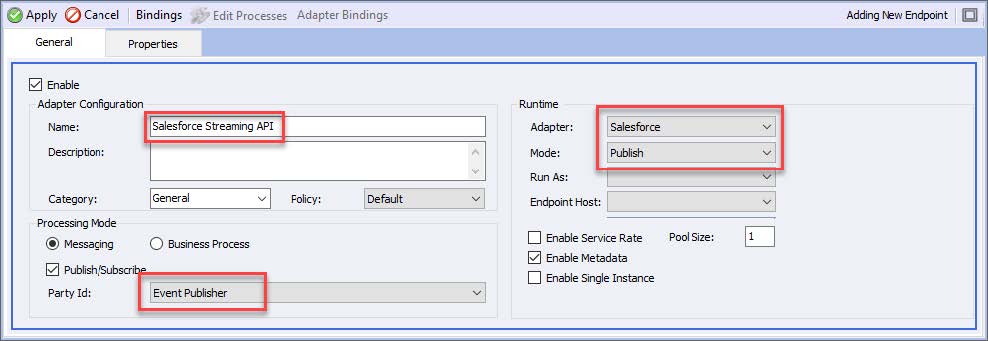
- In Neuron Explorer, navigate to Connections->Adapter Endpoints and click New. Set the name of the adapter endpoint to Salesforce Streaming API, select Salesforce from the Adapter drop-down list, Publish from the Mode drop-down list and select Event Publisher from the Party Id drop-down list.
- Click on the Properties tab and set the properties as described below.
- OAuth Connection – True
- OAuth Authentication Flow – Username and Password Flow
- Salesforce Login URL:
- For production instances (and developer accounts): https://login.salesforce.com/services/oauth2/token
- For sandbox instances: https://test.salesforce.com/services/oauth2/token
- For accounts with MyDomain enabled: https://<MyDomain>.my.salesforce.com/services/oauth2/token, where <MyDomain> is replaced with the My Domain name of your company.
- For production instances (and developer accounts): https://login.salesforce.com/services/oauth2/token
- Concurrent Connections – 2
- Username – Set the Salesforce account username
- Password – Set the Salesforce account password
- Security Token – Set the Salesforce account security token you receive when you set/reset the account password
- Consumer Key – The consumer key from your Connected App in Salesforce Consumer Secret – The consumer secret from your Connected App in Salesforce
- Proxy Server – If needed, change this per your network policies
- Publish Topic – CRM
- Publish Mode – Streaming API
- Streaming API Version – 48.0 (or the latest available)
- Subscription Channels – /data/ContactChangeEvent;/data/AccountChangeEvent
- Durable Messaging – True (note – this property is only available in Neuron ESB version 3.7.5 and later)
- Error Reporting – Error
- Subscribe Mode Properties – you do not need to set/modify any properties in this group
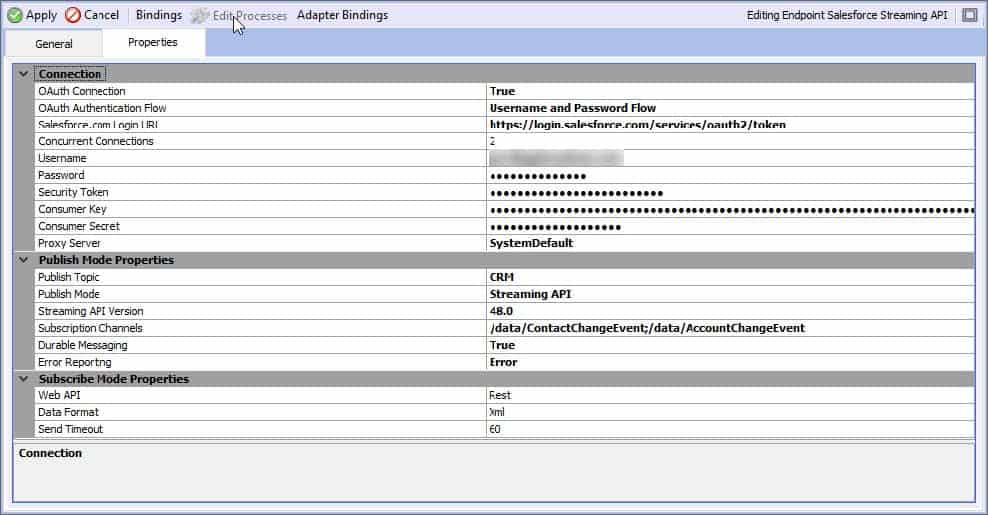
- Click the Apply button
The Salesforce Adapter currently does not support creating schemas or sample documents for the Streaming API.
Testing the Salesforce Streaming API Endpoint
This tutorial will show you how to use the Salesforce Adapter to receive events at runtime. This assumes you completed the previous steps in this section and the Neuron ESB Service is configured to host the Neuron configuration you’ve been working on.
- If you haven’t already done so, save your Neuron Configuration.
- Open a Neuron Test Client by clicking on the Test Client icon in the Neuron ESB Toolbar and select 1 Test Client:

- When the Neuron Test Client open, select CRM Subscriber form the Party Id drop-down list and click the Connect button:

4. In the Neuron Test Client, click on the Receive tab. The events sent from Salesforce will be displayed here.
5. In a web browser, log-into to your Salesforce instance. Navigate to Accounts and click the New Button:
6. Enter Neuron Demo in the Account Name field. Feel free to enter any additional account data you wish. Only the account name is required. Click the Save button: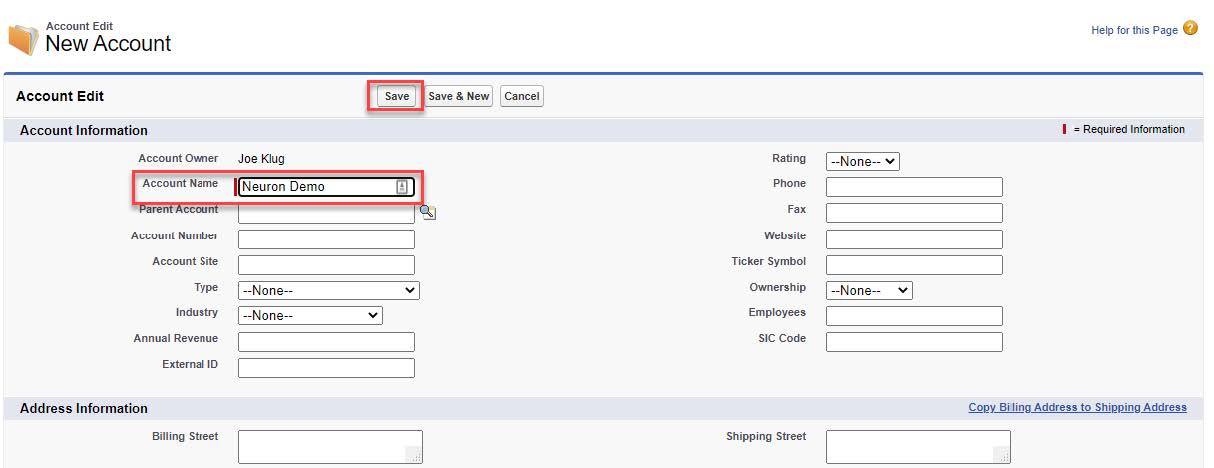
7. Once you click the Save button, Salesforce will send an event to all subscribers.
8. Return to the test client. If everything worked correctly, you’ll see the event in the Receive tab: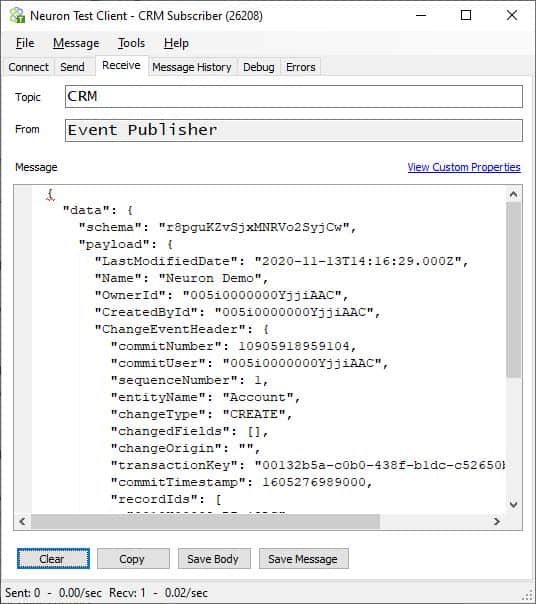
Testing Durable Messaging
To test the durable messaging support in the Streaming API:
- Stop the Neuron ESB service but do not close or disconnect the Test Client.
- In Salesforce, either add a new account or edit the account created in the previous section and click the Save button.
- Restart the Neuron ESB service
- Navigate back to the Test Client, you should see the event that was created while Neuron was offline.
Page Break
Appendix
Calling Custom Apex Rest Services
You can use the Salesforce adapter to call a custom Apex Rest service in pretty much the same way you would call the regular Salesforce Rest API. The only difference is how you set the URL that you would call.
For example, for this Apex class:
@RestResource(urlMapping='/v1/contacts/*')

global with sharing class myContactsRest{


  @HttpGet

  global static ContactWrapper doGet() {

    RestRequest req = RestContext.request;

    RestResponse res = RestContext.response;

    String lastName= req.requestURI.substring(req.requestURI.lastIndexOf('/')+1);


    ContactWrapper response = new ContactWrapper();

    response.contactList = [SELECT FirstName, LastName, Phone FROM Contact WHERE LastName = :lastName];

    response.status = 'Success';


    return response;

  }


  global class ContactWrapper{

    public List<Contact> contactList;

    public String status;

    public String message;


    public ContactWrapper(){

      contactList = new List<Contact>();

    }

  }

}
You would set the URL for the Rest request like this:
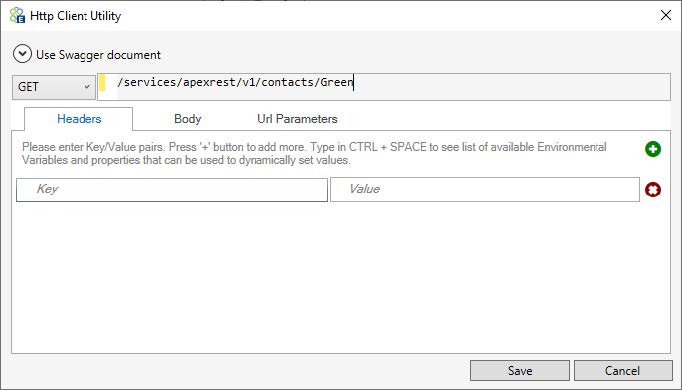
You always have to set the value “/services/apexrest”. The remaining part of the URL is derived from the Apex code:
@RestResource(urlMapping=’/v1/contacts/*’)
In this example, the remaining code would be /v1/contacts/<last name>. In our example, the last name we are retrieving is “Green”.
If you are performing a POST you send a body with the request message in either JSON or XML format. See https://developer.salesforce.com/docs/atlas.en-us.apexcode.meta/apexcode/apex_rest.htm for more information.
Calling Custom Apex SOAP Services
You can use the Salesforce adapter to call a custom Apex Soap service in pretty much the same way you would call the regular Salesforce Soap API, with a few additional properties to set. You have to let the adapter know that you are calling an Apex service by setting the message property sforce.apexService = true. You’ll also need to set the local path for the Web service call.
For example, for this Apex class:
global with sharing class myContactsSoap{


webservice static Contact[] getContact(string lastName) {

  Contact[] contacts = [SELECT FirstName, LastName, Phone FROM Contact WHERE LastName = :lastName];

  return contacts;

  }

}
You would create the SOAP request message body, set the apexService message property and the local path in a C# step like this:
context.Data.Text = "<myc:getContact xmlns:myc='http://soap.sforce.com/schemas/class/myContactsSoap'>" +

     "<myc:lastName>Green</myc:lastName>" +

   "</myc:getContact>";


// Set this as an Apex Service

context.Data.SetProperty("sforce", "apexService", "true");


// Set the local path

context.Data.LocalPath = "/services/Soap/class/myContactsSoap";
With custom Apex Soap services, Salesforce provides you with the option to download a WSDL for the service to see the message types.
About the Author
Joe Klug is a Solution Architect for Peregrine Connect, responsible for pre-sales engineering, post-sales support, training, architectural reviews, product development and consulting. Prior to joining the team, he spent a number of years at Microsoft.
Read more about Peregrine Connect

-
Rabbit MQ Topics
Introduction Due to the open-source nature of RabbitMQ and constant updates, it is...
-
Port Sharing
One of Neuron ESB’s scalability features is the ability to install multiple...

-
The Integration Journey to...
The Integration Journey to Digital Transformation with Peregrine Connect
-
Saving Time and Money by...
Neuron ESB Application Integration and Web Service Platform: A Real-World Example...

-
Elektro Gorenjska
Peregrine Connect Eliminates Over 30% of Point-to-Point Integrations and reduces...
-
D&H Distributing
Modernizing operations integration to increase volume transactions by 2X

-

Decision Test Data Mapping
- Use decisions to drive the execution of...
-
Map Testing
Learn how to utilize FlightPath's testing functions...