Working with Parties
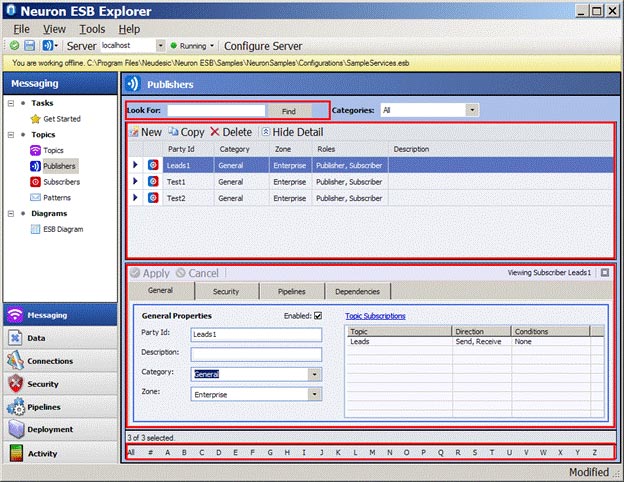
To work with Parties in the Neuron ESB Explorer, select either Messaging ->Topics->Publishers or Messaging ->Topics->Subscribers from the navigation bar located on the left hand side of the Neuron ESB Explorer. Both of these menu items will open the same Party Management Window. When a Party is selected, the Details Pane will be displayed on the lower bottom of the Management Window. Below this will be the navigation bar. Above the Management Window will be the Search bar. The Details Pane is where users enter information for a new Party, or modify information for an existing Party.
A Party can be persisted to the Neuron ESB Configuration by clicking the Apply button. However, it will not be enabled for runtime execution or activation until it is saved (by clicking the Save toolbar button).
Management Window
The Management Window displays a list of all saved Publishers, Subscribers or both (Parties) within the currently opened Neuron ESB configuration. This list can be sorted by clicking on any column within the grid. By default, Parties created are enabled. If disabled, the row representing the Party within the Management Window will be grayed out.
Details Pane
The Details Pane lies below the Management Window and is only displayed when a Party within the Management Window is selected. The Details Pane contains all the configuration settings for a Party, separated into 3 categories; General, Security and Processes. Additionally, all Adapters, Service Connectors and Client Connectors that reference the Party can be viewed in the Dependencies tab.
Navigation Bar
The Navigation Bar lies directly below the Management Window and Details Pane. This allows the user to filter all the Parties currently being viewed in the Management Window by Alpha. The Navigation Bar options are “All”, which will display all topics (default), as well all the letters in the English alphabet (A-Z).
Search Bar
The Search Bar allows users to search for a specific Party name. By the default, the search field accepts 1 parameter and uses that in a wildcard search. For example, if the following were entered:
- Order1
The following Party names would be returned
- Order1
- PublishOrder15
- PublishOrder16
Searches are not case sensitive and search terms must be entered without quotation marks.
Augmenting the Search Bar is a Category filter. All categories created will be auto populated in the drop down selection. By default the selection is “All” which displays all Parties with all categories.
Add Party
Parties can be added by clicking the “New” button located at the top of the Management Window. This will display the Details Pane that can be configured for a new Party.
Delete Party
Parties can be deleted by clicking the “Delete” button located at the top of the Management Window. This will delete the currently selected Party. It will NOT delete any dependent Adapters, Service Connectors or Client Connectors. For example, if there is an Adapter Endpoint that is referencing the Party, upon deletion of the Party, The Party will be removed from the Adapter reference.
Copy Party
The configuration of one Party can be completely copied to new Party by clicking the “Copy” button located at the top of the Management Window. The essentially creates a new Party.