Specifying a Service Account for Neuron
This topic helps you decide what type of service account to use for the Neuron service component.
How the Service Account is Used
The Neuron service account is used as the identity to run the Neuron ESB Service (a standard Windows service component), it is installed as part of the Server installation configuration only.
Considerations for Specifying a Service Account
The Neuron service account must have the “Log on as a service permission”. For optimal security, the Neuron service account:
- Should NOT be a member of the domain Administrators group.
- Should have the option “Account is sensitive and cannot be delegated” selected for Active Directory on the domain.
- Should be a domain account.
Specifying a Service Account
The service account can be a built-in account, a domain account, or, for a single-server workgroup deployment, a local account. For more information about account types, see “How Security Principals Work” and “LocalSystem Account“.
Using a System Account
The LocalSystem account is a predefined local account that is not recognized by the security subsystem. It has extensive privileges on the local computer, and acts as the computer on the network. Its token includes the NT AUTHORITY\SYSTEM and BUILTIN\Administrators SIDs; these accounts have access to most system objects.
If you use the LocalSystem account as the Neuron service account, the Neuron service will be run with the elevated rights and permissions that are currently assigned to that account.
Using the LocalSystem Account
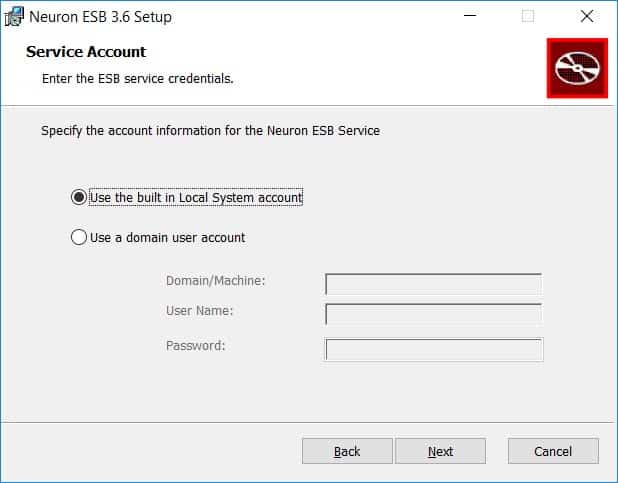
The following procedure describes how to select the LocalSystem account as the Neuron service account.
- On the Service Account page, click Use the built in Local System account.
- Click Next.
Using a Domain Account
Domain accounts are authenticated user accounts created in a domain. Choosing a domain account as the Neuron service account lets you customize the rights and permissions available to that account.
A domain account is the preferred type of Neuron service account. The domain account canbe a member of the local Administrators group (BUILTIN\Administrators), but NOT a member of the domain Administrators group.
The following procedure describes how to specify a domain account as the Neuron service account.
- On the Service Account page, click Use a domain user account.

- Enter either the Domain Name or Machine Name.
- Enter the User Name.
- Enter the Password.
- Click Next.
Using a Local Account
Local accounts are user accounts created on a computer that is a member of a workgroup environment. The computer is not associated with a domain. Local user service accounts are only permitted in single-server workgroup deployments of Neuron.
Follow the instructions for using a domain account, but specify a machine name instead of a domain name when browsing for the account.
Running under Non Administrator Account
Neuron ESB runs as a Windows Service in developer, testing and production environments. Usually developers will run Neuron ESB using either the Local System account or a user account that is a member of the Local Administrators group on the host computer. For production environments, granting a service administrative rights to the computer may be a concern from a security perspective. When running Neuron ESB using a local or domain user account that is NOT a member of the local Administrators group, the account must be placed within the following groups of the host computer:
- Performance Monitor Users
- Users1
Grant the User Account the ability to be used by a Windows Service
In order the for the new user account to be used to run the Neuron ESB Windows Service, the account has to be granted the permission to “log into” the computer as a Windows Service as well as the other rights listed below.
- Act as part of the Operating System
- Adjust memory quotas for a process
- Bypass Traverse Checking
- Create Global Objects
- Generate Security Audits
- Impersonate a client after authentication
- Log on as a Service
- Replace a process level token
Open the Control Panel on the host computer. Click on “System and Security” to open the System and Security control panel. Click on “Administrative Tools”. The Administrative Tools control panel should open. Double click on “Local Security Policy” to open the Local Security Policy editor. In the Local Security Policy editor, expand the “Local Policies” node on the left and choose “User Rights Assignment” in the tree. Double-click on the “Log on as a service” row in the right pane. In the Properties dialog window, click the “Add User or Group…” button. Select the user account that you created in the first step. Do this for each of the rights listed above. Click the OK button to close the window. Close the Local Security Policy Editor.
Running Endpoint Hosts Under Different Credentials than the ESB Service
If it is desired for the Endpoint Hosts to run under different credentials (i.e. setting the “runas” property in Endpoint Host settings), then the account the ESBService is running under must have the User Rights Assignments listed above in order for it to launch the Endpoint Host process under the given credential. The service account for the Endpoint Host must have at minimum the same rights as those listed above.
Grant the User Account access to the Neuron ESB database
The user account must be added to the NeuronUsers database role of the database assigned to the active deployment group. This can be done using either Microsoft SQL Server Management Studio or by using the Neuron ESB Explorer. In the Neuron ESB Explorer, navigate to Deployment->Manage->Databases, select the database and then select the Security tab to add the user. Once added, hit apply and save.
Issues with running with user permissions
There are three known issues that require manual registration on the host computer when running Neuron ESB under non administrative privileges
- WMI events require manual registration
- HTTP based Neuron ESB Client Connectors (SOAP/REST services hosted by Neuron ESB) require manual registration
- HTTP operations against Neuron Endpoint Host monitoring service requires manual registration
WMI Events
When Neuron ESB starts up, by default it will try to register two WMI events (EndpointStateChangeEvent and FailedMessageEvent), if not already registered. If the Neuron ESB service account lacks the necessary permissions then the following error will be reported on startup if there are any existing service or adapter endpoints or Topics defined in the Neuron ESB solution:
Exception: This schema for this assembly has not been registered with WMI.
The Neuron ESB 3.7.5 release includes a PowerShell script that you can use to create the WMI events on the host computer. To manually register these events, execute the RegisterWmiEvents.ps1 PowerShell script passing in the path to an INSTANCE FOLDER. The following example uses default folders and the DEFAULT instance:
- Open a PowerShell console.
- Use the Set-Location cmdlet to change the directory to the installation directory for Neuron ESB.
> Set-Location “C:\Program Files\Neudesic\Neuron ESB v3\” - Execute the PowerShell script, providing the correct values for the parameters:
> .\PowerShell\RegisterWmiEvents.ps1 -instanceFolder “C:\Program Files\Neudesic\Neuron ESB v3\DEFAULT”
HTTP based Neuron ESB Client Connectors
Neuron ESB client connectors that use an HTTP-based protocol use the Windows HTTP.SYS service to listen for and receive incoming HTTP requests sent to them. Because Neuron ESB Windows Service is running without administrator rights, it is important for you to grant permission for the user account hosting the Neuron ESB Windows Service to listen on the defined HTTP ports.
To grant permission to the HTTP URLs used by client connectors, open a Windows command prompt or PowerShell session. Run the following command for each URL being used by client connectors in your solution:
netsh http add urlacl url=<url> user=<computer/domain-name>\<username>
This command will allow the Neuron ESB Windows Service to connect to the specified URL and receive incoming HTTP requests. In the command above, the URL is typically of the form:
http://+:<port>/[optional/path/]
If you have multiple client connector URLs sharing the same port and hosted and different paths, you only need to run the command for the base port and you do not need to specify the complete path for both client connectors.
The following command is an example of allowing the Network Service to access the default ports defined in the appSettings.config file.
Swagger Port:      netsh http add urlacl url=http://*:51003/ sddl=”O:NS”
Neuron Endpoint Host Port:      netsh http add urlacl url=http://*:51004/ sddl=”O:NS”
Event Processor Service Port:      netsh http add urlacl url=http://*:51005/ sddl=”O:NS”
Data Mapping Service Port:      netsh http add urlacl url=http://*:8585/ sddl=”O:NS”