Sending Email with the SMTP Adapter
Overview
Neuron ESB can send emails over the SMTP protocol. Neuron SMTP Adapter endpoints subscribe to messages from the ESB, converts them into an email message and sends them using the configured SMTP Server. The SMTP adapter endpoint can be configure to create the email in different manners:
- Set the ESB Message body as the body of the email message as either text or HTML
- Set the ESB Message body as an attachment to the email message
- Set the ESB Message body as the body of the email message, and add attachments from the file system
- Set a part of the ESB Message body as the body of the email message
- Apply an XSL Template to the ESB Message body to transform it prior to attaching it to the email
Solution
This sample consists of two adapter endpoints:
- StaticSmtpAdapter
- DynamicSmtpAdapter
The first adapter endpoint is fully configured with static values where the endpoint is defined. The second adapter endpoint is not fully configured at the endpoint. Many of the values this endpoint will use are set in a code step inside a process. Each adapter subscribes to messages from the bus using a different party ID – StaticAlertsSubscriber and DynamicAlertSubscriber. The messages these subscribers receive are published to the bus using a test client.
The StaticAlertsSubscriber adapter endpoint is configured to send part of the message body as an attachment. This adapter endpoint also demonstrates setting different endpoint properties from values within the message itself.
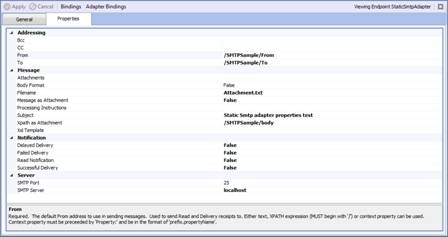
The From and To properties retrieve their runtime values based on the XPATH provided in the property grid. The message used for this sample is:
<SMTPSample>
       <From>Neuron@NeuronDemo.com</From>
       <To>Logs@NeuronDemo.com</To>
       <body>This is a static Smtp adapter properties test</body>
</SMTPSample>
The adapter properties set for the DynamicAlertsSubscriber configure the adapter to use an XPATH expression to select part of the message body, and then transform that part using an XSL transform. Also configured are several other properties used to format and send the email:
context.Data.SetProperty("smtp", "To", "Logs@NeuronDemo.com");
context.Data.SetProperty("smtp", "From", "Neuron@NeuronDemo.com");
context.Data.SetProperty("smtp", "Subject", "Dynamic Smtp adapter properties test");
context.Data.SetProperty("smtp", "IsBodyHtml", "true");
context.Data.SetProperty("smtp", "BodyAsAttachment", "false");
context.Data.SetProperty("smtp", "XpathAsAttachment", "/FAILURE/Document/text()");
context.Data.SetProperty("smtp", "FileName", "FailedMessage.xml");
context.Data.SetProperty("smtp", "XslTemplate", "FailureToHtml");
The message used for this sample is much more complicated. You can see the XML in the Repository as the DynamicSampleXml.
Running the Sample
Prerequisites
- To run this sample you must have access to a SMTP-enabled email server.
Open the Sample
To open this sample, see the topic Using the Neuron Samples and select the Smtp Adapter sample.
Configure Adapter Endpoints
SMTP Adapter Endpoints
You’ll need to verify the SMTP Adapter endpoint settings.
- In the Neuron ESB Explorer, navigate to Connections->Endpoints->Adapter Endpoints.
- Select the adapter endpoint StaticSmtpAdapter, and verify the SMTP Port and SMTP Server fields to point to your SMTP Server.
- After modifying the adapter endpoint properties, click the Apply button.
- Repeat steps 1-3 for the DynamicSmtpAdapter endpoint.
- To modify the To: or From: properties for the the DynamicSmtpAdapter endpoint, navigate to Processes->Set Dynamic Smtp Properties, and open the editor for the code step. Make the necessary changes, click OK, Apply, and then save the changes.
Run the Sample
- In the Neuron ESB Explorer, select Respository->XML Documents and select the StaticSampleXml document. Click on the XML tab, highlight the entire XML document and copy it.
- In the Neuron ESB Explorer, open a test client by clicking Tools->Test Client->1 Test Client.
- In the test client, select StaticAlertsPublisher from the Party Id dropdown list and click the Connect button.
- In the test client, click the Send tab. Paste the XML copied from step one into the message pane. Modify the From and To: fields according to your SMTP server requirements.
- Click the Send button.
- An email will be sent to the To: email address listed in the XML document.
- In the test client, click on the Connect tab and then click the Disconnect button.
- In the Neuron ESB Explorer, select Respository->XML Documents and select the DynamicSampleXml document. Click on the XML tab, highlight the entire XML document and copy it.
- In the test client, select DynamicAlertsPublisher from the Party Id dropdown list and click the Connect button.
- In the test client, click the Send tab. Paste the XML copied from step one into the message pane. If you need to modify the To: and From: fields, you will have to modify the Process that dynamically sets them.
- Click the Send button.
- An email will be sent to the To: email address set by the Process.