Scheduled Jobs Sample
The scheduler sample will show you how to setup the Peregrine Connect Management Suite scheduler and run jobs in conjunction with Business Process hosted in Neuron ESB 3.7.5.
This sample contains the following information:
- Neuron ESB Configuration
- SQL Database Script
- Sample Documentation
Before walking through this scenario, please make sure to run the database script provided with this sample. This will create a database and the needed table in your SQL server.
To execute this sample, you will have to follow along with Sam, and do as he does when it comes to Peregrine MS and creating jobs.
Overview
It is often a requirement of integration that data sources be queried for updated information regularly. This can be for any number of reasons, and most developers can think of at least three right off the top of their head.
Neuron ESB ships several adapters and enables the development of custom adapters. When used in conjunction with their polling and availability functionality, can easily accomplish this task. However, what happens when you wish to have the same polling on a schedule functionality for web services? What about when you need to have an adapter stop polling on specific days such as holidays and don’t want to shut down the adapter manually? This is where the Peregrine MS scheduler comes into play and provides you the flexibility and functionality to address these scenarios.
Scenario
Our good friend Sam Pleuser is working for a financial company, helping them establish their integration environment as they move away from older methodologies and a sparkling new ESB-driven platform. Sam’s manager has asked him to schedule a job inside the ESB which will pull currency rate information from a Web API and save it to the company’s internal database. The company needs the data to be retrieved every 10 minutes, every day except on weekends.
Sam knows that Neuron ESB, the ESB that his company has deemed to be the best available on the market and thus the one they are going to be using, allows him to develop a service endpoint that will retrieve the required data from the Web API. He also knows that using the ODBC process step in the Business Process Designer, he can easily insert data into a database.
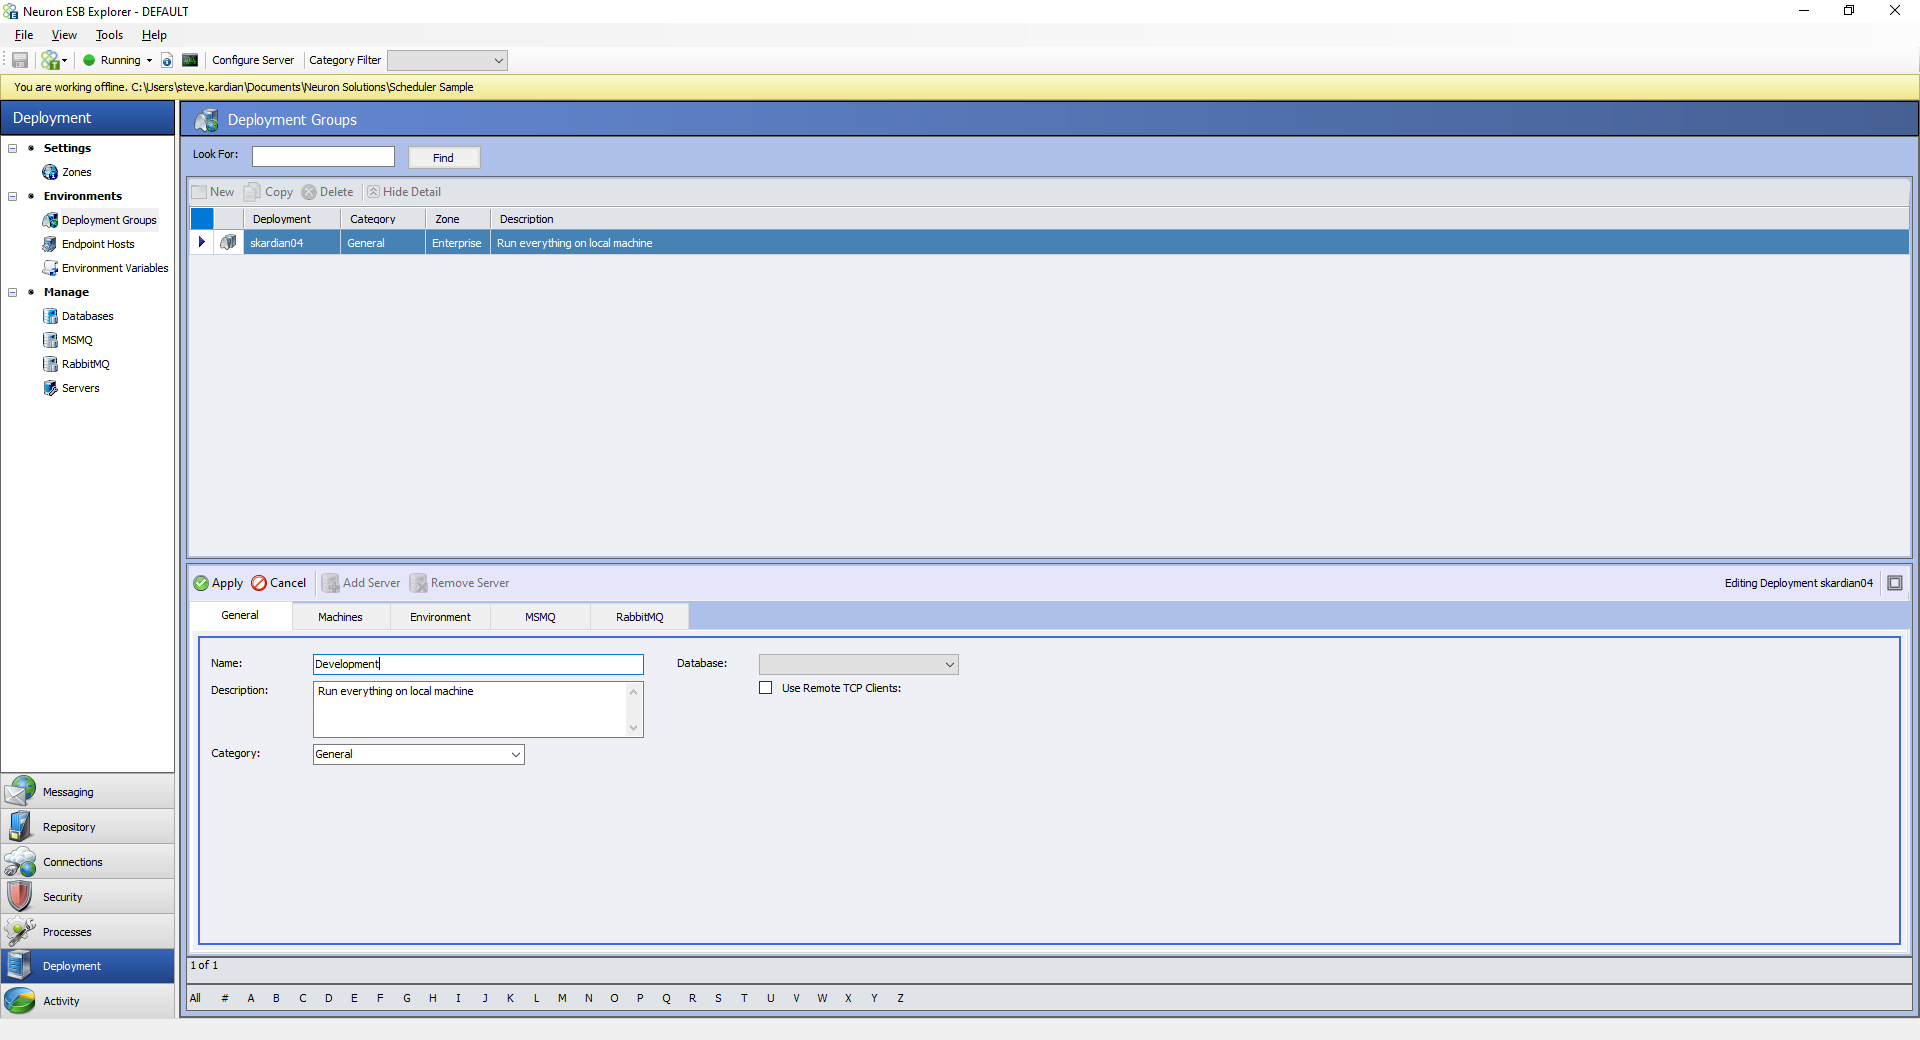
Sam starts by creating a new Neuron ESB configuration and modifies the base deployment group to be named Development.
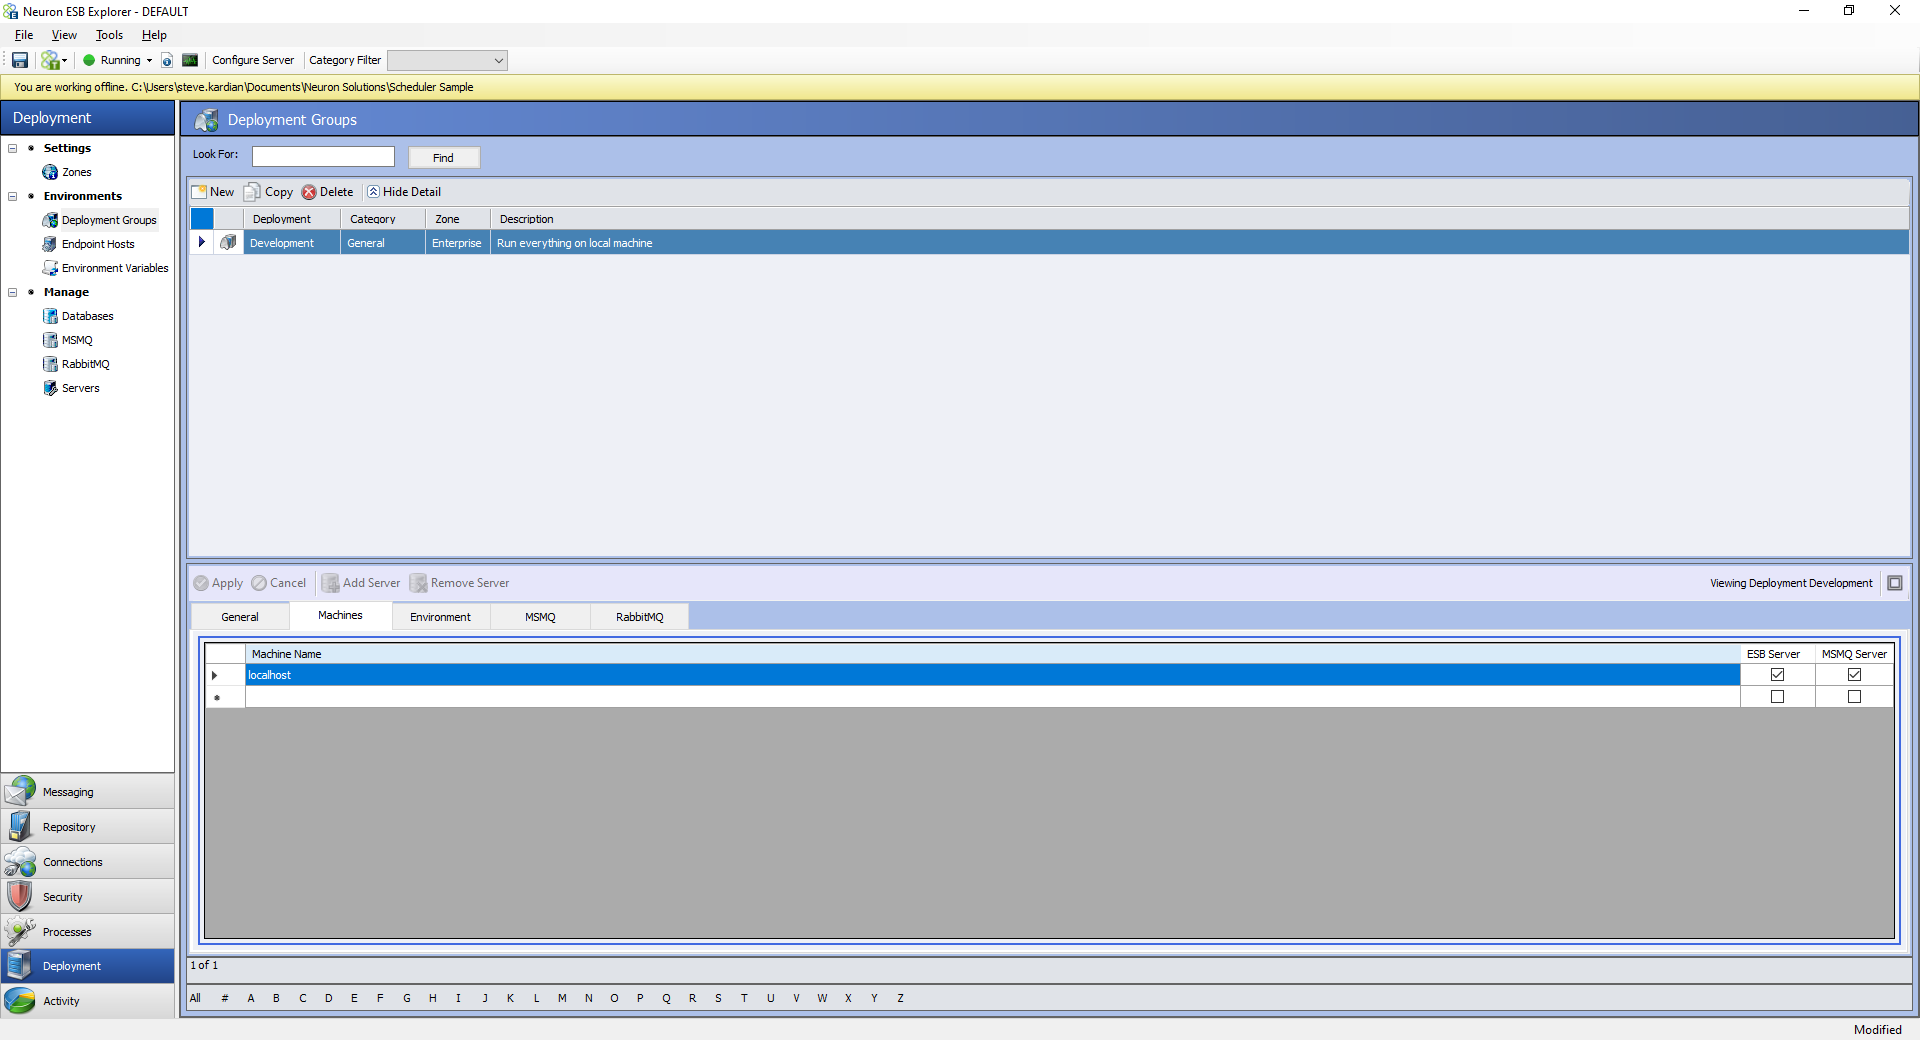
He also makes sure to assign the machine on which the Development deployment group will run to localhost so that other developers can easily run the solution on their systems.
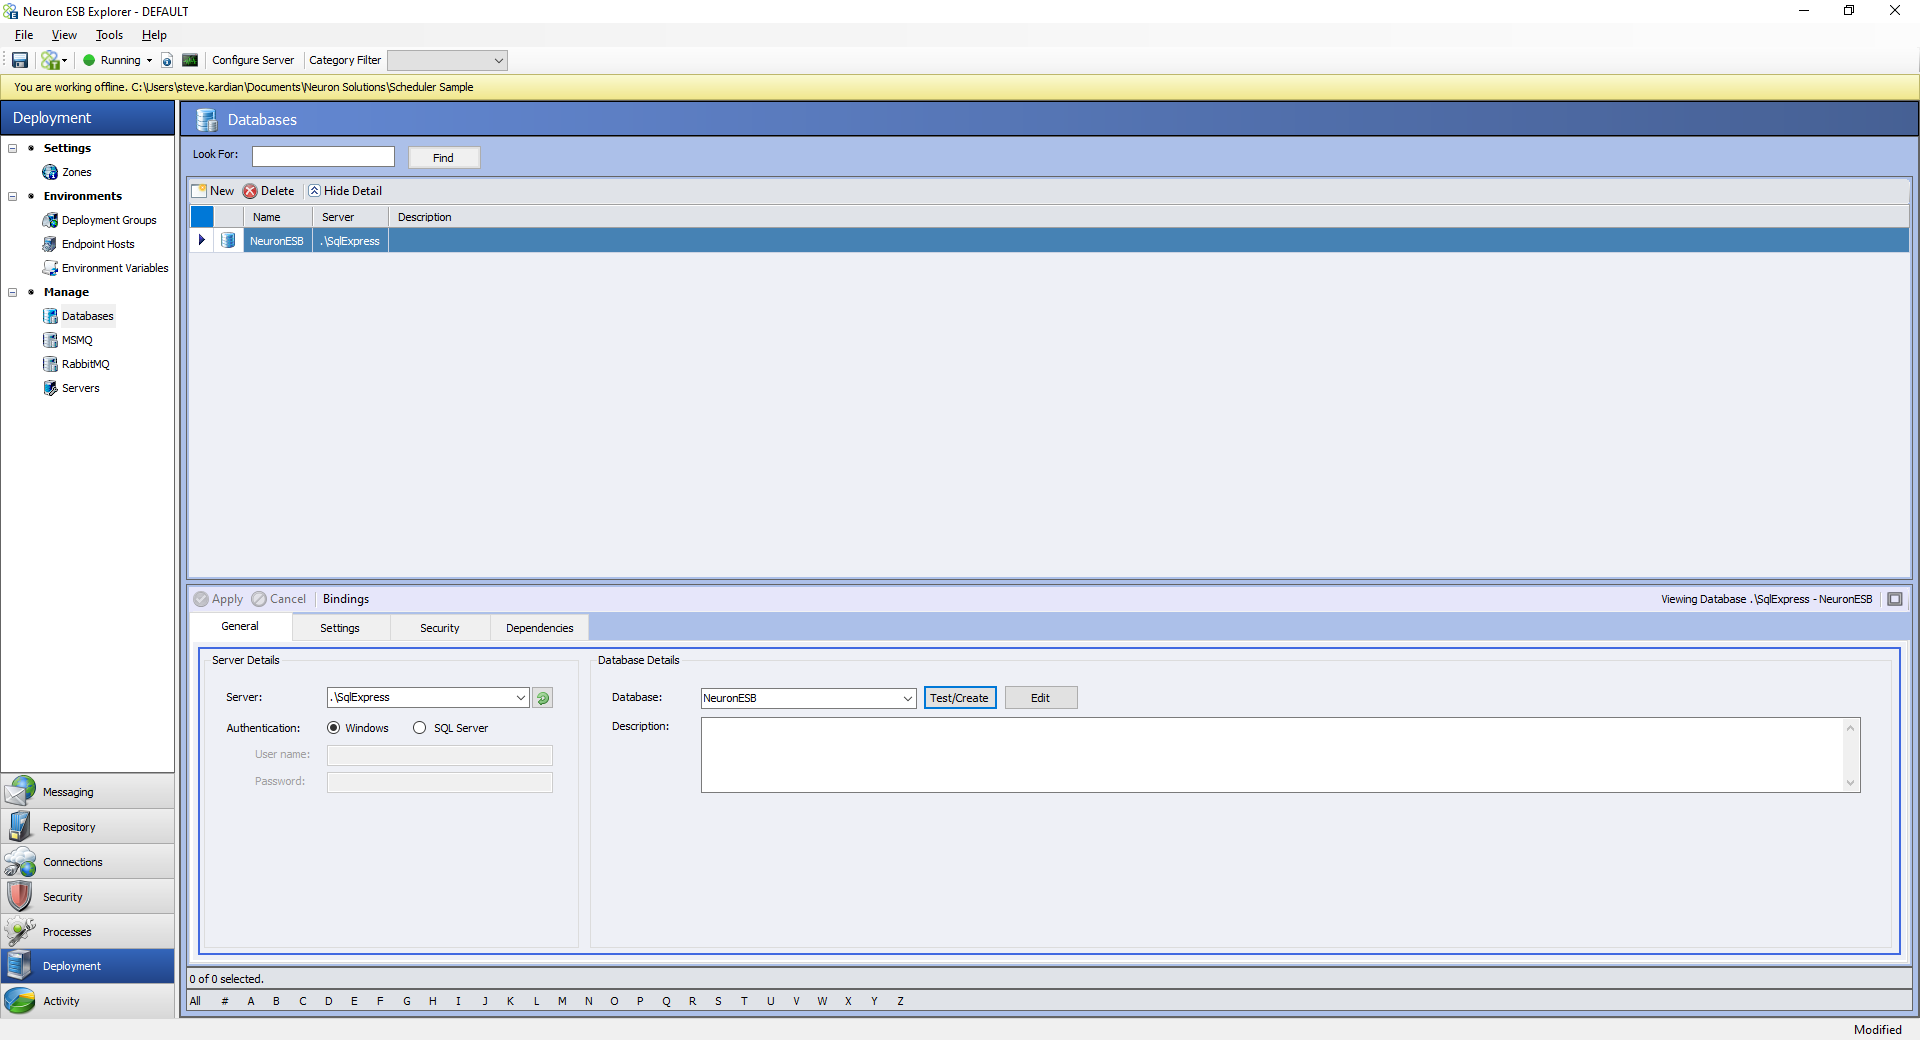
Next, Sam creates a Database which he points to “.\SqlExpress”, knowing that the rest of the developers on his team all use SqlExpress with default naming conventions, but that those who use a full SQL instance, or have named their database something unique, can easily change the Server Name to point to their database instance. He points the database to the NeuronESB database, which is the standard for those in his organization but easily modified for developers who wished to be different.
Once his database is created, he makes sure to associate it with the development deployment group so that the Neuron ESB Instance can use it.

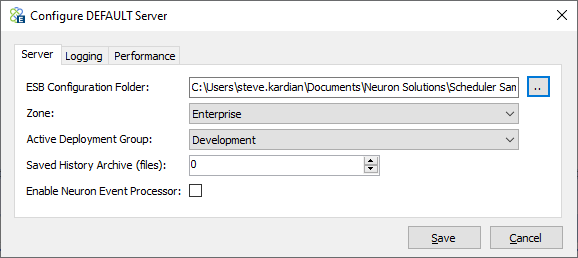
His initial setup is complete. Sam redirects the Neuron ESB instance to run his new configuration and restarts his Neuron ESB instance.
With the basic housekeeping out of the way, Sam turns his attention to developing a solution to the problem that he has been presented.
Sam knows that while Neuron ESB provides a robust messaging architecture, he doesn’t need to use this functionality for his particular solution. As he plans to use Peregrine MS to manage the job for him, a business process is all he will need to accomplish his goals.
The business process that Sam develops makes use of several aspects of the Neuron ESB platform.
- Sam creates a table with the following structure in a SQL Database he has access to. E.g., JobScheduling Demo. Note down the connection string for this database in the format as below. Note that this database may or may not be the same as the Neuron ESB database.
CREATE TABLE [dbo].[CurrencyRates](
    [TimeStamp] [datetime] NOT NULL,
    [Base] [nchar](10) NOT NULL,
    [Date] [datetime] NOT NULL,
    [USD] [decimal](18, 4) NULL,
    [AUD] [decimal](18, 4) NULL,
    [CAD] [decimal](18, 4) NULL,
    [GBP] [decimal](18, 4) NULL
   )

   Server=.\SQLEXPRESS;Integrated Security=true;Database=JobSchedulingDemo;"))
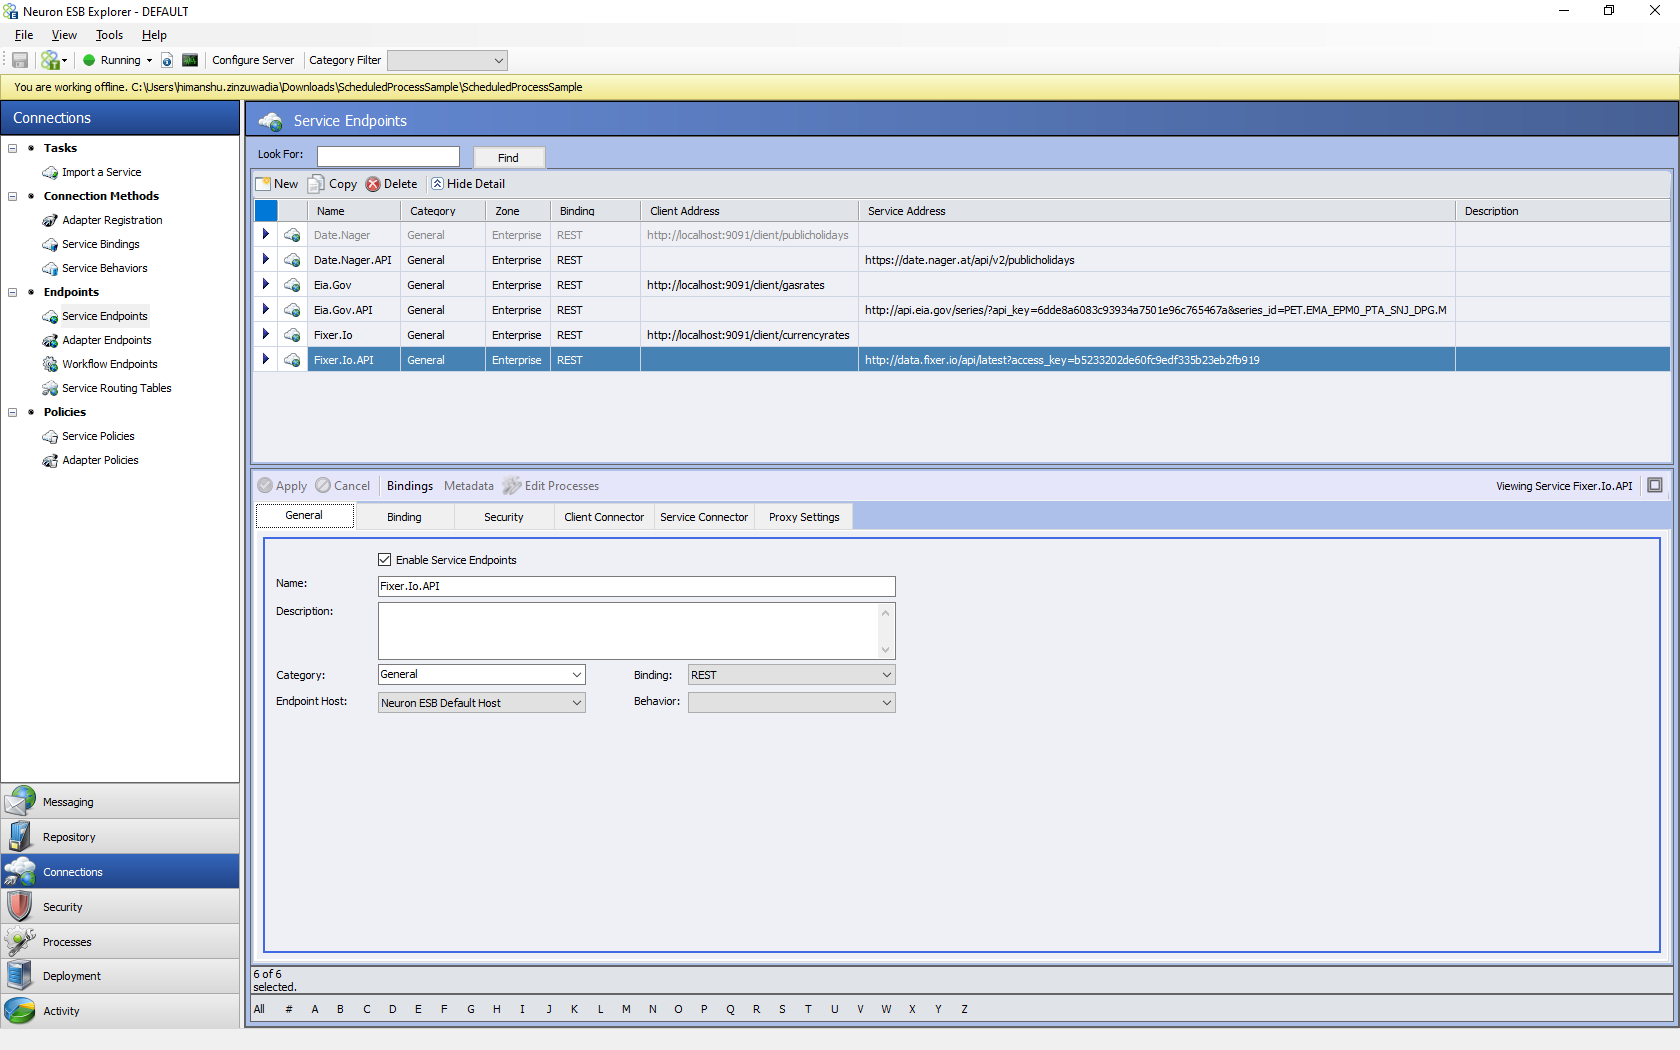
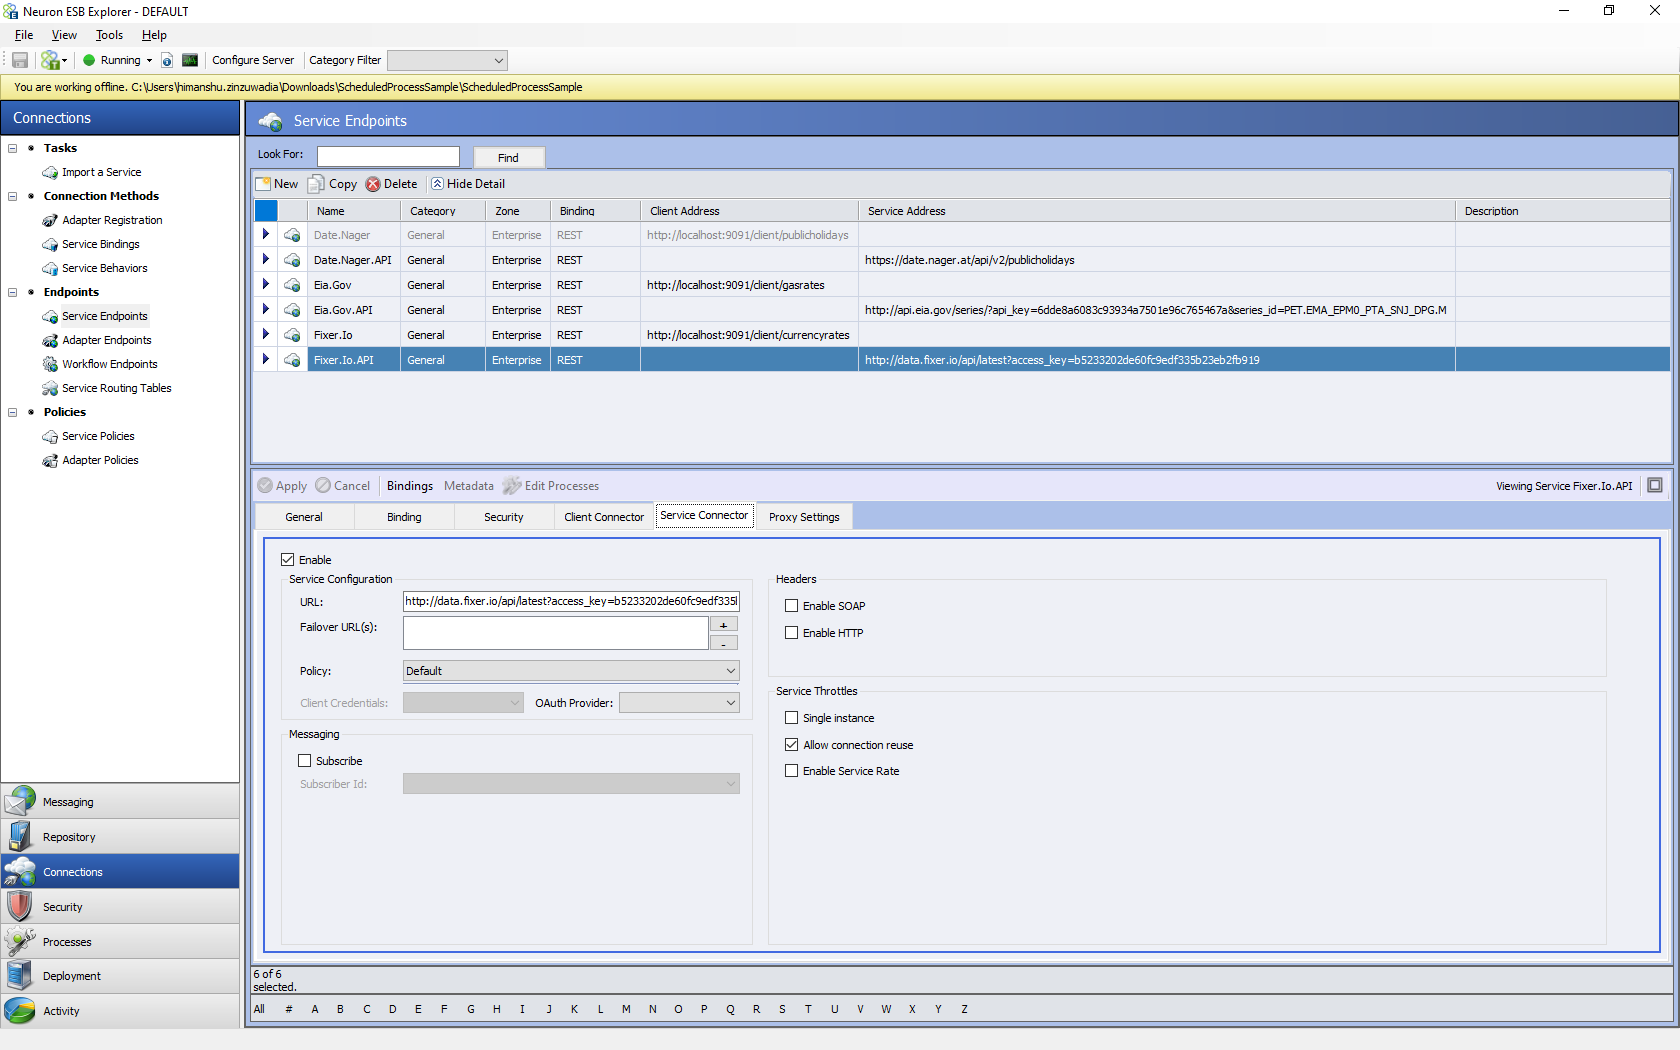
- Then Sam creates a Neuron ESB Service Connector pointed to the Currency Web API and set to run in business process and not as part of the messaging architecture.
This web API is provided for your testing. Use it in moderation otherwise, access will be disabled. If you need your commercial API, you can get one from Fixer.IO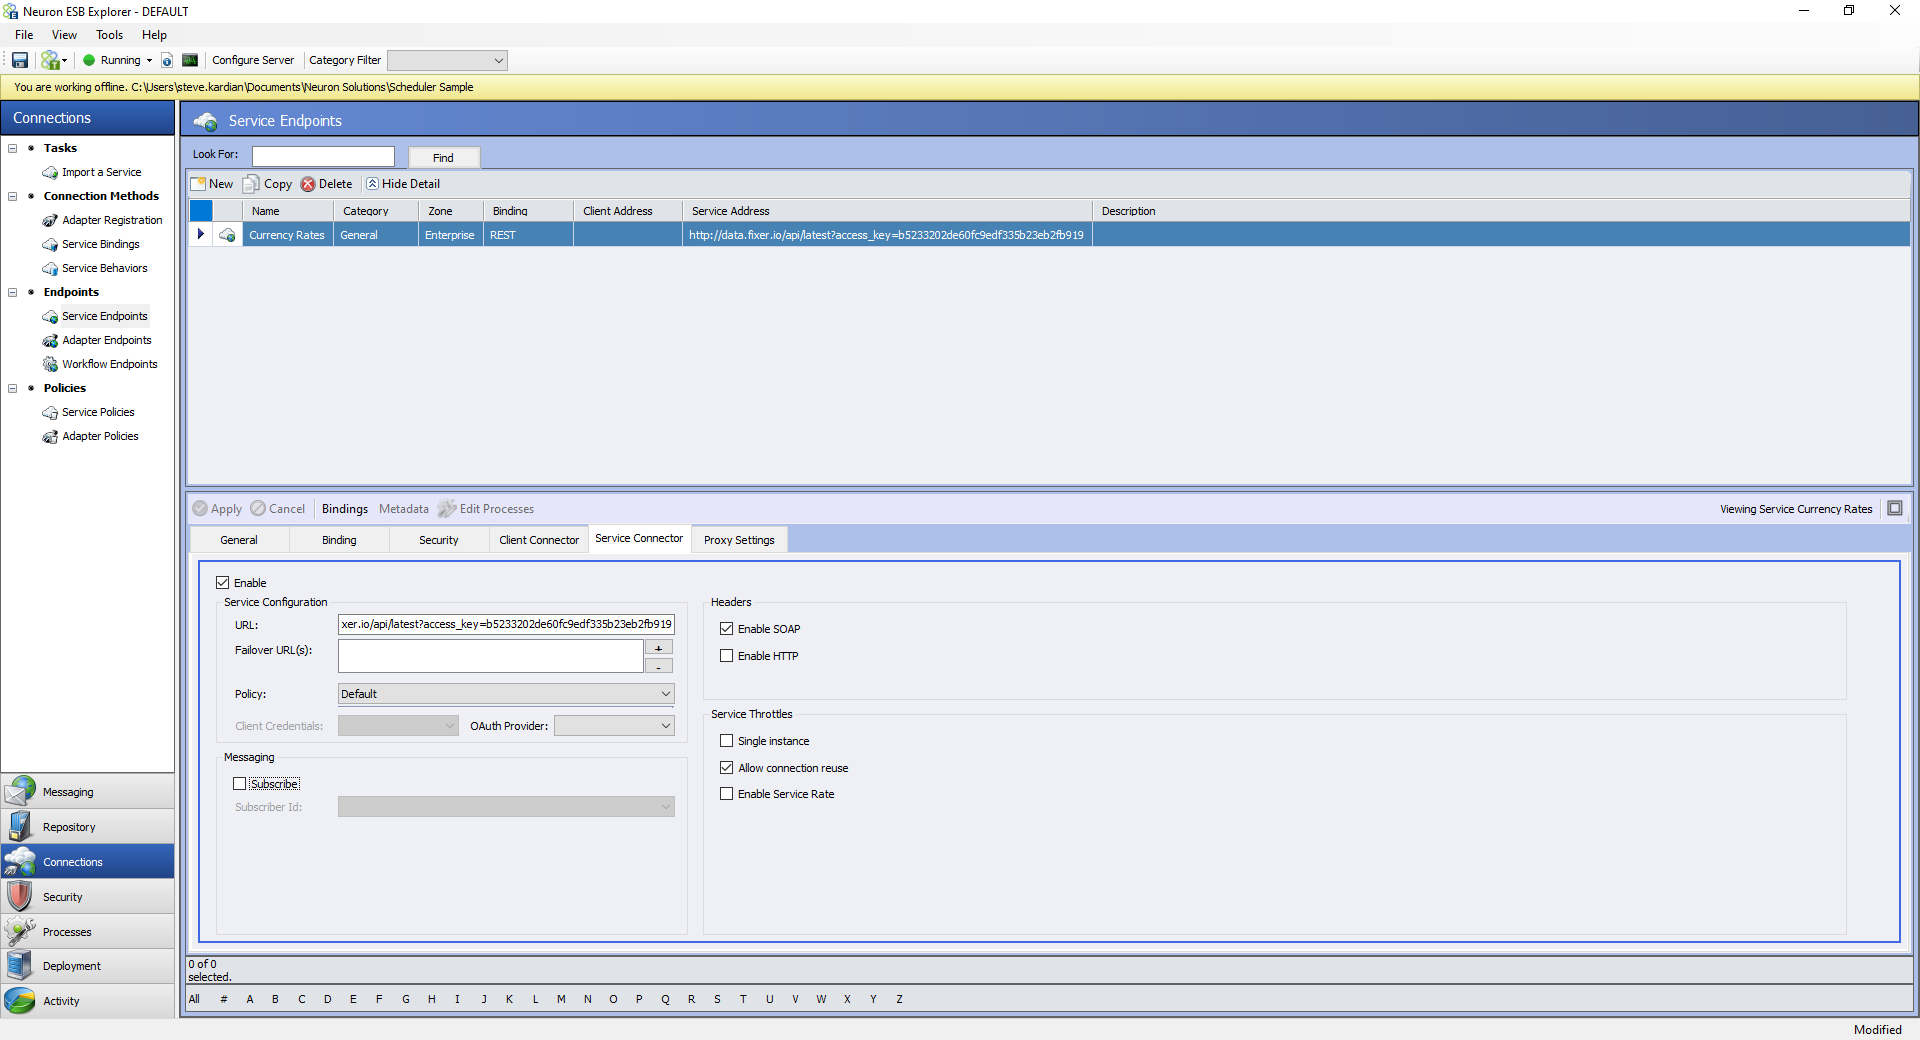
http://data.fixer.io/api/latest?access_key=b5233202de60fc9edf335b23eb2fb919
Configure the service connector with REST binding and put this URL in the Service Connector tab’s URL property. Select Neuron ESB Default host as the endpoint host.
- Finally, Sam develops the business process that the scheduler will call, which puts all the pieces together.
- The business process calls the Web API using the service connector configured above to retrieve the information from the database.
- It then uses a C# process step to get the connection string from the job data map. It parses the information in the response from the Web API, then assigns that information to the appropriate placeholders in the SQL insert statement to insert into the SQL table.
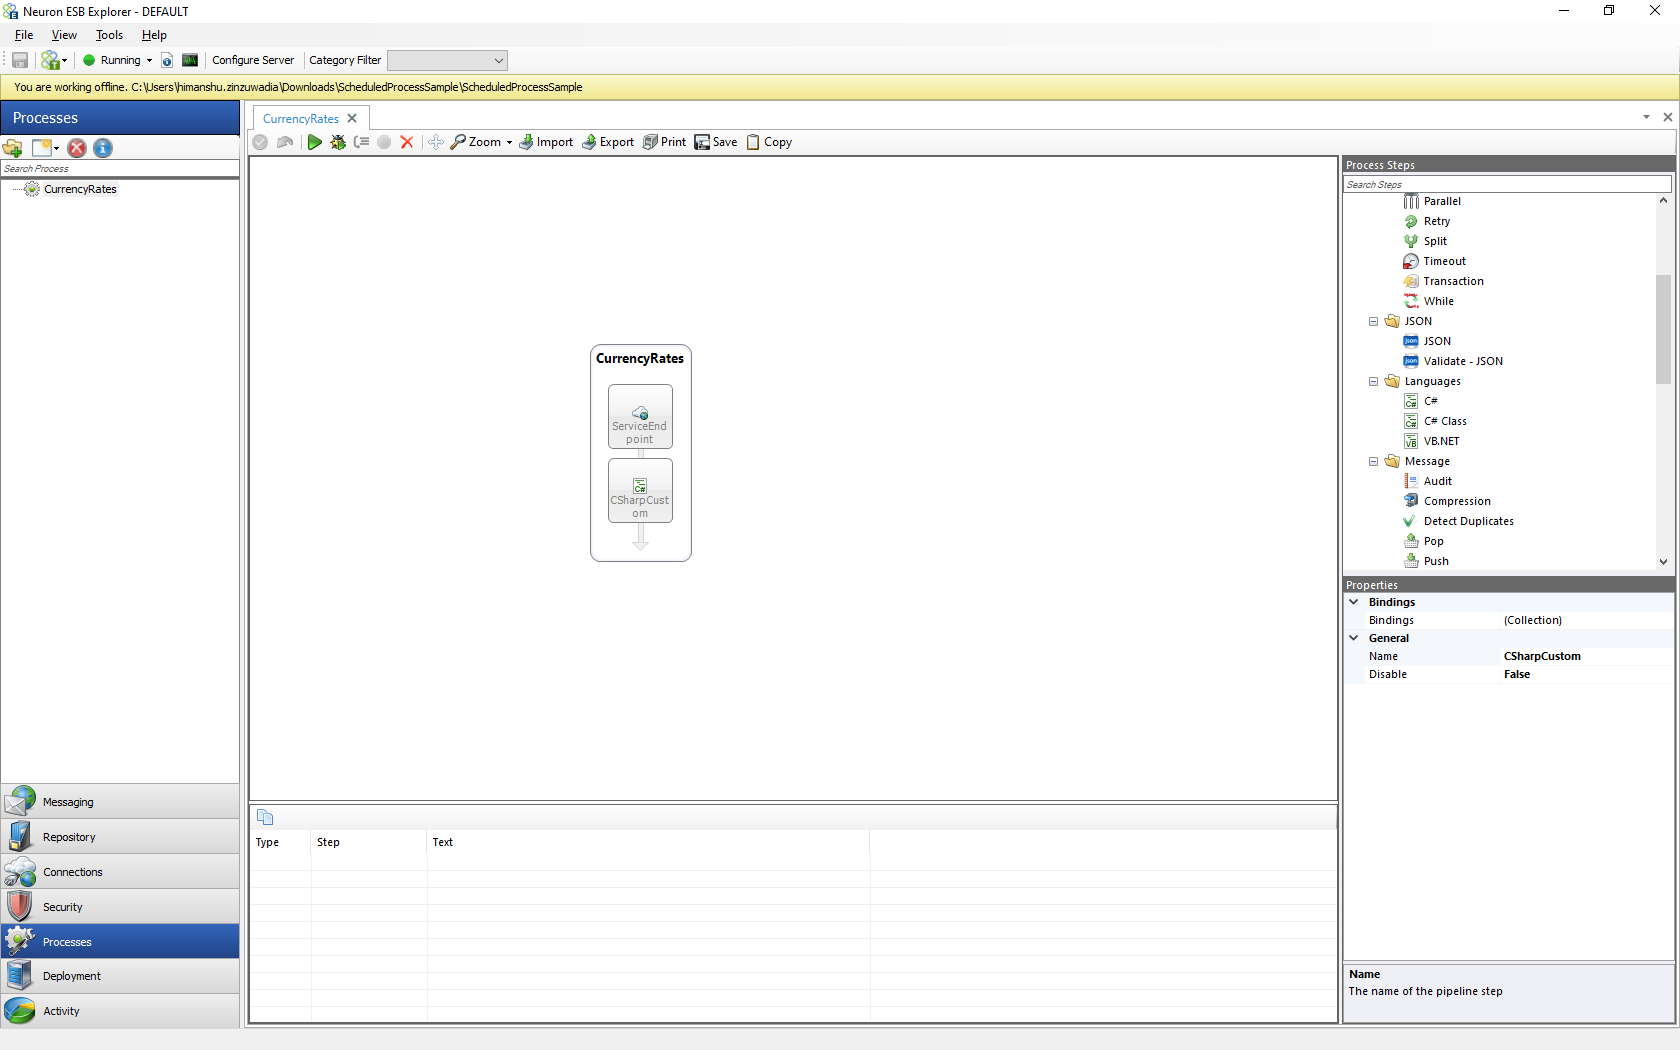
Following is an example of the C# code you can use for testing in the On Execute method of the C# process step. This step parses the response from the currency API and inserts into the table created above.
//Parse the value returned by web service
dynamic currencyObj = JObject.Parse(context.Data.Text);
Decimal AUDRate = System.Convert.ToDecimal(currencyObj.rates.AUD.Value);
Decimal USDRate = System.Convert.ToDecimal(currencyObj.rates.USD.Value);
Decimal GBPRate = System.Convert.ToDecimal(currencyObj.rates.GBP.Value);
Decimal CADRate = System.Convert.ToDecimal(currencyObj.rates.CAD.Value);
string connString;
//Get the connection string from Job Data Map of Scheduler.

Context.Data.Scheduler.Properties.TryGetValue("ConnectionString",out connString);

if (string.IsNullOrEmpty(connString))
 throw new ApplicationException ("Connection String Job Property is required
 to save currency data");

//Make the database call to save the data.

using (var conn = new SqlConnection(connString)) //@"Server=.\SQLEXPRESS;Integrated Security=true;Database=JobSchedulingDemo;"))
{
	var cmd = new SqlCommand("insert into dbo.CurrencyRates (timestamp, Base, Date, USD, AUD, CAD, GBP) values (@timestamp, @Base, @Date, @USD, @AUD, @CAD, @GBP)", conn);

cmd.Parameters.AddWithValue("@timestamp", DateTime.Now);
cmd.Parameters.AddWithValue("@base", "EUR");
cmd.Parameters.AddWithValue("@Date", DateTime.Now);
cmd.Parameters.Add("@USD", System.Data.SqlDbType.Decimal).Value = USDRate;
cmd.Parameters.Add("@AUD",System.Data.SqlDbType.Decimal).Value = AUDRate;
cmd.Parameters.Add("@CAD",System.Data.SqlDbType.Decimal).Value = CADRate;
cmd.Parameters.Add("@GBP", System.Data.SqlDbType.Decimal).Value = GBPRate;

conn.Open();

cmd.ExecuteNonQuery();

conn.Close();
}
Now that his business process is created, Sam’s Neuron ESB configuration is exactly where he needs it to schedule his job through Peregrine MS.
Sam configures the Neuron ESB instance to run this configuration and starts the Neuron ESB instance.
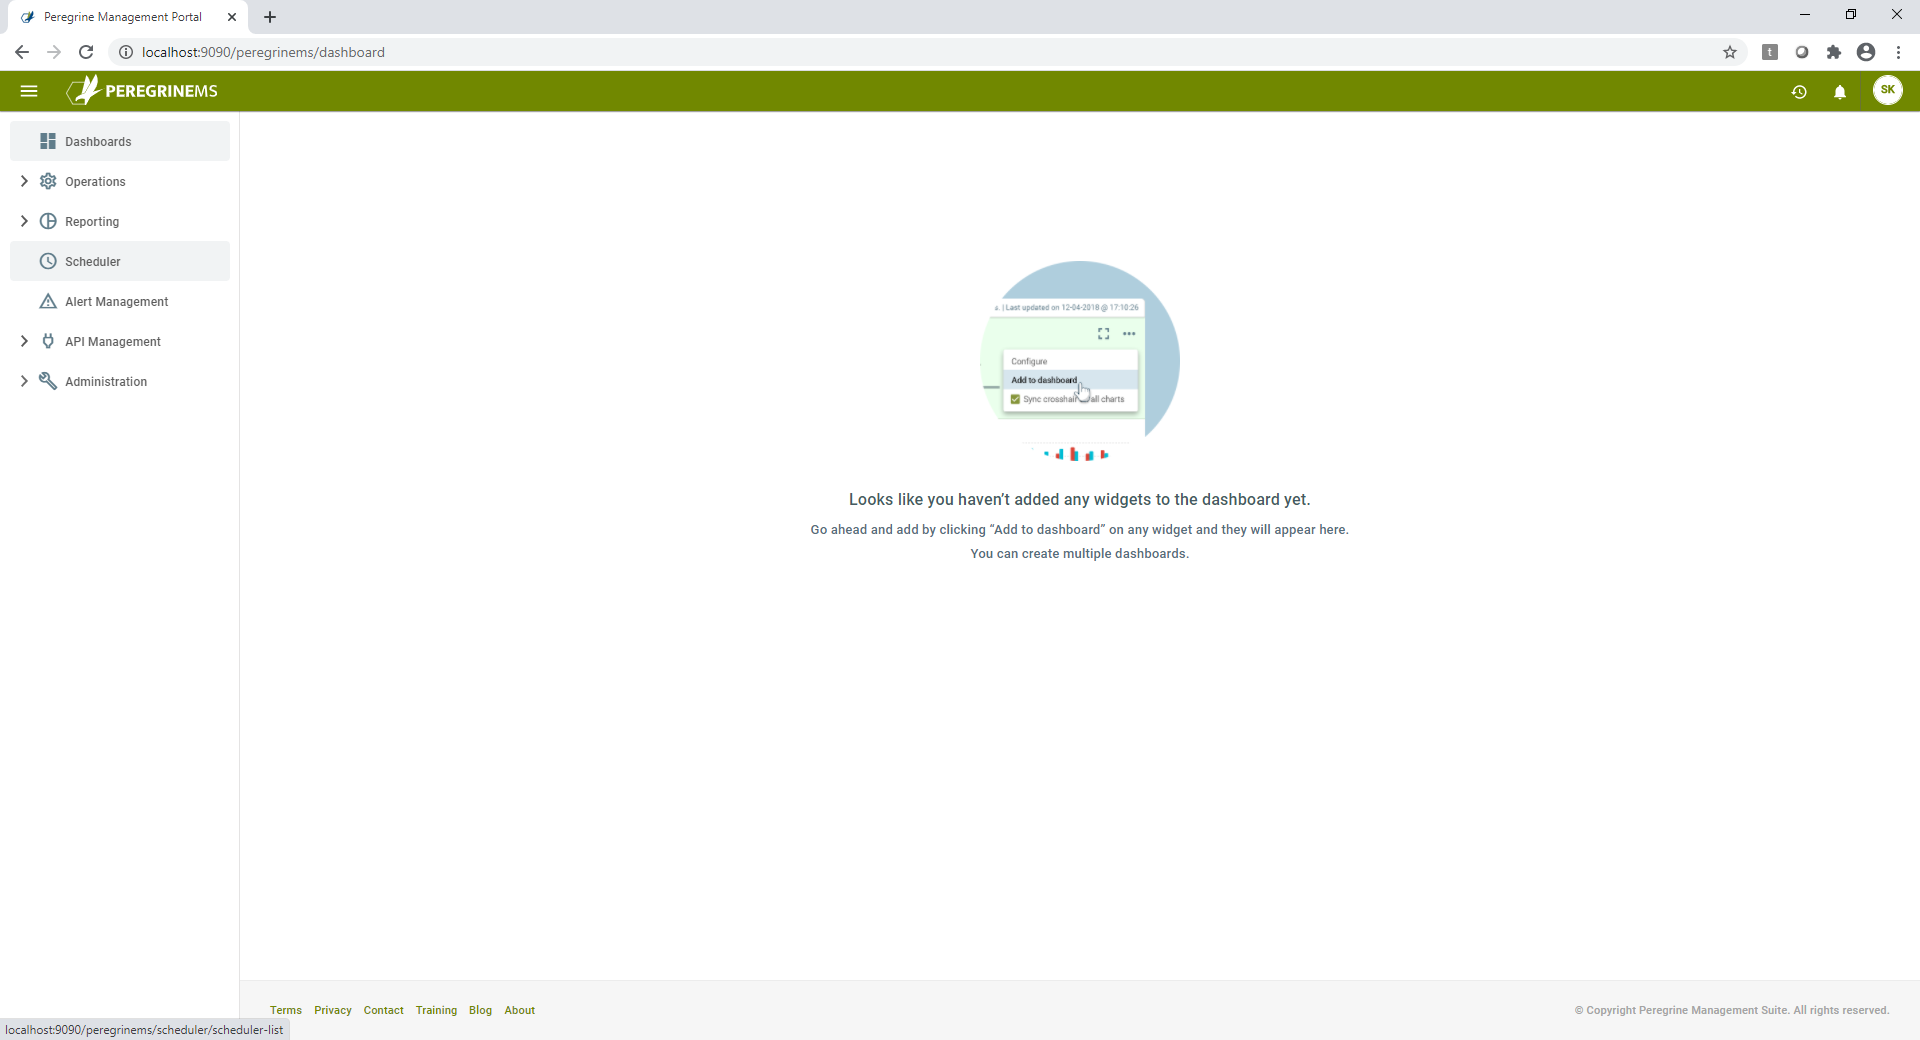
Opening Peregrine MS, and after logging in, Sam selects scheduler from the menu on the left.
The scheduler will allow Sam to execute a Neuron ESB business process based on a number of criteria:
- Start Date
- End Date
- Time
- Days to Skip
- How often to execute
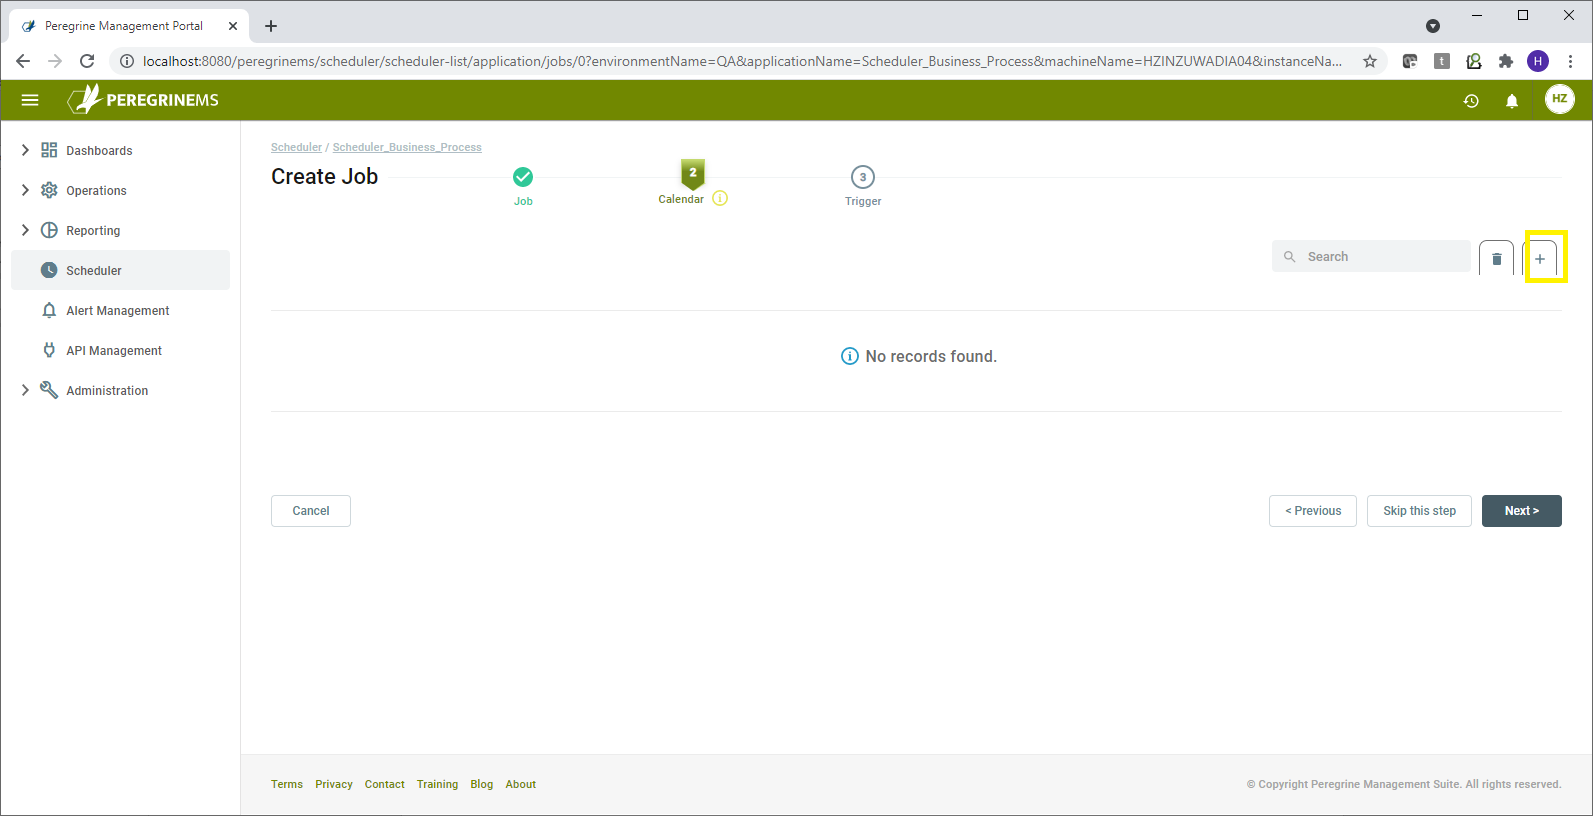
He starts by clicking the expand icon on the scheduler widget, which brings him to the job page for the scheduler.
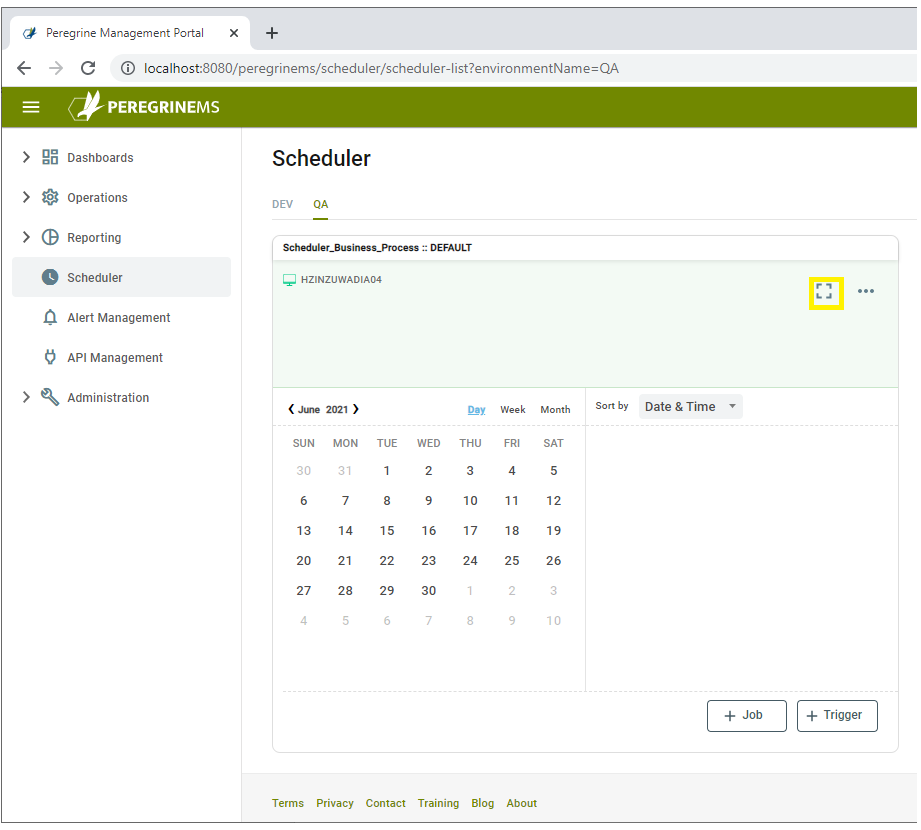
The jobs page allows Sam to view any existing jobs that are assigned to his configuration. As he currently has no jobs created, the page doesn’t give him a lot of options, so he will come back and take a look at it again after creating his first job.
To create a job, Sam clicks on the Create Job button to launch the job creation wizard, which will walk him through his job creation.
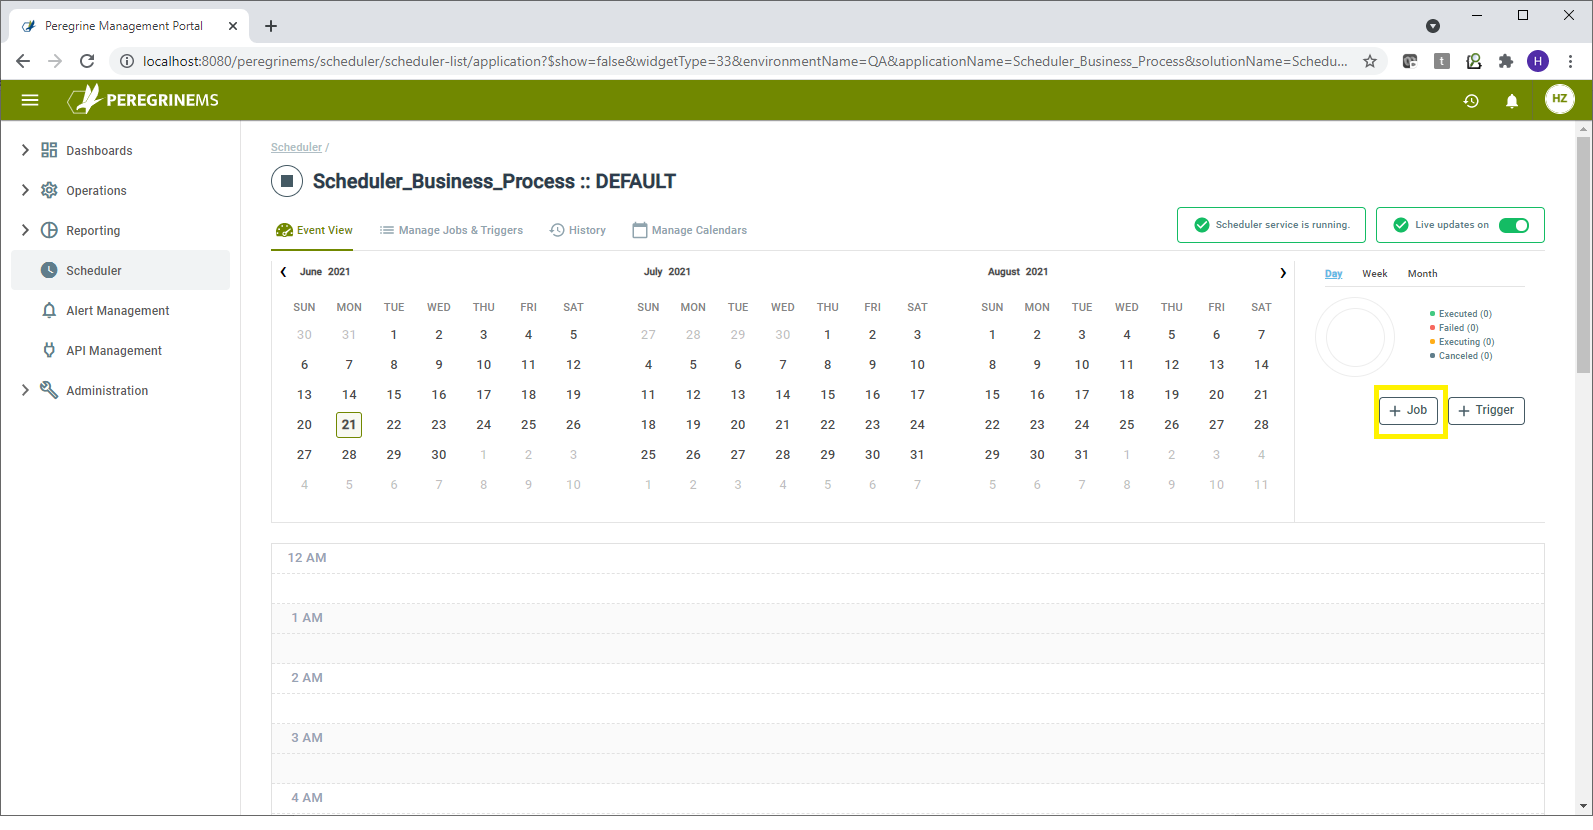
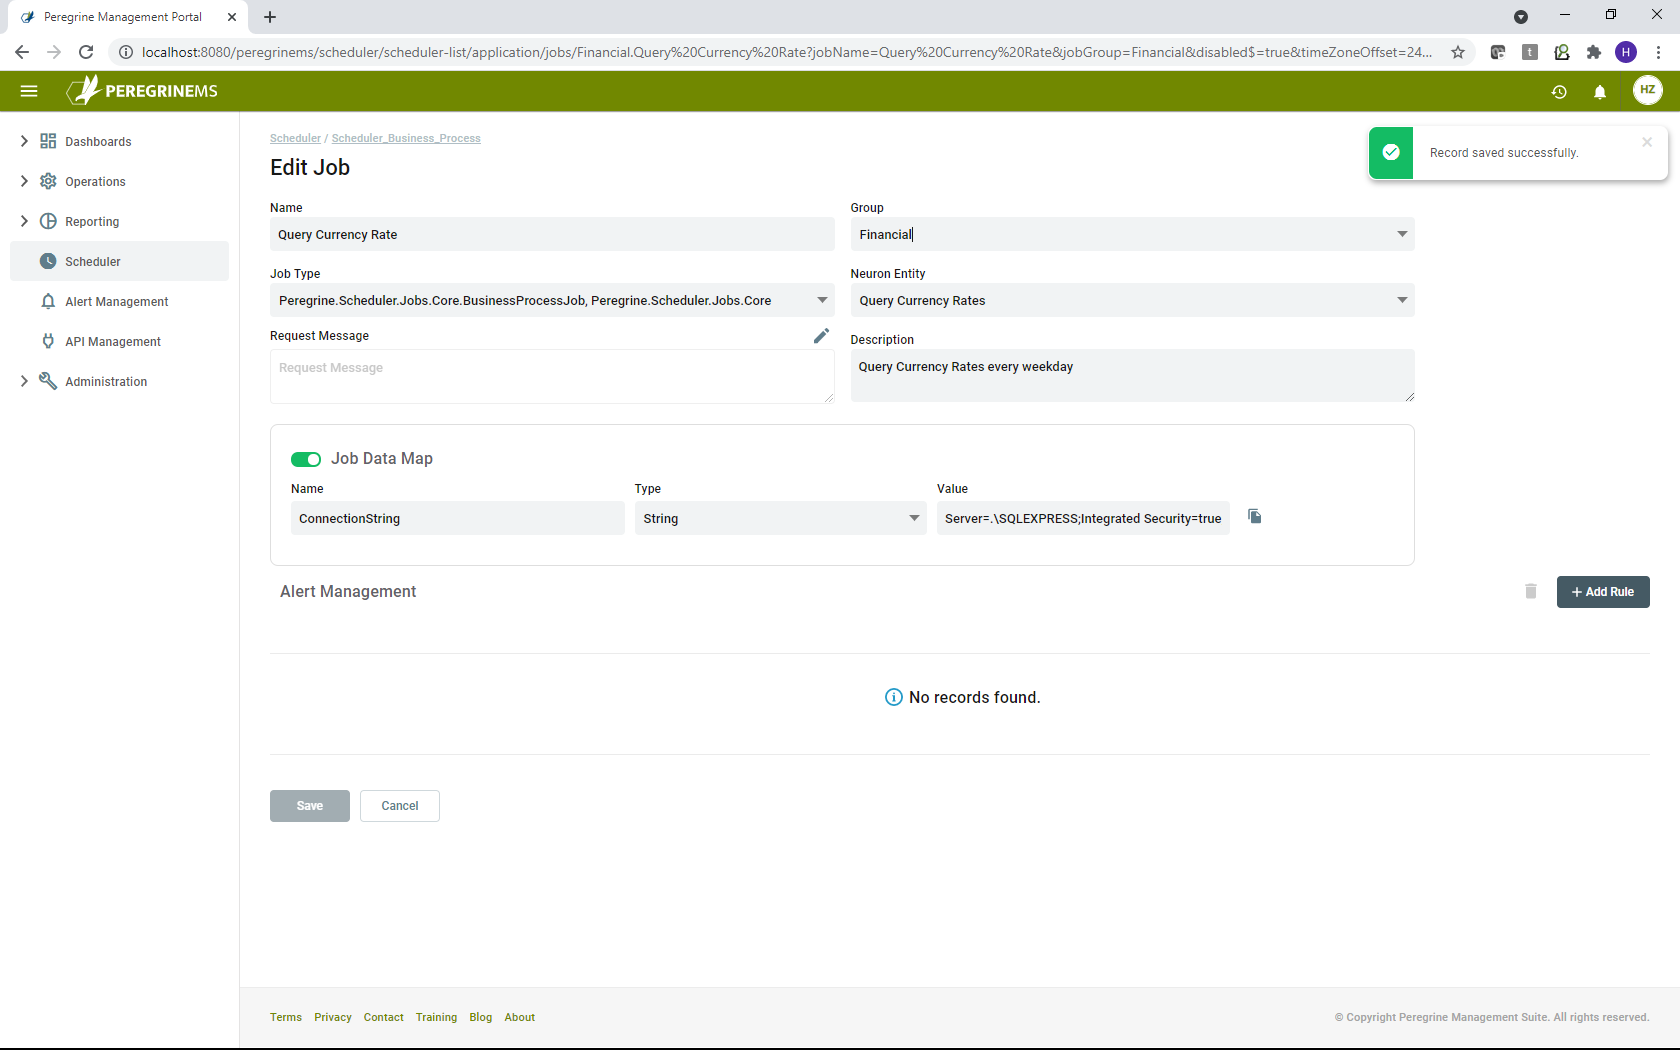
The first page is the job page, where Sam is asked to define the specifics about his job. He begins by giving it the name Query Currency Rates and assigning it to the group Financial by typing financial in the group box. If Sam already had groups created, he could select them from the groups drop-down list. However, as this is the first time, he is creating something in Peregrine Connect Management Suite (MS), typing it in will create the group when he saves his job.
Next, Sam selects Peregrine.Scheduler.Jobs.Core.BusinessProcessJob, Peregrine.Scheduler.Jobs.Core from the Class drop-down list, as this is the only one available to him. If Sam had a custom jobs DLL that he had implemented in Peregrine Connect MS he could have selected that from the drop-down list. However, that is a bit more advanced, and Sam will have to cover that in a different sample.
Next, Sam clicks on the Entity drop-down list and sees the Query Currency Rates business process. Selecting the Query Currency Rates business process, Sam instructs his new job to execute the business process every time the job runs.
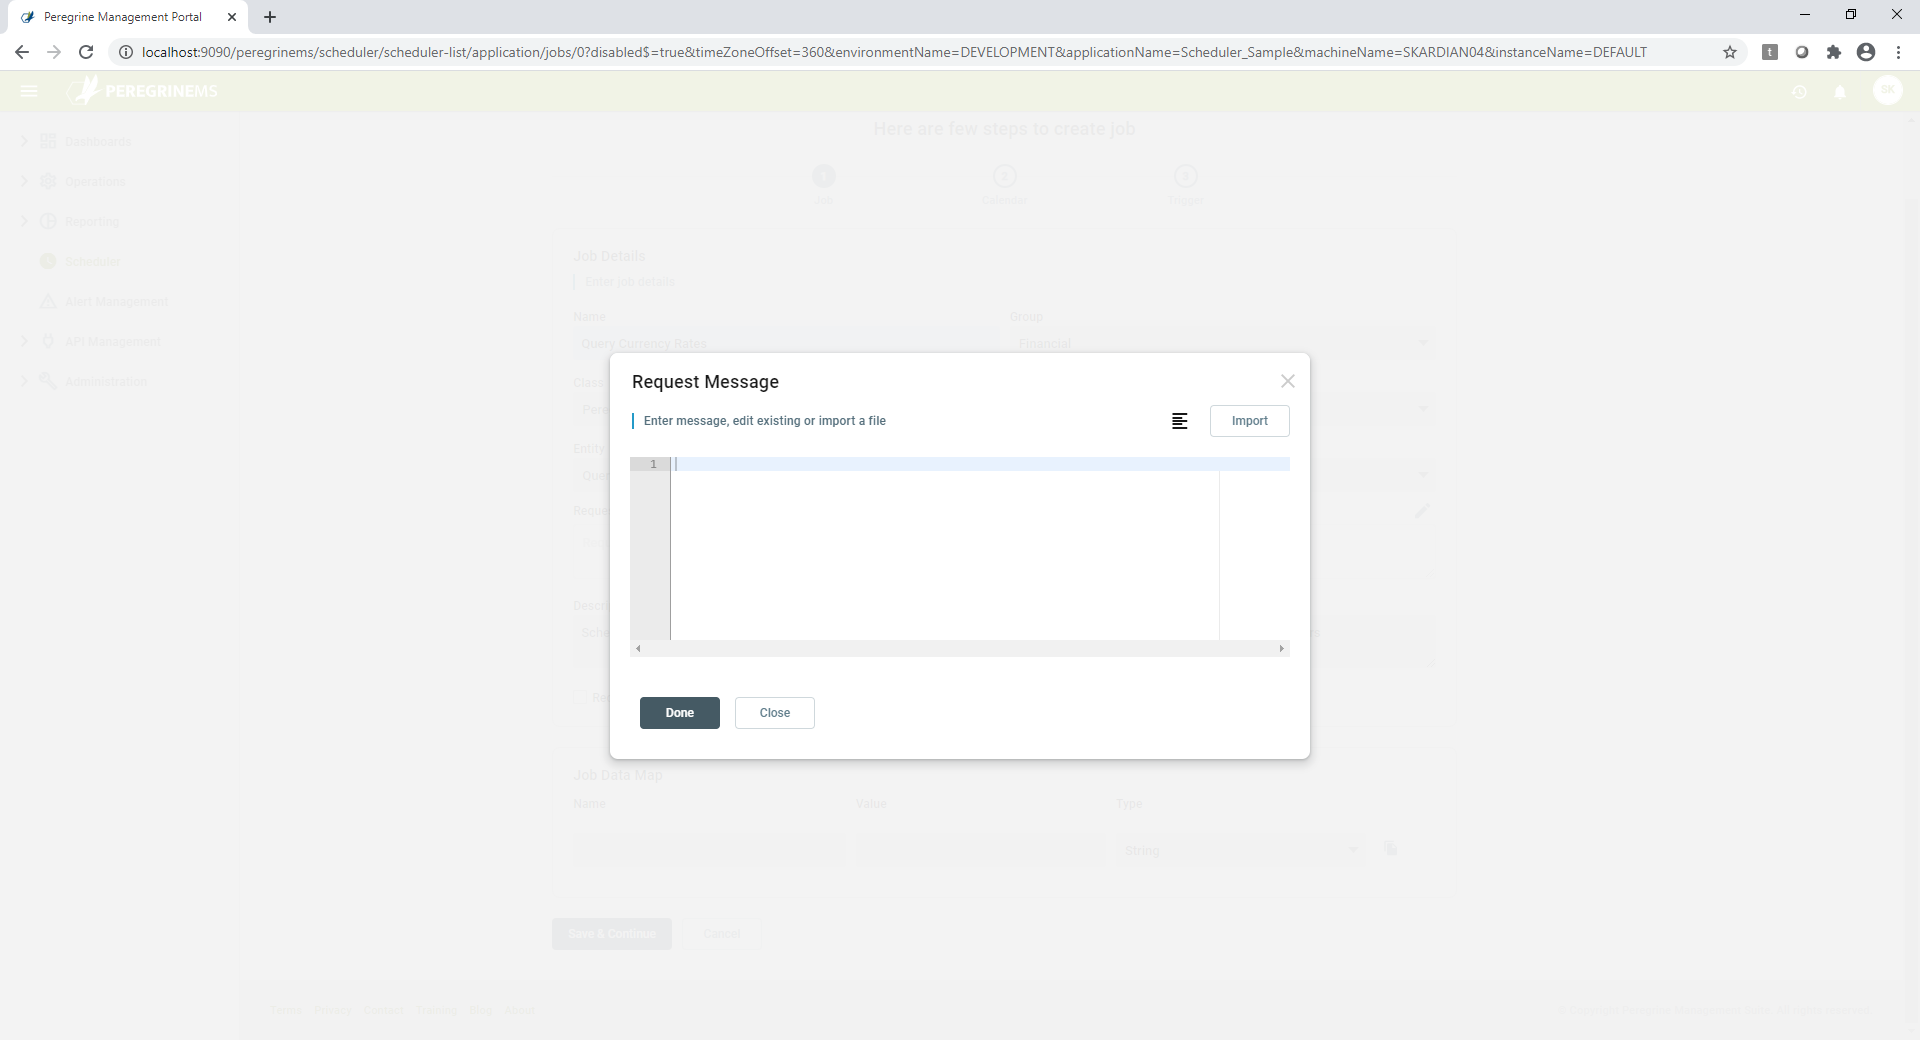
The request message on the jobs page is optional, and in Sam’s case, he does not need to send a message to the Web API to receive the data he is looking for. However, he makes a note of the fact that should it become necessary to send a message to retrieve data, such as a query message for a database, he would be able to enter that in the Request Message section of the job so that it is passed to the business process every time it is called. Sam ruminates on the fact that he could setup a message that could be dynamically modified in the business process for aspects of the message that might be variable such as the date and time of data to retrieve or import a message that he already has using the import feature of Request Message.
Sam enters a brief description for his job in the description section to easily identify the purpose of the job and the business process in his configuration that is being called by the job.
Noticing that with a job data map, he can add properties to a message being sent from the job to the business process. Sam resolves to revisit both the sending of request messages and the ability to add properties to request messages in a different sample.
Sam adds the property “ConnectionString” and enters the value noted above and clicks on the Save and Continue button to move on to Calendars.
On the Calendars page, Sam can determine which calendar he would like to use, if any, to control the days on which the job does not run. In Sam’s case, there are no existing calendars from which to select, and he knows that none is not the right option as he needs to make sure the job does not run-on weekends, so he instead selects Create New.
Note: Very important to understand that trigger defines when the job runs, and calendar if any defines when the job is skipped.
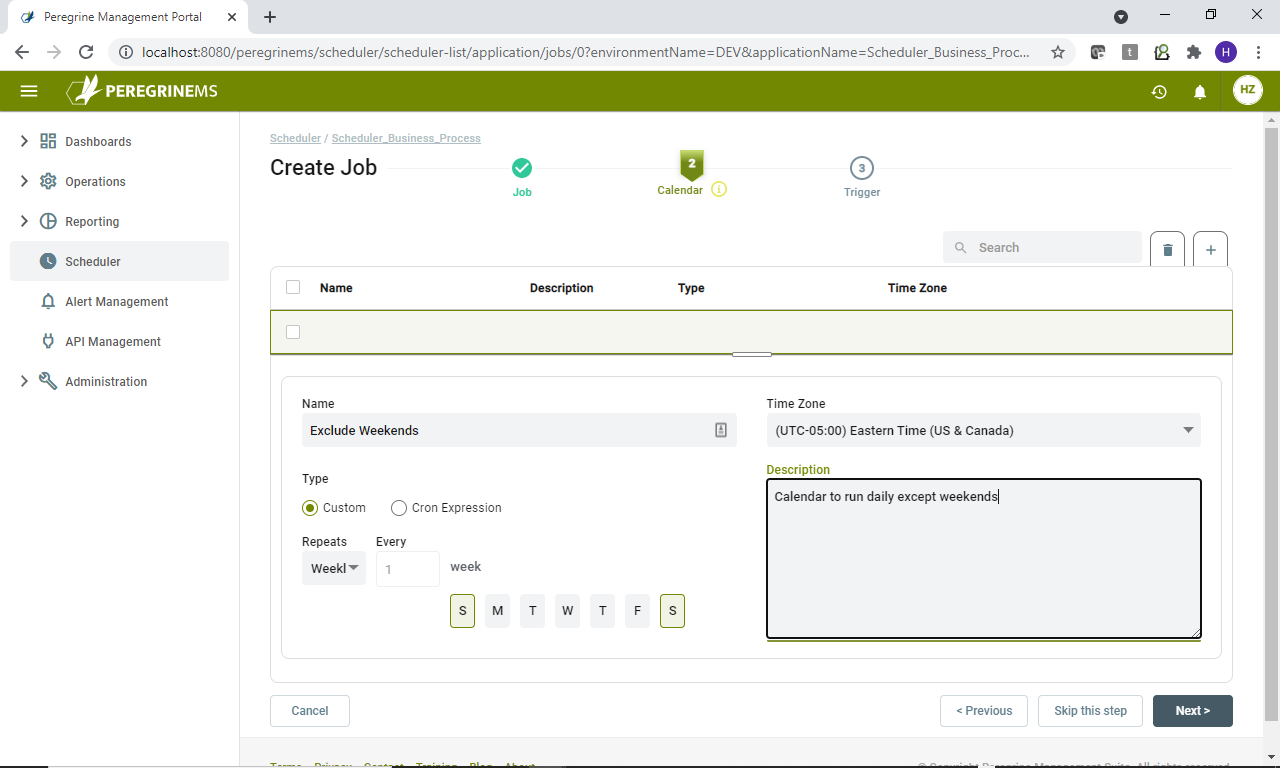
A new section is displayed in which Sam can enter the proper values for his Calendar. He starts by naming his calendar “Exclude weekends”. Coupling his calendar with his job doesn’t feel like the right thing to do, as others might need to schedule jobs with the exact same exceptions and it would be better to be able to reuse one calendar than make multiple, so Sam names his calendar based on what it does and not on the job he is creating.
He leaves the type as weekly, as he would like the job to run on every day of the week except Saturday and Sunday. However, he does look at the other options so that he understands the options that he has available when it comes to future jobs, he is likely to create.
Selecting Custom provides a drop down with the following values.
- Annual – Provides the ability to exclude days from the calendar so the job will not execute on those days.
- Daily – Provide the ability to execute the job every day between the specified times only.
- Monthly – Provides the ability to exclude specific days of the month from the calendar so the job will not execute on those days.
- Weekly – Provides the ability to exclude specific days of the week from the calendar so the job will not execute on those days.
Selecting Cron, he can enter a cron expression to more specifically define the calendar
It Executes the job every day at the times indicated, with the ability to indicate specific times of the day that the job should not execute. Includes a link to a cron expression maker so that a proper cron expression can be created.
Next, Sam enters a description for his calendar so that others can easily identify what this specific calendar does if the name is not enough to provide them all the information they need.
The default time zone for the job is Central America (UTC-6:00). However, as the company that Sam works for operates on Eastern Time (UTC-5:00), he selects that from the drop-down list.
Sam clicks on the Continue button to move to the last step in the process, Triggers.
The triggers page allows Sam to indicate what triggers the job to run. Here he is given multiple options on the type of trigger he would like to create.
- Cron – Specifies a cron expression that is used to determine when the job should execute between the start and end dates specified.
- Simple – Specifies how often the job should execute between the start and end dates specified
- Daily – Specifies how often the job should execute, not only between the start and end dates specified but also the start and end times on those dates and whether or not there is a limit to how many times the job should execute each day.
- Calendar – Specifies how often the job should execute between the start and end dates specified, with options to preserve the hour of the day across daylight savings and skip the day if the hour does not exist.
Note: When associated to a calendar, the job is executed as defined by trigger except on the dates/times specified by the calendar.
Sam opts to go with a simple trigger for this scenario as the Calendar will handle the skipping of days, and there is no need for any of the more intricate options to be employed.
Note that if the job had two different triggers for daily and weekends and the connection in each trigger were to be different, the connection string property can be associated with the respective trigger instead of the job using the job data map section under triggers.

Sam then names the trigger he is creating, and since he is creating it for a specific job, he opts to make the trigger name reflect that. Though he could have made it a generic trigger that any job could use should they need the same options.
He also creates a trigger group named Financial by typing Financial into the Trigger Group text field.
Sam adds a description to his trigger to let other developers know that it is being used for the Query Currency Rates job, so that they do not adjust the trigger without first determining if it has a negative impact on the job it is attached to.
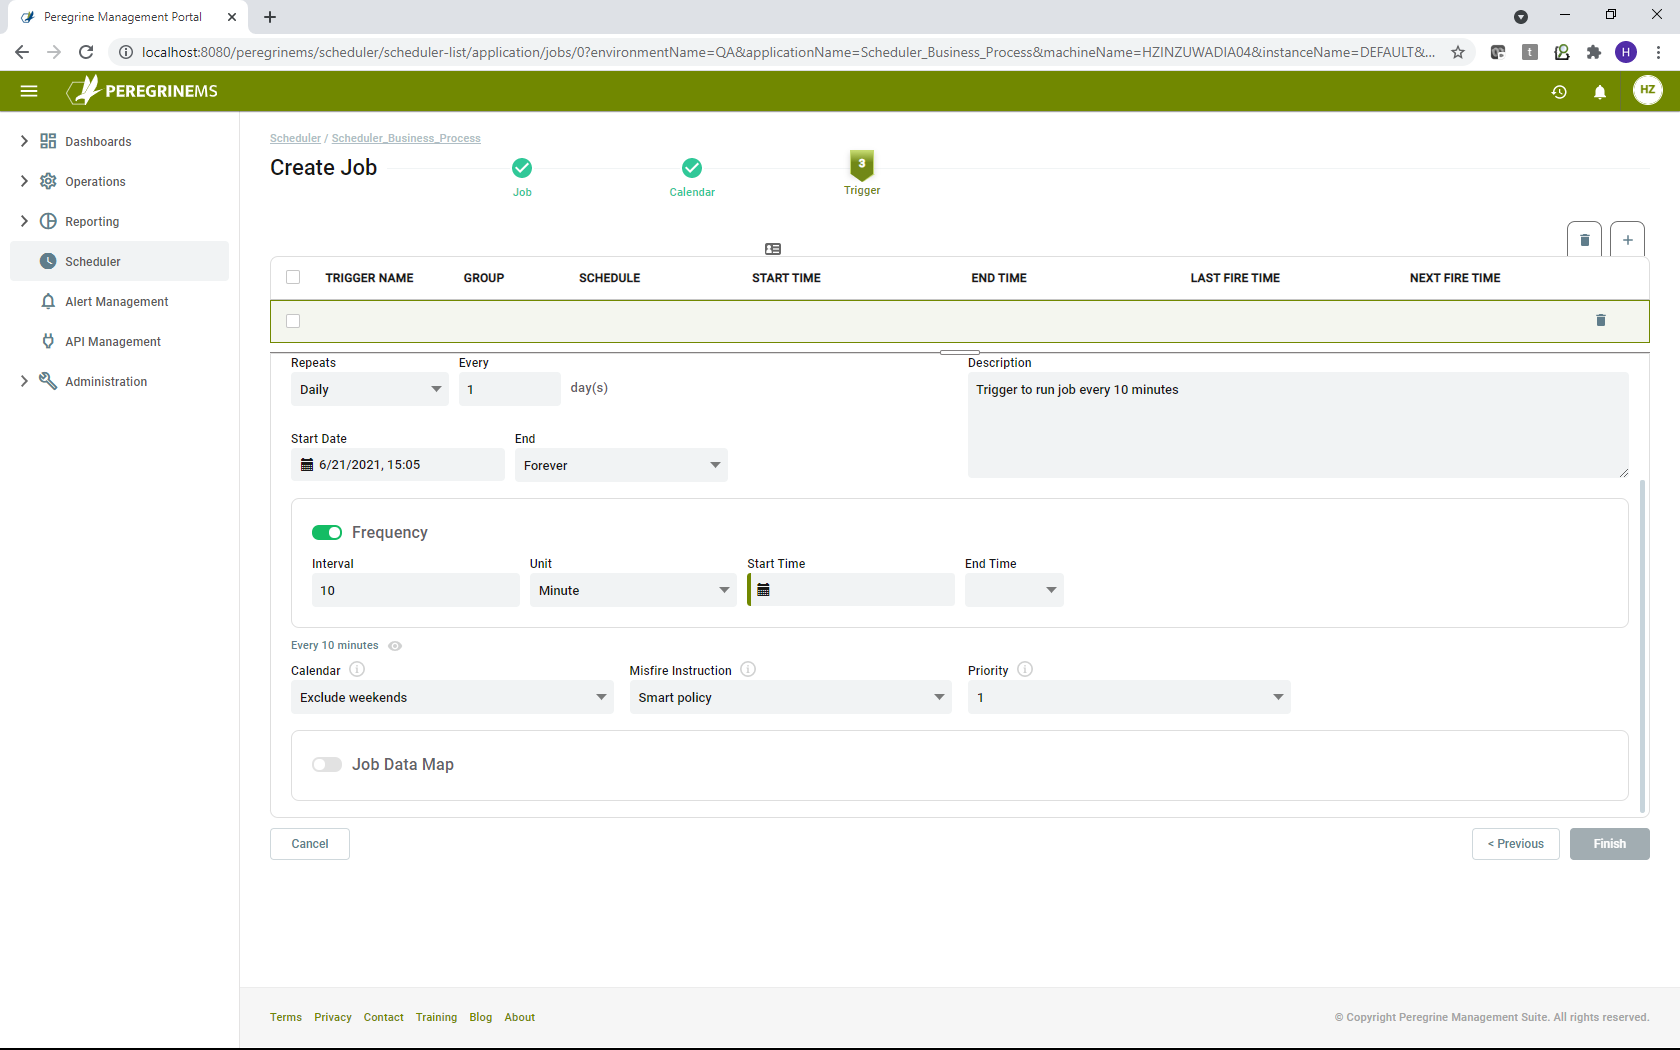
Next, Sam enters a start date and an end date for the job. He decides to go with a span of forever, ensuring that the job does not have to be restarted anytime soon.
The Calendar for the job is already pre-selected, having created it in the previous step, so Sam moves on to the Misfire Instructions.
The Misfire Instructions tell Peregrine Connect MS what to do in the case that the firing of an event trigger goes awry. Sam looks through the various options available to him.
- Smart Policy – Quartz engine will determine the appropriate action based on trigger type and configuration. When the scheduler starts, it searches for any persistent triggers that have misfired, and it then updates each of them based on their individually configured misfire instructions
- Fire Now – Fires the trigger immediately
- Reschedule now with existing repeat count – Reschedules the firing of the trigger with the existing repeat count. For example, if the repeat count is 10 and the trigger fails on the 4th attempt it will reschedule the firing of the trigger with a full 10 events to complete.
- Reschedule now with remaining repeat count – Reschedules the firing of the trigger with the remaining repeat count. For example, if the repeat count is 10 and the trigger fails on the 4th attempt it will reschedule the firing of the trigger with only 6 events to complete.
- Reschedule next with remaining count – Reschedules the next firing of the trigger with the remaining repeat count. For example, if the repeat count is 10 and the trigger fails on the 4th attempt it will reschedule the firing of the next trigger with 6 events to complete.
- Reschedule next with existing count – Reschedules the next firing of the trigger with the existing repeat count. For example, if the repeat count is 10 and the trigger fails on the 4th attempt it will reschedule the firing of the next trigger with a full 10 events to complete.
Sam settles on using the Smart Policy to handle the misfiring of the trigger, as he feels it best suits the needs of the company. Sam also sets the priority to 1. While the trigger is important, the smart policy should adjust for a single misfire, 1 indicates something of high importance which should be addressed in a timely manner.
Now it is time for Sam to set the Simple Trigger specific properties and let the trigger know how often it should repeat. As he was directed to have the data retrieved every 10 minutes, Sam enters 10 into the Repeat Interval field and selects minute from the Unit drop-down list. He also tells the system to repeat forever rather than specifying a set number of times to repeat.
With all that complete Sam is ready to conclude the creation of his job. He clicks the Save button, and his job is created and executes for the first time a few moments after the completion process. It will continue to do so every 10 minutes of every day, except weekends, just as he was directed.
Variations
One can access properties of the last job run inside the process as below.
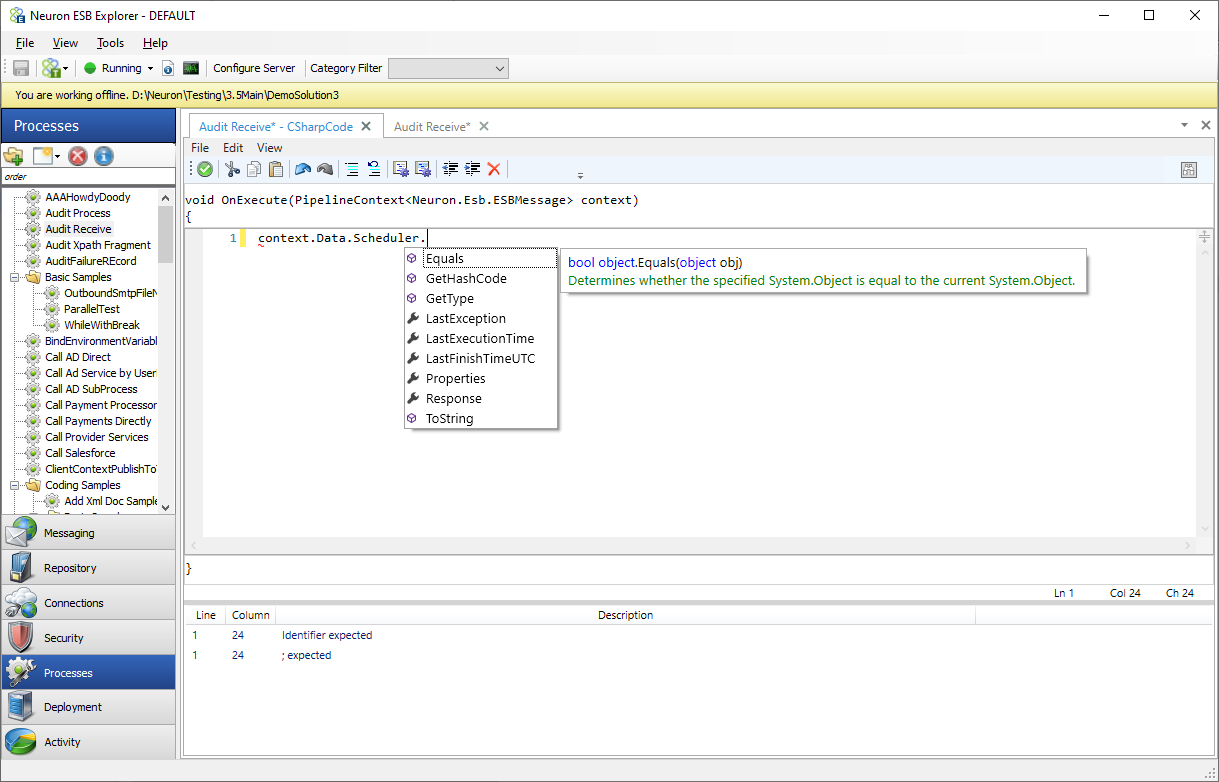
One can also modify the Job Properties or add a job property from your scheduled process. For example, you wanted to add a custom property of Last AUD rate, you can do so by adding it to context.Data.Scheduler.Properties. For example, as shown below.
context.Data.Scheduler.Properties.Add("AUDRate", 2.45);