Neuron ESB 3.5 Cumulative Update (CU) 4 Released!
Intro
Cumulative Update 4 is the culmination of the great customer feedback we’ve received since the original release of Neuron ESB 3.5. We use updates as an opportunity to deliver brand new capabilities to the Neuron ESB community, enabling the development of more complex, yet easy to manage solutions on the platform.
If you’re using Neuron ESB 3.5 today, please download the Cumulative Update 4 patch to update your existing installation. Current customers can obtain either the Patch or the full installation from the Neuron ESB Support website. If you are new to Neuron ESB, you can download the full installation from the Neuron ESB website. All the details of this release can be found in the Knowledgebase Article KB354-0531151.
Neuron ESBs CU4 feature pack provides over 60 new features, enhancements, and connectors. The numerous enhancements include Swagger/API management, workflow, connectors and OAUTH integration. CU4s host of new connectors for cloud-based tools and services include CertainSafe, NetSuite, Dropbox, Amazon, Marketo, Twilio, Apple Push Notifications and more.
Many more capabilities are included is this update, some of which include:
- OAuth Support
- Flat File Parser
- Swagger Support for REST APIs
- HTTP (REST) Endpoint Configuration
- Rabbit MQ Topics (revamped )
- JSON Templates & Data Mapping
- New Workflow Activities
- New Monitoring & Service Broker Capabilities
- 11 New Connectors
- 100+ Product Fixes
All the changes included in the CU4 update can be found in the Neuron ESB Change Log which gets installed with Neuron ESB. In this blog post, I thought I would elaborate on some (not all) of the new enhancements and features we’ve added to the update.
Adapters/Connectors
The Neuron ESB CU4 includes a number of new adapters/connectors. Adapters are a key piece of capability in the world of an integration broker. They serve as the bridge to and from the bus between applications, databases, transports and protocols. The completeness of what you ship as well as how easy it is for others to build their own adapters is critical in accelerating the development of any solution. Not only is Neuron ESB hands down one of the easiest adapter frameworks to learn in the industry, it also has pre-built adapters for most commodity transports, queuing technologies, databases and on premise/cloud applications. However, we continue to deliver a more complete and richer set of connector with every release. This update is no exception.
Certainsafe
Neuron ESBs CertainSafe Adapter is the culmination of a partnership between the two companies. The adapter enhances your efforts to securely store and transmit encrypted secret data while leaving mundane information in clear text form. It does so by simplifying the steps you employ to interact with your CertainSafe Digital Vault from your Neuron ESB based integration infrastructure. Together Neuron ESB and CertainSafe enable automated data security for databases, files, processes, messages and API communications.
The Neuron ESB CertainSafe adapter functions in a Solicit/Response pattern in that the adapter listens for messages published to the bus based on its Topic. Those messages can contain data bound for secure storage and encryption by the CertainSafe service or tokens that map to previously secured data. The response from the CertainSafe Digital Vault service is a new token in the former case and the returned data in the latter. For more information about CertainSafe can be found here: https://certainsafe.com/.
More information can be found here: CertainSafe Adapter
Zuora
Zuora is an enterprise software company that designs and sells SaaS applications for companies with a subscription business model. The new Neuron ESB Zuora adapter enables you to easily embed any or all of Zuoras commerce, billing and finance Software as a Service products into your own subscription-based services. The adapter turns your Neuron ESB integration infrastructure and all of your connected services into relationship business management dynamos that provide you the information you need to design, iterate and understand your subscription revenue streams.
The Neuron Zuora adapter functions as either a publish or subscribe endpoint to the bus. Using Publisher or Subscriber model, the Zuora adapter enables connectivity with the Zuora Rest API, through which businesses can perform operations such as managing subscriptions from a web storefront, retrieving user information, and synchronizing catalogs with ERP systems. Using the Zuora adapter users can easily configure integration with popular third party applications and systems such as NetSuite, Dynamics CRM and SalesForce.
More information can be found here: Zuora Adapter
Marketo
Marketing in the brave new services world is different. Marketo excels at Lead Management, email, consumer, customer base and mobile marketing processes for your service based products. The Neuron ESB Marketo adapter enables you to connect all of Marketos Software as a Service product through your Neuron ESB integration infrastructure to your own services and backend systems. Modernizing your own marketing efforts couldn’t be easier than with Marketo and the Neuron ESB Marketo adapter.
The Neuron ESB Marketo adapter can function as either a publishing or subscribing endpoint to the bus. Using the subscriber model, the Marketo adapter enables connectivity with the Marketo API, allowing users to interface with marketing data through API calls to add/update leads, manage campaigns, run analytics, and track opportunities. Marketo can also Interact directly with the Neuron ESB Marketo Adapter via its WebHook feature (i.e. Publish mode). Using the WebHook feature, Marketo can send a Notification to Neuron ESB. Examples would be Customer Inactivity, Duplicate prevention and Sending Reminders for meetings prior to demo.
The Neuron ESB Marketo adapter allows your businesses to integrate Marketo with existing ERP, eCommerce, and CRM applications such as NetSuite, Salesforce and Dynamics CRM.
More information can be found here: Marketo Adapter
Twilio
Twilio’s popularity as a communications Infrastructure as a Service provider makes it an easy choice for any customer interaction scenario that includes in-app VOIP/Telephony or text/picture messaging. The new Neuron ESB Twilio adapter and your Neuron ESB integration infrastructure enables you to quickly add these feature sets to your own services and products.
The Adapter provides easy accessibility to Twilio’s REST API and it supports both publish and subscribe modes. Solicit/response and request/reply patterns are also supported. This enables you to build customer communication scenarios that include you own internal processes in the communications patterns that your customers expect. For example, you can fire off processes that are initiated from customer phone calls or text messages or respond to any event with direct phone calls or texts out to your customers. Neuron ESB and Twilio turn your business systems into customer retention tools.
More information can be found here: Twilio Adapter
Apple Push Notification Service
The Apple Push Notification Service adapter allows your Neuron ESB solutions to interact with iOS mobile devices (iPhone, iPad). Using the adapter, Neuron ESB solutions can send alerts and notifications to iOS devices, set application icon badges, and play sounds. The adapter can also be used to receive notifications from the Apple Feedback Service when messages cannot be delivered to iOS devices. This is typically a result of the user unsubscribing from receiving notifications for an application.
More information can be found here: Apple Push Notification Service Adapter
Amazon Web Services Simple Queueing Service
Amazon Web Services is the leading cloud hosting provider, and the SQS service lets Neuron ESB integrate with solutions running in the AWS cloud. The adapter supports publishing messages to an SQS queue or receiving messages from an SQS queue. The adapter can be used to pass work to batch processes running in EC2 or Lambda, or to publish events and notifications from your AWS applications to other services that are integrated using Neuron ESB.
More information can be found here: AWS SQS Adapter
Dropbox
Dropbox is a leader in cloud storage and now you can use Neuron ESB to upload files to Dropbox or download files from Dropbox. The Neuron ESB Dropbox adapter wraps the Dropbox REST API and exposes several operations around file management in Dropbox accounts. You can use the Dropbox adapter to archive messages safely to Dropbox for backup, syndicate documents to subscriber accounts, or import documents from subscriber accounts. You can also use the Dropbox adapter to copy files, move or rename files, delete files, or create folders in user Dropbox accounts.
More information can be found here: Dropbox Adapter
Rabbit MQ
The Neuron ESB Rabbit MQ Adapter allows Neuron ESB to interact with Rabbit MQ in a variety of ways, with configurable levels of Transaction support and Quality of Service. Organizations can use the adapter to monitor Rabbit MQ Topics or Queues for new messages, forwarding those (i.e. publishing) to a Neuron ESB Topic where other subscribing parties (e.g. Adapter, Service or Workflow Endpoints) can receive the information. Conversely, the adapter can also be used to forward information published to or generated by Neuron ESB to either a Rabbit MQ Queue or Topic, essentially making Rabbit MQ a Neuron ESB subscriber. Both types of Rabbit MQ Transactions are supported (e.g. Transaction and Publish Confirms) as are Virtual Hosts, SSL and all the latest features of Rabbit MQ.
More information can be found here: Rabbit MQ Adapter
Active Directory
Neuron ESB’s Active Directory (AD) Adapter simplifies efforts to make an organizations AD Server(s) part of a Neuron ESB-based integration infrastructure. Using the Neuron ESB Active Directory adapter, organizations can incorporate AD into their Business Process automation and management solutions to automate tasks involved in new hire and user/group provisioning scenarios. The Neuron ESB Active Directory adapter can function as either a publishing or subscribing endpoint to the bus. In Publish mode, the adapter can monitor an organizations AD server for specific changes/events (i.e. password change, deleted user, etc.), publish those changes to bus where they would be routed to all interested subscribing users or Business Processes/Workflows. In Query mode, the AD server can be queried for information, or existing users and groups can be updated, added or deleted. Users and Groups can also be enabled/disabled and passwords can be reset.
More information can be found here: Active Directory Adapter
Neuron ESB Microsoft Project Connector for NetSuite
With NetSuite’s cloud-based project management solution, stakeholders can see, monitor and manage project status anytime, anywhere. By delivering complete visibility and control, NetSuite’s project management solution gives you real-time access to all of your project information. The result is a significantly improved project completion record, more satisfied clients and reduced non-billable work.
Microsoft Project makes project management easy. With tools designed specifically for team members, project managers, executives and the PMO, it enables collaboration from virtually anywhere with the right tools for any role.
The Neuron ESB Microsoft Project Connector for NetSuite enables you to sync projects and resources across both toolsets through your Neuron ESB integration infrastructure. When you’ve got NetSuite as your project management system of record and Microsoft Projects role focused editions in the hands of your stakeholders, synchronized with Neuron ESB, your business will provide instant access to critical project data anytime, anywhere for anyone.
More information can be found here: https://www.neuronesb.com/why-neuron-esb/netsuite-integration/
Dynamics CRM WEB API
The Neuron ESB Dynamics CRM Web API Adapter provides direct access to Microsoft Dynamics CRM 2016 Web API. Using this adapter, organizations can easily integrate their business applications such as SAP, NetSuite or Marketo with Dynamics CRM 2016, both on-premises and online. The adapter utilizes the new Azure Active Directory/ADFS OAuth Provider to manage access to Dynamics CRM. This adapter operates in both subscribe as well as solicit/response (or query) mode. Organizations can use the adapter to query for data, create, update, retrieve and delete entities and execute CRM Functions and Actions. The adapter can be used to access the entire Dynamics CRM Web API. When developing applications that utilize this adapter, developers will be able to use the Adapter Metadata Generation Wizard to generate JSON samples that describe the request and/or response documents that are exchanged with Dynamics CRM. Developers can also use the new Http Utility process step in our process designer to very easily define the calls to Dynamics CRM.
More information can be found here: Dynamics CRM Web API Adapter
OAuth Providers
The Neuron ESB 3.5 CU4 release introduces OAuth support for authorizing web service invocations using Service Connectors (i.e. HTTP/REST service endpoints) and supported Adapters. Using OAuth, Neuron ESB can obtain access tokens that can be passed to REST services to authorize protected resource invocations. In CU4, OAuth bearer tokens based on RFC 6750 are supported.
Neuron ESB supports obtaining OAuth access tokens using the following authorization services:
- Amazon
- Azure Active Directory/ADFS
- Dropbox
- Foursquare
- GitHub
- Microsoft Live
- SoundCloud
- SourceForge
- Tumblr
- Yahoo!
Registering an OAuth Provider
Configuring an OAuth provider for web services is very simple, but will require you to coordinate with the authorization service. Most authorization services will require you to register your application with them in order to obtain an identifier and secret value that is used to identify your application and authorize your application to act on behalf of you or your applications users.
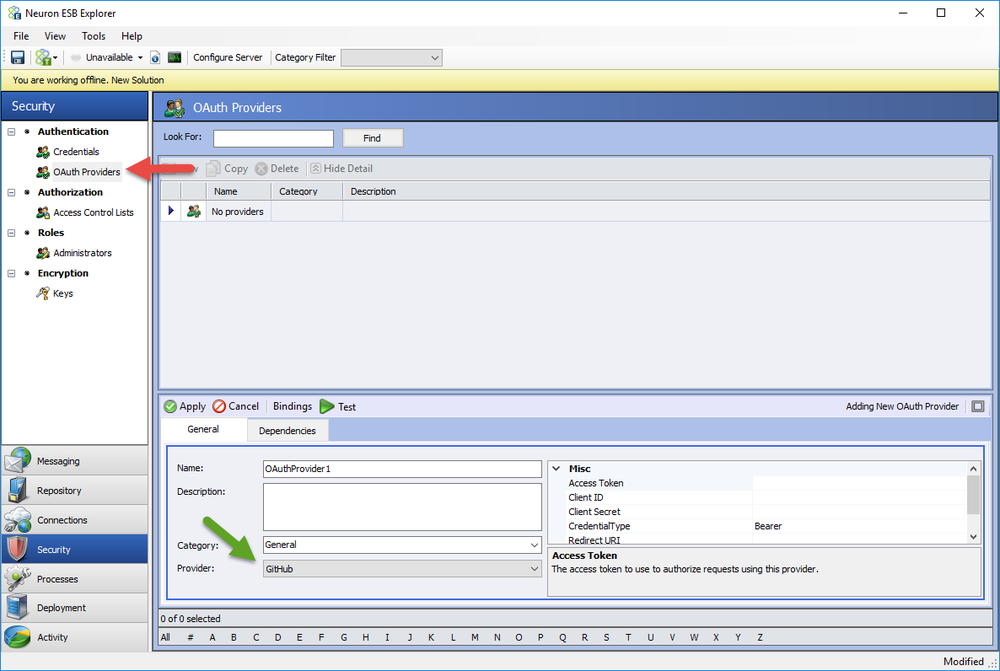
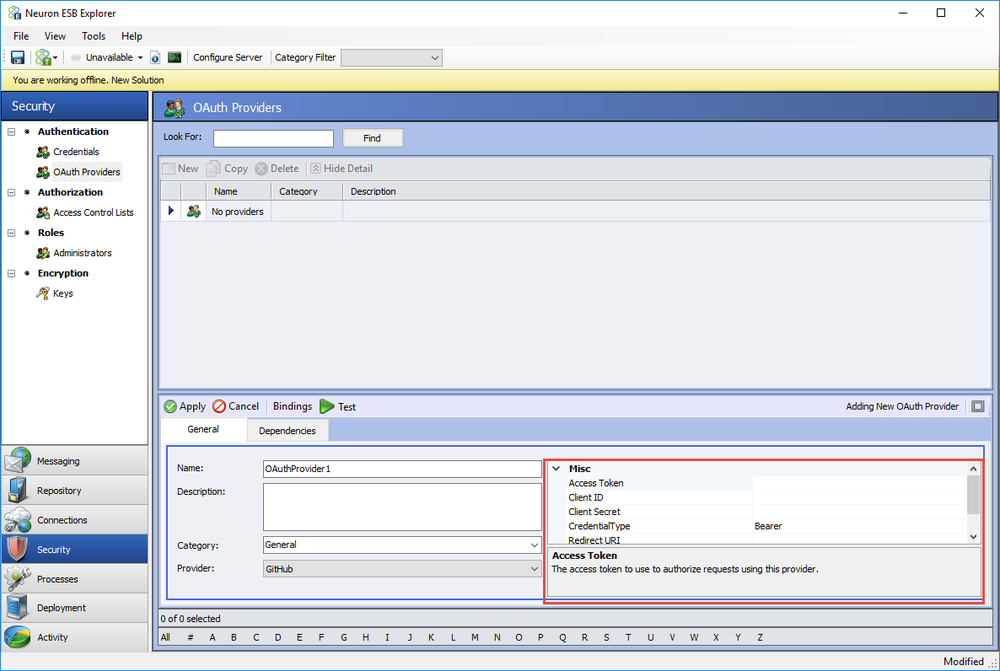
To begin, navigate to the Security tab in Neuron ESB Explorer and select the OAuth Providers node in the tree. Create a new OAuth provider and enter in a name. At the bottom of the details view is a list of providers. Select the authorization service provider that you want to use to obtain an access token for your application to use.
You will next need to register your application with the authorization service. For example, to use Facebook to obtain an access token to authorize access to remote web services, you will need to create an application at the Facebook Developer website.

After creating your application, you will be able to access the client identifier and client secret. These values are used to identify your application to the authorization service and to authenticate the access tokens and codes from the authorization service. When you have these values, you should register them in the OAuth providers properties in Neuron Explorer:
You will typically also need to register a callback URI with the authorization service when you register your application. The callback URI is used as part of the OAuth 2.0 protocol to redirect the user back to your application after signing into the authorization service. You can use any URL. During the OAuth authentication process, Neuron ESB’s OAuth providers will use the URI to determine when the authorization process has completed successfully in order to obtain the access token from the authorization service for the OAuth provider.
After your OAuth provider is configured, you can test the provider within Neuron ESB Explorer using the web-based flows. By clicking on the Test button in the toolbar for the detail view, a web browser will be opened and you will be able to validate that the client identifier, secret value, and redirect URI are correct by authenticating with the authorization service and obtaining an access token.
Using an OAuth Provider in a Service Connector
Once an OAuth provider has been configured, it can be used by a RESTful service connector to invoke web services from a remote web service. All that is necessary is to associate your OAuth provider with the service connector using a new drop-down list that has been added to the service connector detail tab:
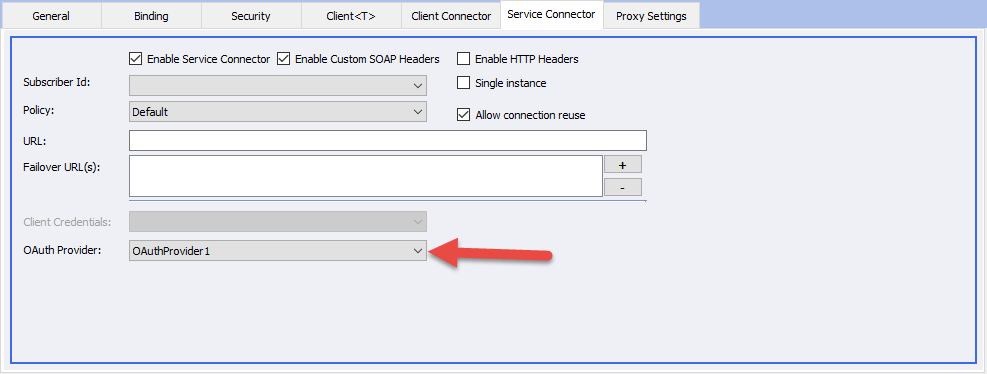
Once the service connector has been configured with an OAuth provider, the service connector will use the OAuth providers access token to invoke the remote web service. The access token will be passed to the remote web service as a bearer token using RFC 6750.
Flat File Parser
In Neuron ESB CU4 there is a flat file parser that can be used to convert single record format flat files into XML. The supported flat files must have the following attributes:
- Fixed-width or delimited. The following delimiters are supported:
- Comma
- Tab
- Vertical Bar (otherwise known as Pipe-Delimited)
- Semicolon
- Custom string (any combination of characters)
- All records in the flat file must conform to the same definition. The only exception to this are leading records and trailing records which can be ignored.
Using the Flat File Parser
Process Definition
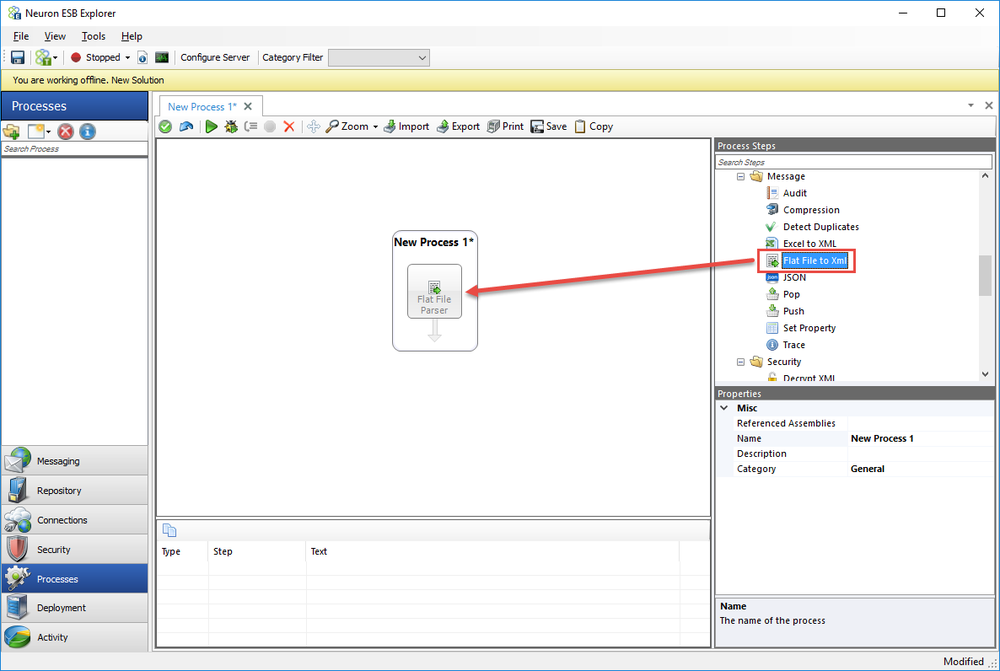
The flat file parser is included as a Business Process step in Neuron ESB Explorer. To use the flat file parser, create a new Business Process (or use an existing one) and drag the Flat File Process step from the Process Steps toolbox onto the Business Process Designer:
Creating a Flat File Definition
The flat file parser includes a wizard that will assist users in creating the flat file definition. The flat file definition cannot be created without using the wizard. The Flat File Wizard requires a sample flat file in order to create the definition. This sample flat file can either be imported into the new Neuron ESB Text Repository located by navigating to Repository->Documents->Text Documents within the Neuron ESB Explorer or, it can be retrieved directly from the file system.
- To start the wizard, right-click on the Flat File Parser step in the process designer and select Flat File Wizard
- On the Welcome page, click Next:
- On the File Type page, select the type of file to process Fixed Width or Delimited. If Delimited is selected, the appropriate delimiter must also be supplied. If something other than the provided options are needed, select Custom String and enter the character(s) to be used as a delimiter. Click Next:If Fixed Width is selected, continue with step 4. If Delimited is selected, skip to step 8.
- On the Fixed-Width Flat File page, either select a sample flat file from the repository or the file system. To select a sample from the repository, select the Repository radio button and select from one of the files listed. To select a file from the repository it must be imported before running the wizard. To select a sample from the file system, select the File System radio button and click the ellipsis button to browse for a file from the file system. Some flat files include column header names in the first line. If your flat file includes column headers, check the box for First Row Contains Column Names. Also, if you want the Flat File Parser to ignore any of the leading or trailing rows, indicate how many of each row to ignore:
- Once you have selected a fixed-width document the preview pane will display the first 10 rows:
- When parsing a fixed-width file you need to set the column breaks. To set a column break, click anywhere in the preview pane and a vertical line will appear. Click the line again and it will disappear. Note you don’t have to click on the ruler above the preview pane, just click inside the preview pane:
- After selecting all the column breaks, click Next. Skip to step 10.
- If you selected Delimited in step 3, the Comma-Delimited Flat File page will appear. On this page, either select a sample flat file from the repository or the file system. To select a sample from the repository, select the Repository radio button and select from one of the files listed. To select a file from the repository it must be imported before running the wizard. To select a sample from the file system, select the File System radio button and click the ellipsis button to browse for a file from the file system. Some flat files include column header names in the first line. If your flat file includes column headers, check the box for First Row Contains Column Names. Also, if you want the Flat File Parser to ignore any of the leading or trailing rows, indicate how many of each row to ignore:
- Unlike the preview pane for fixed-width files you do not need to set column breaks. This file includes headers in the first row. Click Next:
- When you check the First Row Contains Column Names checkbox, the column names are automatically populated. However, you can still change these names on the Column Details page. After confirming the column details, click Finish to close the wizard.
After finishing the wizard, the flat file definition is stored as a process property. You can re-run the wizard and see the same values you selected the previous time you ran it.
To test the Flat File Parser, use the Process Tester and use the same sample data you used when running the Wizard.
Swagger Support for REST APIs
Swagger is a simple yet powerful representation of any RESTful API. With one of the largest ecosystems of API tooling, thousands of developers are supporting Swagger in almost every modern programming language and deployment environment. With a Swagger-enabled API, organizations get interactive documentation, client SDK generation and discoverability.
Its natural that the Neuron ESB Client Connector (i.e. SOAP/REST API services hosted by Neuron ESB) should also create Swagger-enabled APIs. Starting with Neuron ESB 3.5 CU4 the Client Connector does exactly that.
Creating Swagger Documentation
The CU4 release includes a new section in the Neuron ESB Explorer Repository called Swagger Documents (see figure 1). This is where Swagger API documentation can be stored and managed. Users can create a new Swagger document in the Repository by either copying or entering the content of an existing Swagger document or by importing an existing Swagger document from any External URI.
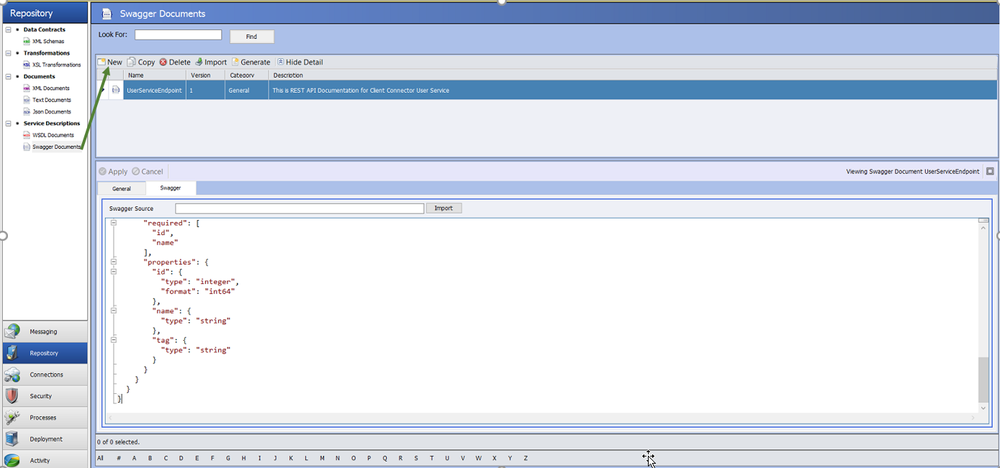
Once a Swagger document is stored in the Repository, the document will automatically be hosted by Neuron ESB at http://localhost:51003/docs/<newlycreatedswaggerdoc>. All Neuron ESB managed Swagger Repository documents are hosted on Port 51003. However, the port can be changed by editing the value of the SwaggerSelfHostingUrl key in the appSettings section of the discoveryservice.exe.config configuration file located in the C:\Program Files (x86)\Neudesic\Neuron ESB v3 folder.
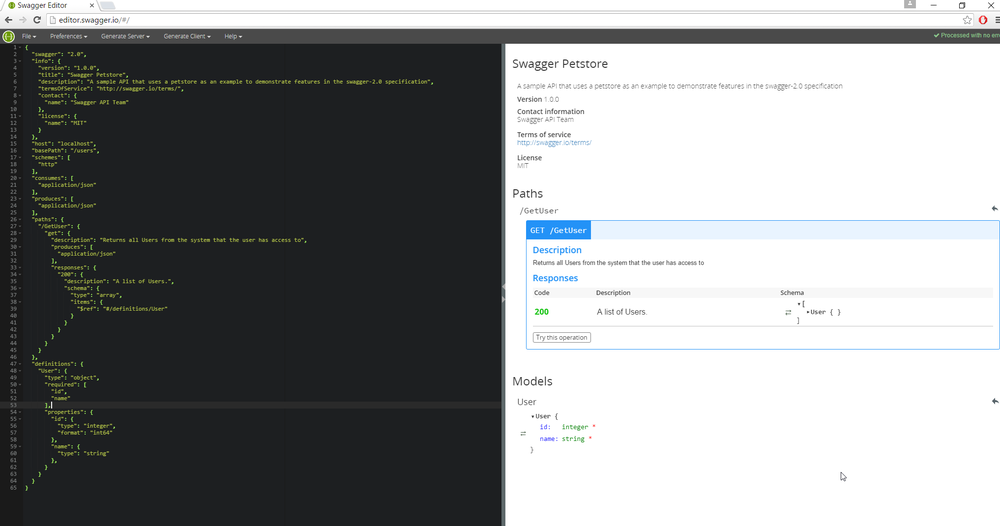
To create Swagger documents from scratch, the Swagger Editor (http://editor.swagger.io ), an online tool, can be used as shown in Figure 2 below.
Using Swagger Documents
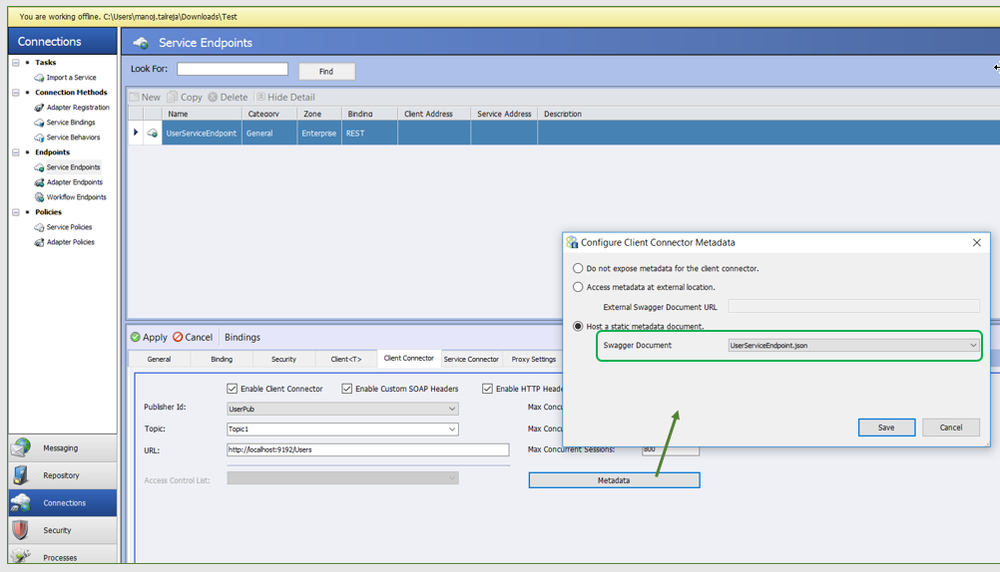
- In order to assign a Swagger document to the Neuron ESB Client Connector, navigate to the Client Connector Tab then select the Metadata Button, which will present you a Configure Client Connector Metadata dialog box. Here either an external Swagger document URI can be provided or a static Swagger document located in the Swagger Documents section of the Neuron Explorer ESB Repository can be chosen as shown in Figure 3.
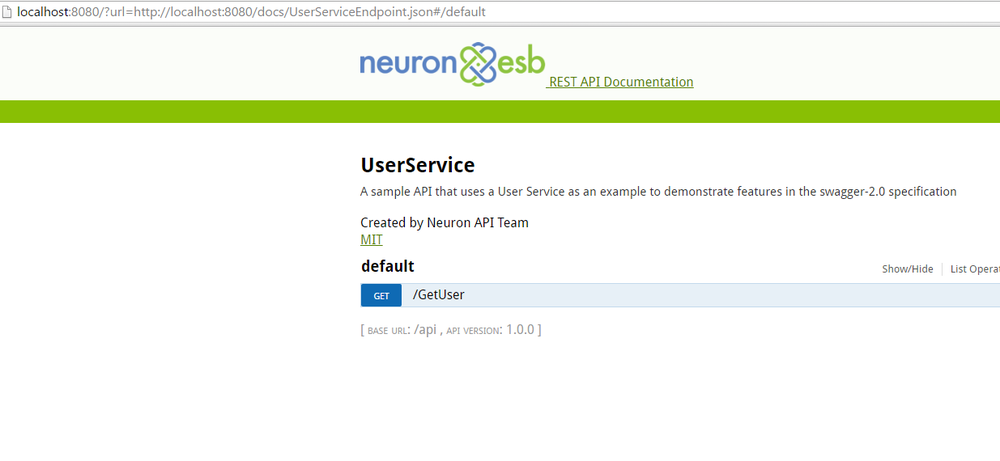
- Once a Swagger document is selected from the dropdown selection, or an external Document URI is provided, the Client connector will have Swagger documentation associated with its endpoint. Pointing a web browser to the Client Connector URL along with /help will expose the Swagger documentation.For example, if the Neuron ESB Client Connector URL was http://localhost:9192/Users, then the http://localhost:9192/Users/Help URL will redirect users to the Swagger documentation (see Figure 4).
Implementing and Testing
Once a Swagger document (like the one created and shown above) is assigned to the Neuron ESB Client Connector, the implementation for the call either has to already exist or be created. The following example demonstrates how we can create a simple implementation that can be tested by users browsing to the Client Connectors Swagger document.
Using the Neuron ESB Business Process Designer a simple Process can be created that contains the implementation of the GetUser API call as shown in the Figure 5 below. The Business Process is then attached to the OnPublish event of the Neuron ESB Publisher assigned to the Client Connector.
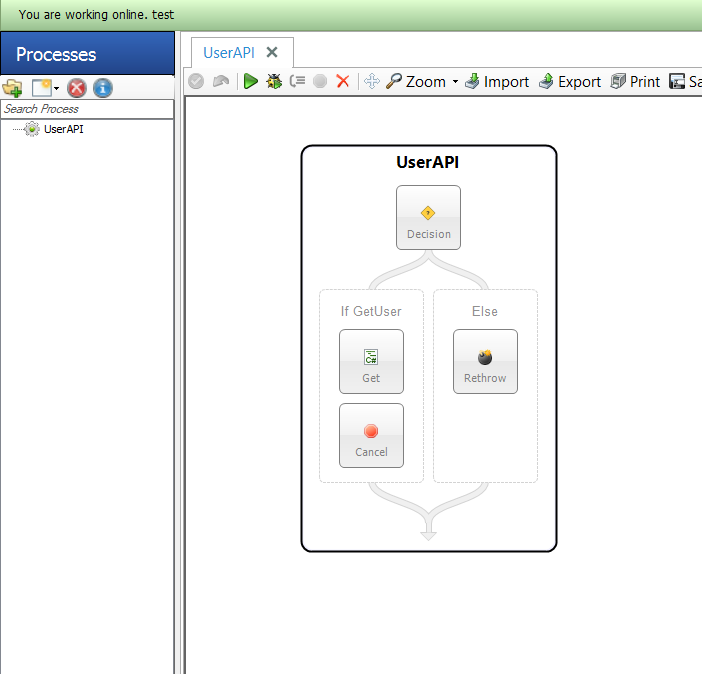
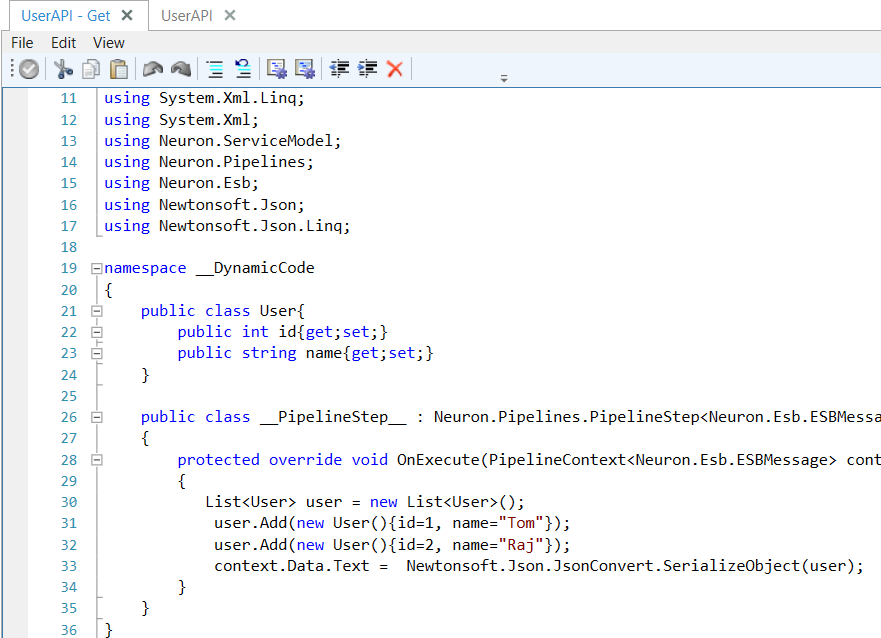
The actual implementation for GetUser is simple and encapsulated within the Get C# Process Step shown in Figure 5. The Get Process Step expands into the Neuron ESB C# Code Editor as shown in Figure 6. The Code Editor contains C# code to mock users in a list, convert the list to a JSON object, setting the Neuron ESB Message body.
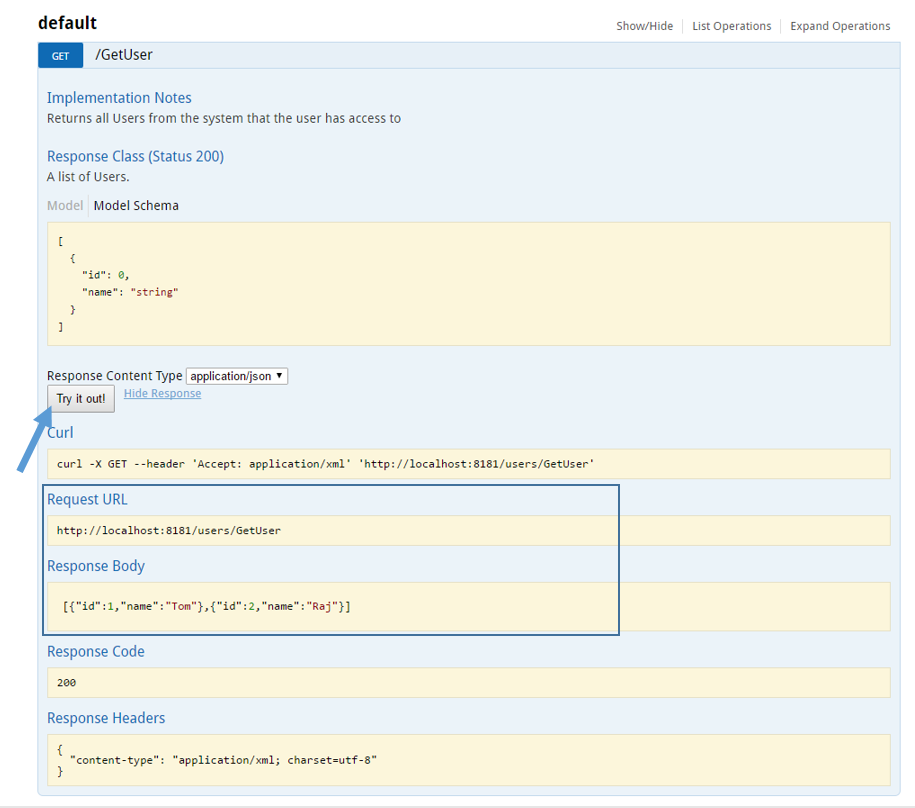
Once implemented, this Neuron ESB Client Connector API can be tested directly from the Swagger document as can be seen below in Figure 7. Clicking the Try it out! button will execute the GetUser API call, returning the Response message.
HTTP Utility, JSON and Swagger
Neuron ESB includes a Service Broker that enables organizations to deploy Neuron ESB as a Service Gateway, providing mediation, security, hosting and a number of other services. Service Connectors are essentially registrations within Neuron ESB that point to existing services hosted within an organization, by a partner or in a cloud domain. These services, which can be either SOAP or REST (HTTP) based, can be called either through the Neuron ESB messaging system via a Topic subscription or by using a Service Endpoint Workflow Activity and Process Step. The latter two options can be used with either the Neuron ESB Workflow Designer or the existing Business Process Designer and allows a user to directly call any Service Connector without the need to publish a request to a Topic, eliminating all pub/sub overhead. These are commonly used to create service aggregation and composition solutions.
For calling REST (HTTP) based Service Connectors (endpoints), its not uncommon that various pieces of information need to be provided at runtime according to the REST specification. For example, the Method name (e.g. GET, POST, PUT, PATCH, etc.) must be provided. HTTP Headers usually need to be provided (e.g. Content Type, Authorization, Accept, etc.) as well as Query string or URL parameters.
In previous versions of Neuron ESB, this information could be provided by using a C# Code Editor within either the Business Process Designer or Workflow Designer directly preceding the Service Endpoint activity as depicted below:
Opening the C# Code Editor allowed developers to provide the information they needed to initialize the service call at runtime by primarily using the HTTP object of the Neuron ESB Message as shown below.
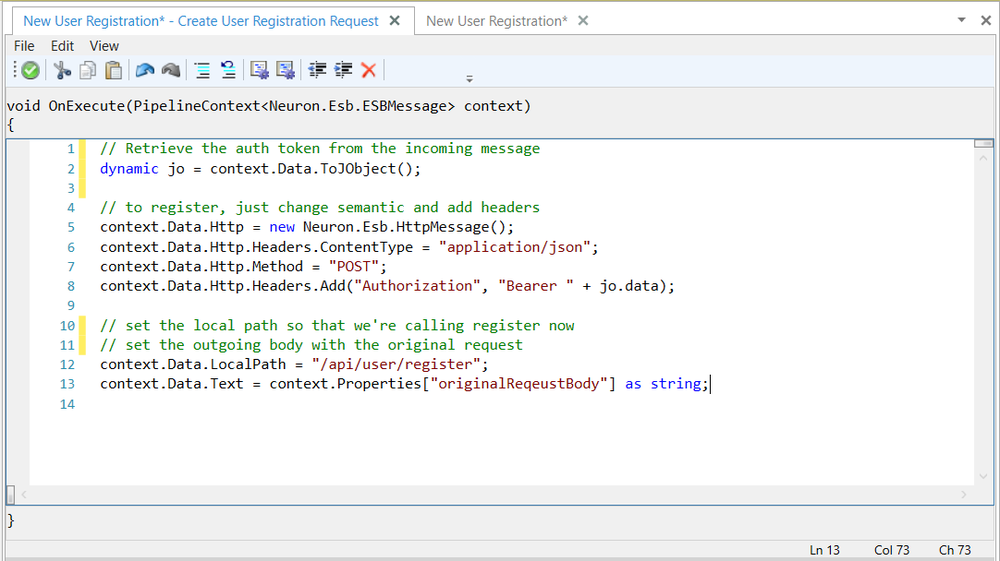
The information used to initialize these HTTP elements could come from the existing Neuron ESB Message, Neuron ESB Message or context properties or even Neuron ESB Environmental Variables that may have different values at runtime depending on the runtime environment they are deployed to. The example below shows how Query string parameters could be set in a Code Editor in the Workflow Designer.

HTTP (REST) Endpoint Configuration
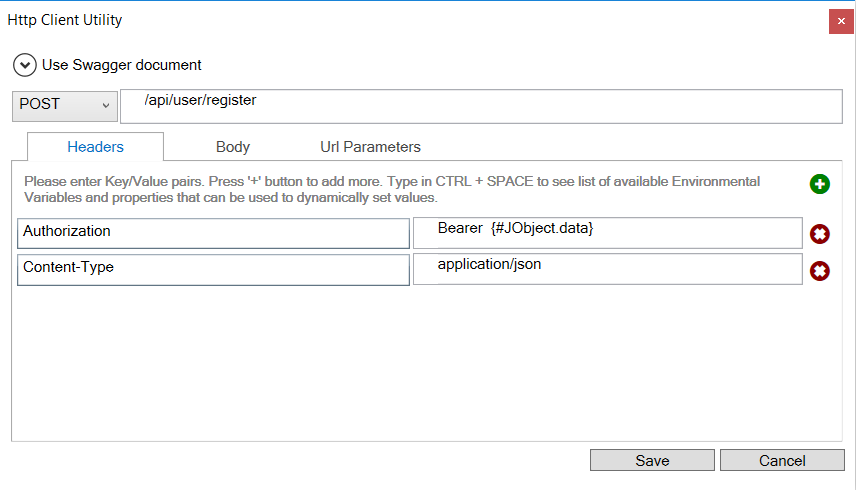
Rather than requiring that developers use C# to set HTTP properties, CU4 introduces a new tool, the HTTP Utility. This utility can be used within the Business Process or Workflow Designer to do more advanced levels of HTTP configuration. The HTTP Utility is exposed as both a Process Step and Workflow Activity that can be dragged onto either designer. Users can select Configure from the context menu to display the main configuration screen of the HTTP Utility as shown below:
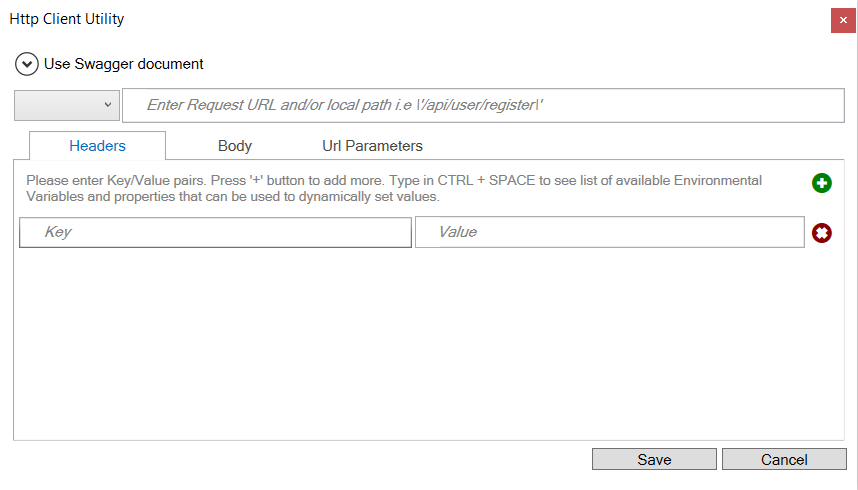
For users familiar with tools like Postman and the REST client of Chrome, the HTTP Utility will look very similar and they will find it just as easy to configure. The HTTP Utility has built in intelligence and allows users to use Neuron ESB Environmental Variables, Neuron ESB Message properties, Context properties and literal values to configure any Value, Message body or URL as shown below:
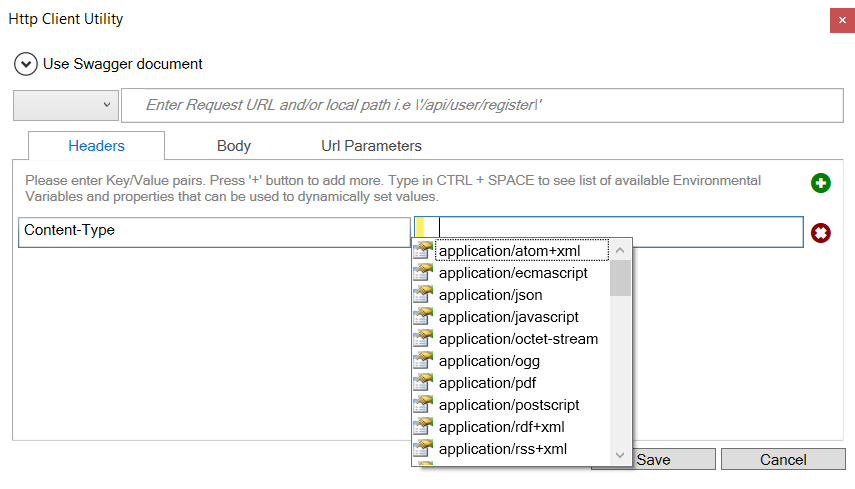
Valid HTTP Header options and methods are displayed as drop down boxes, while possible values for the selected HTTP Header key also appear as context sensitive drop downs.
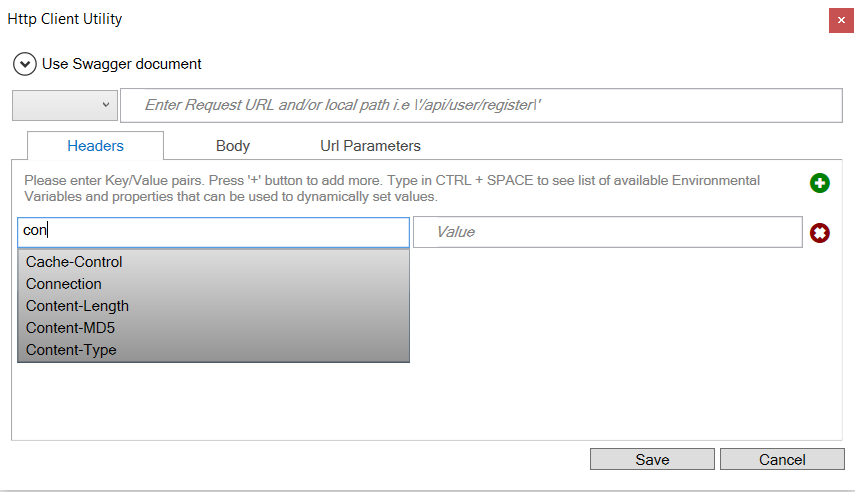
Alternatively, Neuron ESB Environmental Variables, properties (context, message, etc.), message body and literals can be used by selecting from the available list. Environmental variables are preceded by the $, whereas all others are preceded by # as shown below.
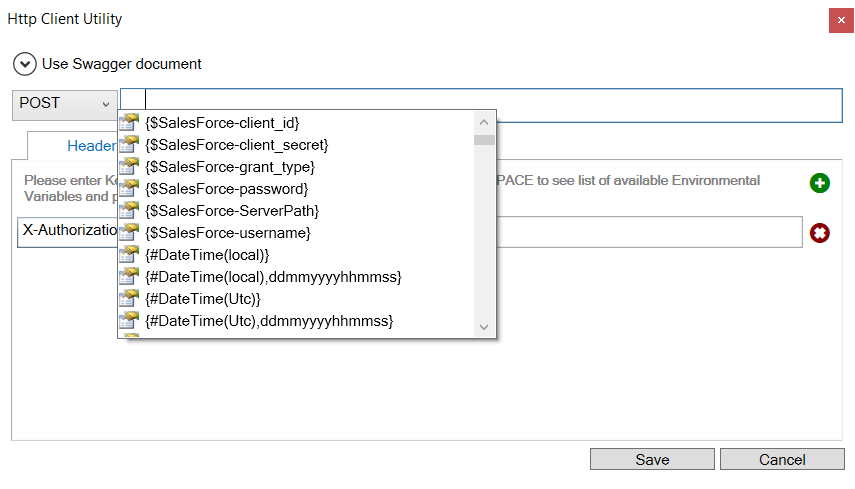
The literal values that appear in the list (i.e. by pressing CTRL + SPACE) that can be used are:
- {#DateTime(local)} – Adds the local date time value with following format: “yyyyMMddHHmmss”
- {#DateTime(local), ddmmyyyyhhmmss } – Adds the local date time value using the provided format specifier
- {#DateTime(Utc)} – Adds the UTC date time value with following format: “yyyyMMddHHmmss”
- {#DateTime(Utc),ddmmyyyyhhmmss} – Adds the UTC date time value using the provided format specifier
- {#IMF-fixdate} Adds the RFC 7231 Date/Time Format e.g. ‘Tue, 15 Nov 1994 08:12:31 GMT'”
- {#GUID} Adds a unique GUID string value (e.g. 00000000-0000-0000-0000-000000000000)
Values that can be used to access either some part of the body or a custom message property of the ESB Message are:
- {#<custom>.<property>} Returns custom message property i.e. context.data.GetProperty(myPrefix, MyProperty)
- {#JObject.<property>} Returns the property from the JSON dynamic object property from the current Neuron ESB Message.
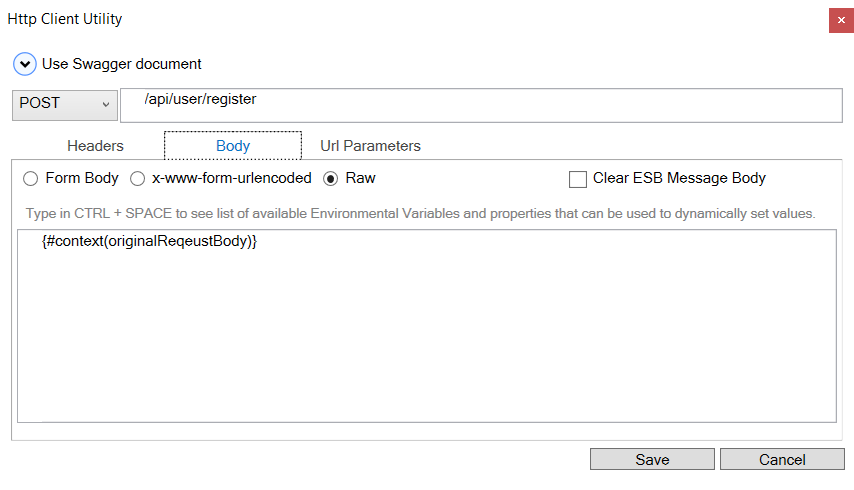
Besides the Method drop down box and the URL text box, the HTTP Utility has 3 primary tabs: Headers, Body and URL Parameters. The Headers tab allows users to specify any HTTP or custom key/value pairs that will appear as HTTP Headers in the final REST service call. A good example of an HTTP Header could be either the Content Type or Authorization header. The Body tab allows users to specify how the body should be encoded and sent to the service as shown below:
Using the settings, Neuron ESB will ensure the proper HTTP Content Type and data are appropriately set and encoded if necessary. Users have additional options like clearing out the underlying Neuron ESB Message body if either Form Body or Form Url Encoded options are chosen.
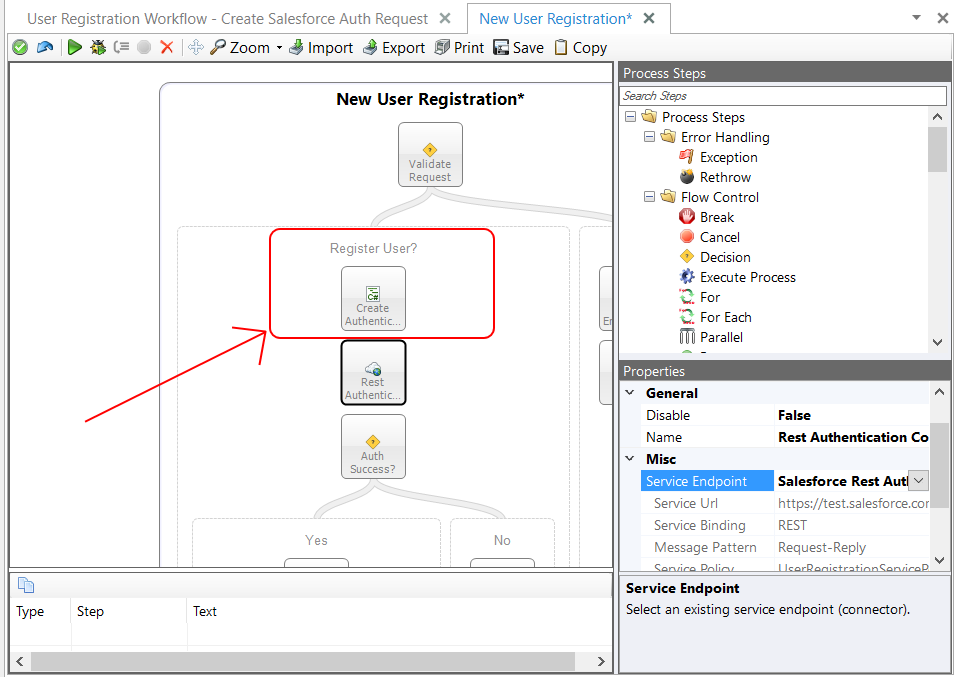
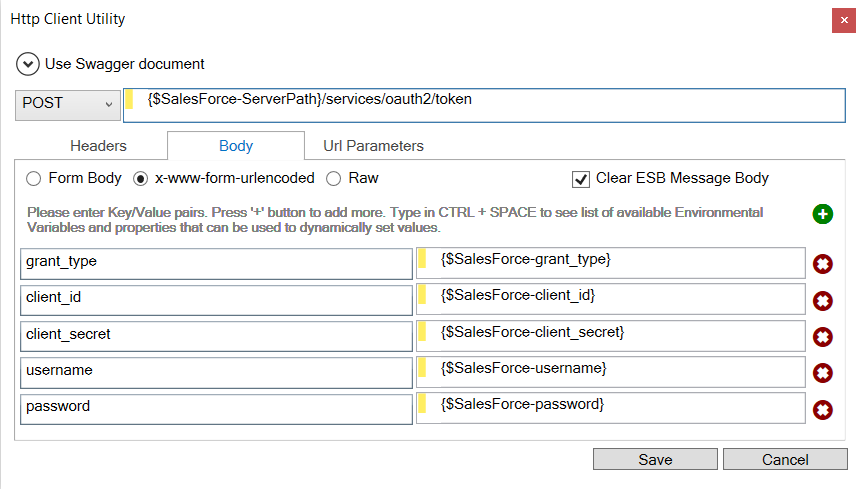
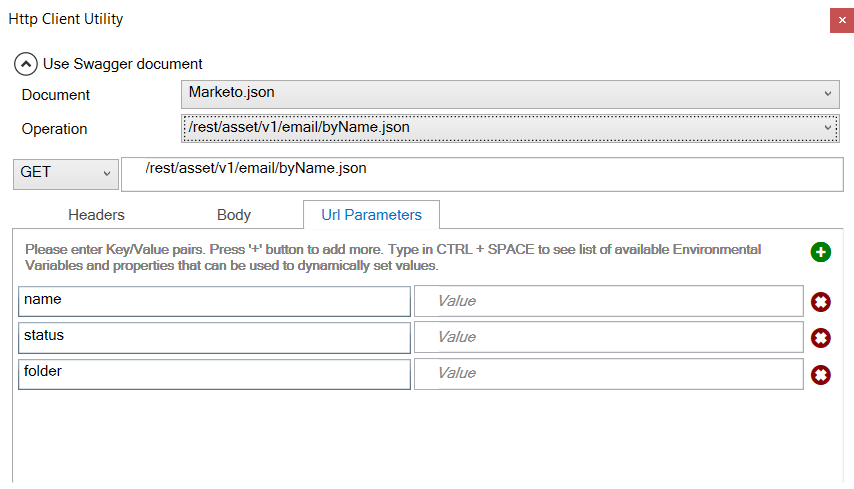
The URL Parameters tab allows users to enter key/value pairs that will be serialized as URL parameters for the service call. The HTTP Utility removes the need for developers to use C# to set the required HTTP properties for any service call. In the example below, a Salesforce authentication call is made where all the values are using Neuron ESB Environmental Variables, allowing the values to be specific to the actual runtime environment the solution is deployed to:
Swagger Integration
Over the years, Swagger has become a common documentation format for REST (HTTP) based services. As such, the CU4 release introduces a number of new JSON/Swagger features, one of which is the ability to configure the HTTP Utility using Swagger.
For example, CU4 ships a Marketo adapter which is accompanied by its respective Swagger documentation. The Marketo Swagger documentation, as well as any Swagger document registered within the new Neuron ESB Swagger Repository, can be accessed directly within the Use Swagger document section of the HTTP Utility.
Swagger documents can be imported in the Neuron ESB Swagger Repository by navigating to Repository->Service Descriptions->Swagger Documents within the Neuron Explorer.
By expanding the Use Swagger document section, the Document and Operations dropdown fields will be visible and populated using existing Swagger documents in the Repository. These can be selected to auto configure the HTTP Utility. If a Swagger document doesn’t exist, one can be imported directly within the UI by selecting the Import Swagger option from the Document dropdown and providing the URL of the Swagger document.
JSON Templates and Data Mapping
JSON has become more prominently used by developers and integrators as organizations move to using more REST (HTTP) based services. CU4 provides new repositories and access methods that make using JSON much easier than in previous releases of Neuron ESB.
In CU4, the ToJObject() has been added to the Neuron ESB Message object. This will return the Neuron ESB Message body as a Newtonsoft.Json.Linq.JObject. This is accessible within either a Workflow or Business Process. It allows users to use .NETs dynamic object keyword to access data correctly using a hierarchical syntax. For example, a sample json document like the following:
{
  "message": "Success. Lead Created",
  "data": {
    "SalesOwnerAccountUserId": "118527",
    "AccountUserId": "89027"
  }
}
Could then be accessed directly in a Code Editor using C# as shown below:
dynamic jo = context.Data.ToJObject();
var ownerID = jo.data.SalesOwnerAccountUserId;
This makes it much easier for developers to access and modify JSON data within a Business Process or Workflow.
To complement this, a new JSON Repository for storing JSON documents and templates has been introduced which can be located by navigating to Repository->Documents->Json Documents within the Neuron ESB Explorer. Sample JSON documents or templates can be stored and accessed at runtime within any of the Business Process or Workflow environments. Integrators can use JSON templates as a quick, simple way to facilitate data mapping/transformations. Json templates are nothing more than Json messages that have format specifiers inserted for their values. For example, if the following template was stored in the repository and named, AccountUpdateRequest:
{
  "salesRepAccountUserID":{0},
  "auditAccountUserID":{1}
}
It could then be retrieved in any Business Process or Workflow by using the JsonFormatString property of the repository document:
var accountUpdateTemplate = configuration.JsonDocs["AccountUpdateRequest"].JsonFormatString;
Once the template is retrieved, data mapping can be as easy as this:
Context.Data.Text = string.Format(accountUpdateTemplate,
        (string)jo.data.SalesOwnerAccountUserId??string.Empty,
        (string)jo.data.accountUserID??string.Empty);
Port Sharing
One of Neuron ESB’s scalability features is the ability to install multiple instances of the Neuron ESB Runtime on a single server. Each runtime instance can be configured as either a 32 or 64-bit process, capable of running side by side. Each instance of the runtime can load an independent Neuron ESB Configuration store (solution). This allows organizations to easily partition business solutions to run on a single server and scale across multiple servers.
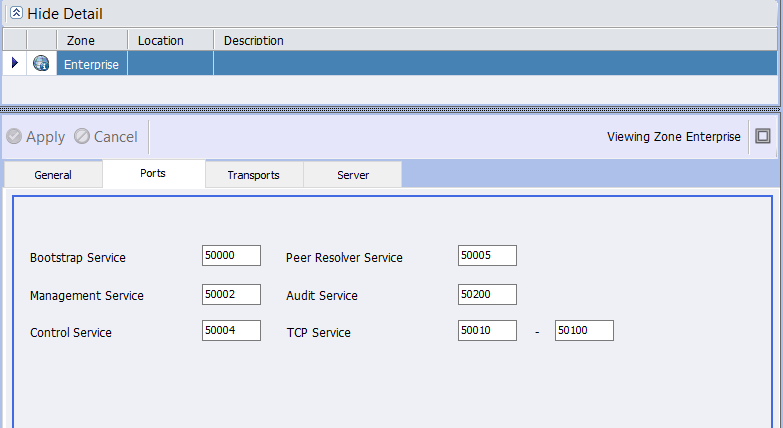
However, one of the configuration challenges has always been TCP port configuration at the solution level. Neuron ESB uses TCP ports to communicate between its internal subsystems e.g. Auditing, Control, Configuration, Master and TCP Publishing Services. Remote Neuron ESB Parties also use TCP to connect to the Neuron ESB Server; to retrieve their respective configuration, receive updates and to regularly send reporting information. The TCP Port configuration for a solution can be found on the Ports tab of the Enterprise Zone by navigating to Deployment->Settings->Zones within the Neuron Explorer.
Prior to CU4, if multiple instances were installed on a single server, users would need to ensure that the ports configured for each solution assigned to those instances were unique. For example, if the Bootstrap Service was configured in one solution (instance A) to run on port 50000, then the other solution (instance B) would need to be configured to use a different port. If they weren’t, then one of the solutions would fail to start, reporting a Port in use exception.
The unique port requirement made it more challenging, operationally, to manage the solutions as more runtime instances were installed on a single server. To resolve the need to change and manage port conflicts between solutions we are introducing Port Sharing in the 3.5 CU4 release. Port Sharing can significantly reduce the operational and management overhead when installing and running multiple instances of the Neuron ESB Runtime on the same machine.
Port Sharing is easily enabled by doing 2 things
- Enable and then set for automatic startup the Net.TCP Port Sharing Service in the service control manager. Start the service. For more information: https://msdn.microsoft.com/en-us/library/ms733925(v=vs.110).aspx
- Enable the new Port Sharing option located on the Port tab of the Enterprise Zone within the Neuron ESB Explorer as shown below:
Once the Port Sharing option is enabled, the solution must be saved and the runtime instance assigned to it restarted.
Organizations using the Neuron ESB Party API directly in their .NET applications will be required to append the name of the runtime instance to the service address url. For example, previously the service address would look similar to following if the runtime instance name was default64:
<configuration>
  <appSettings>
    <add key="esbZone" value="Enterprise"/>
    <add key="esbServiceAddress" value="net.tcp://localhost:50000"/>
    <add key="esbServiceIdentity" value=""/>
  </appSettings>
If Port Sharing is enabled, the service address would now look like this:
<configuration>
  <appSettings>
    <add key="esbZone" value="Enterprise"/>
    <add key="esbServiceAddress" value="net.tcp://localhost:50000/default64"/>
    <add key="esbServiceIdentity" value=""/>
  </appSettings>
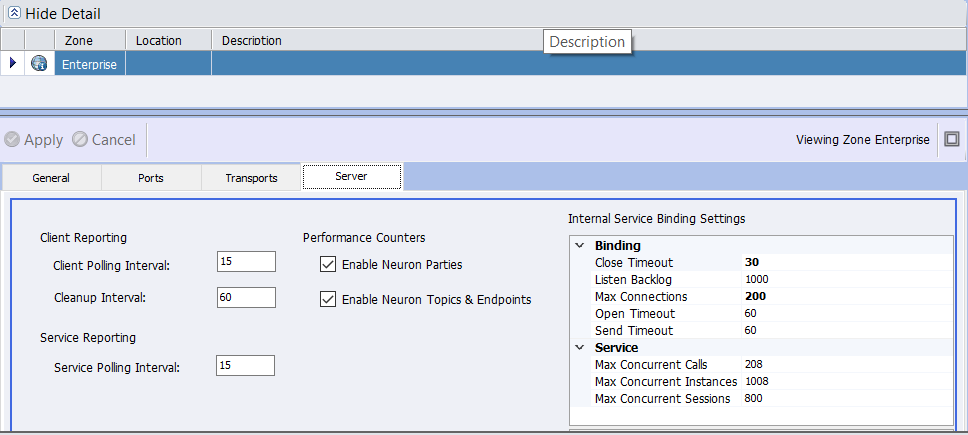
Lastly, the other implication to consider is performance tuning. When Port Sharing is disabled, performance tuning for the Neuron ESB internal subsystems is controlled by modifying the Internal Service Binding Settings located on the Server tab of the Enterprise Zone as shown below. These parameters are typically modified to reflect the number of CPUs/Cores balanced against the load being placed on the services.
However, when Port Sharing is enabled, the SMSvcHost.exe, (which hosts the Net.TCP Port Sharing Service) manages the TCP sockets on Neuron ESB’s behalf. This means that performance tuning will be controlled by the binding settings within the SMSvcHost.exe.config file. For more information regarding the configuration of tuning parameters and the creation of the config file: https://msdn.microsoft.com/en-us/library/aa702669(v=vs.110).aspx .
The new Port Sharing option will greatly simplify the creation, deployment and management of multiple Neuron ESB runtime instances and solutions on individual servers!
Rabbit MQ Topics
Neuron ESB provides a hierarchical, Topic-based publish and subscribe model to mediate the routing of messages between Parties (Publishers and Subscribers that are hostable in .NET applications), Adapter, Service and Workflow Endpoints. Topic based messaging can be a great way of abstracting endpoints from one another. In essence, all endpoints become publishers and subscribers with one never having to have knowledge of the other. This allows organizations to easily change and modify existing solutions without interrupting the processing of other endpoints.
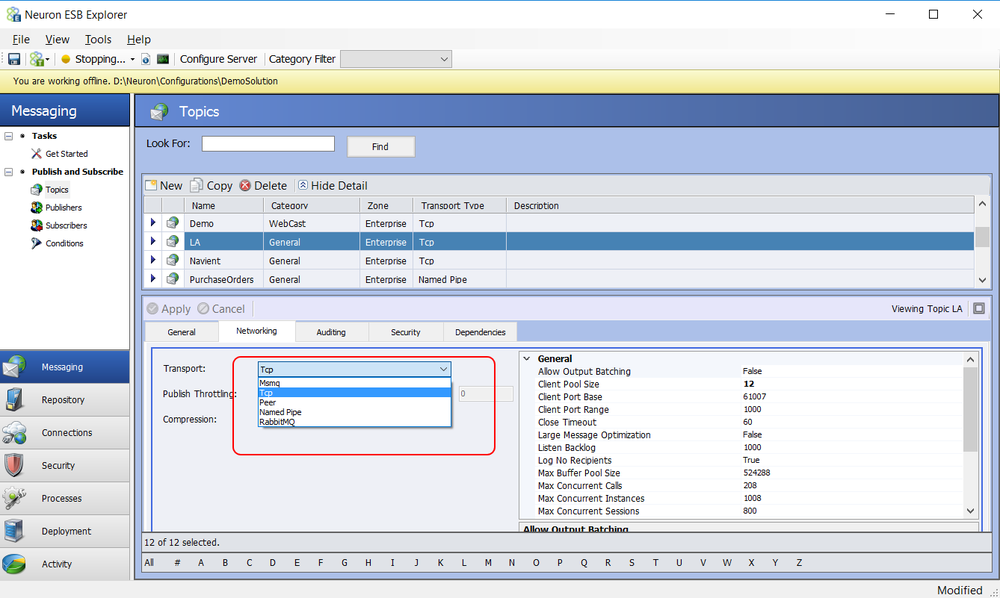
Neuron ESB is unique in that the Quality of Service and underlying Transport of Topics can be changed to better accommodate and more closely align with the business requirements of specific use cases. For example, durable, guaranteed, and reliable messaging as well as in-memory routing of messages, can be provided by simply changing the Transport property of a Neuron ESB Topic as show below:
When changes are made, the underlying Party API is self-aware of changes made at the server and auto configures itself to accommodate the Topic configuration changes, even when deployed and hosted on remote machines. This means that developers using the Party API do not need to know, nor do they directly have to work with or individually program the underlying transport configuration, transaction or QOS requirements. This is all controlled and managed at the server level. For the user who needs to publish messages, the code is as simple as this:
// Create an instance of a publisher
            using (Publisher publisher = new Publisher("MyPublisher"))
            {
                // catch any exceptions that may occur while connecting
                // to each individual topic
                PartyConnectExceptions exceptions = publisher.Connect();
                if (exceptions.Count < 1)
                {
                    publisher.Send("MyTopic", "<Test>My Request</Test>");
                }
                else
                {
                    // log the errors
                }
            }
Neuron ESB 3.5 provides a number of Transports that users can select for Topics including Named Pipes, TCP, Peer, Rabbit MQ and MSMQ. Some provide durable, guaranteed, and reliable messaging such as MSMQ and Rabbit MQ. In the CU4 release, the Rabbit MQ Transport for Topics has been completely refactored to provide not only better performance, new manageability and more flexibility, but also better fault tolerance, reliability and security.
Updated Version Support
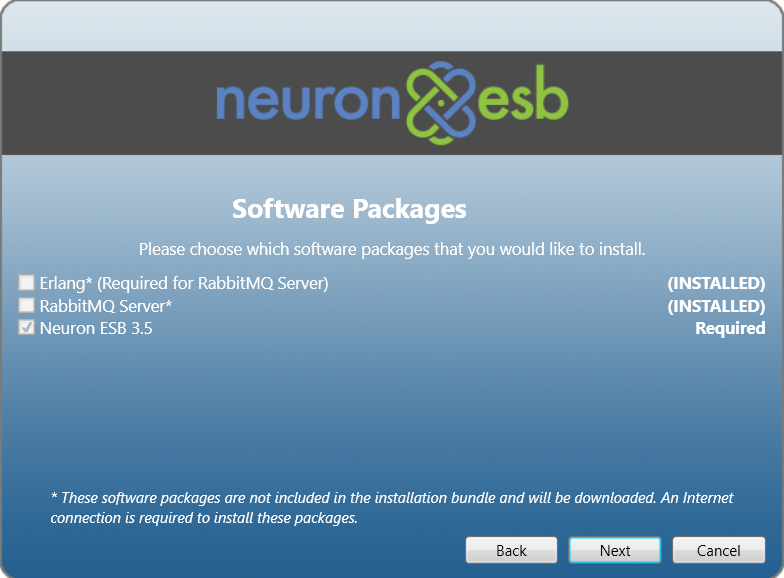
In the CU4 release, the first notable change is that our support for Rabbit MQ has been upgraded to support Rabbit MQ version 3.5.6 and Erlang 18.1. Using the Neuron ESB installer, users can optionally select to install these during the setup process, or can download these from the locations list in our readme.html file or directly from the Rabbit MQ web site.
Configuration
The Rabbit MQ configuration for a Deployment Group can be found on the RabbitMQ tab of a Deployment Group by navigating to Deployment->Environments->Deployment Groups within the Neuron Explorer.
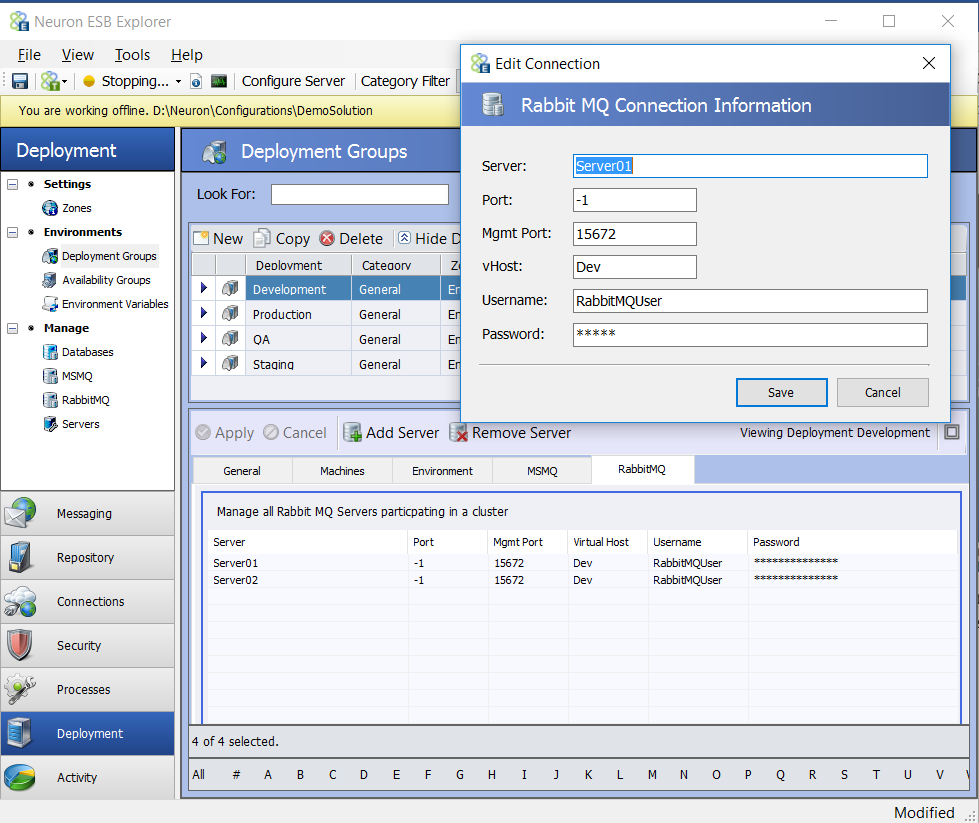
When registering Rabbit MQ servers for a Neuron ESB Deployment Group the following information is required:
| Property | Description |
| Server | Name of the Rabbit MQ Server |
| Port | Port of the Rabbit MQ Server. -1 will use the default Rabbit MQ port of 5672 |
| Mgmt Port | Port of the Rabbit MQ Management Portal. Default is 15672 |
| vHost | The configured vHost of the Rabbit MQ Server. Default value is / |
| Username | Username to access Rabbit MQ. |
| Password | Password to access Rabbit MQ |
Although some properties may seem fairly straight forward, others may not. For instance, the Mgmt Port represents the port of the Rabbit MQ Management Plugin. Neuron ESB requires this to be installed and configured for every Rabbit MQ server registered as it uses it to query for the health and message throughput rates which appear in both Endpoint Health and the Rabbit MQ Message Management console in the Neuron ESB Explorer. More information regarding the Rabbit MQ Management Plugin and how to install it can be found here: https://www.rabbitmq.com/management.html
As of Rabbit MQ version 3.3.3, the default username Guest cannot be used against the Rabbit MQ management plugin if the server name is anything other than Localhost. It is always recommended to create a dedicated username and password in Rabbit MQ that can be used by Neuron ESB.
High Availability and Failover
Neuron ESB allows users to enter multiple instances of Rabbit MQ servers to support the mirroring of the underlying queues that Neuron ESB will use for the Publishers and Subscribers created within the Neuron ESB Explorer. Rabbit MQ uses mirroring, rather than Windows Failover Clustering, to achieve High Availability of messages. More information regarding Rabbit MQ HA and its configuration can be found here: https://www.rabbitmq.com/ha.html
When multiple servers are configured, at runtime Neuron will use the first server it can connect to as the primary message server. If for any reason that server becomes unavailable, Neuron ESB will automatically failover over the next server in the list until it can find one that it can establish a connection against. If a connection can be established, publish and subscribe activities remain undisrupted at runtime; messages will not be lost and the failover will be invisible to the processes and users of Neuron ESB. Internally we detect connection issues and then cache and resend the messages when we fail to receive the original acks/nacks from the Rabbit MQ servers.
Multiple Environments and VHosts
New to CU4 is the inclusion of the vHost property. A common practice by some Rabbit MQ users is to establish specific vHosts to mirror their deployment environments. For example, there may be a vHost named Development, QA and Production. By supporting Rabbit MQ vHost environments, Neuron ESB users can easily map Neuron ESB deployment groups to their respective vHost environments. This will functionally isolate the underlying queues and exchanges that Neuron ESB creates for one deployment group from another on the same Rabbit MQ server instance.
Once the Rabbit MQ servers are registered with a Deployment Group, Topics and Parties can be configured to use the Rabbit MQ Transport.
Neuron ESB Topic Configuration
The Rabbit MQ Transport configuration is located on the Networking tab of the Topic by navigating to Messaging->Publish and Subscribe->Topics within the Neuron Explorer.
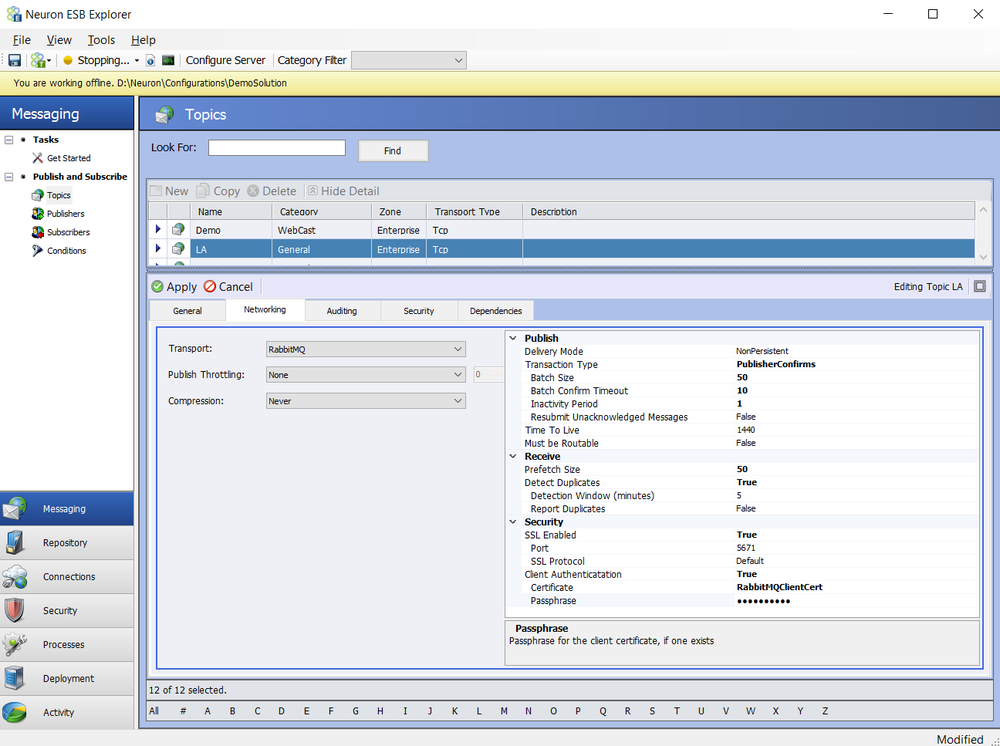
In the CU4 release a number of new properties have been added, some changed (*), others removed
| Property | Category | CU4 | Description |
| Delivery Mode | Publish | * | Persistent (i.e. Durable) or NonPersistent. Persistence ensures message is written to disk. If using Transactions, Persistence SHOULD be used. |
| Transaction Type | Publish | * | Controls the level of reliability for messages. Either ‘None’, ‘PublisherConfirms’ or ‘Transactional’ can be selected. ‘PublisherConfirms’ uses an asynchronous Ack/Nack protocol while ‘Transactional’ forces a commit/rollback on each message published. |
| -Batch Size | Publish | Only for use with PublishConfirms type of transactions. The number of messages that will be published to Rabbit MQ in a Publish Confirm transaction | |
| -Batch Confirm Timeout | Publish | NEW | Only for use with PublishConfirms type of transactions. The number of seconds to wait after the Batch of messages have been published to receive all ACKs/NACKs from Rabbit MQ. Should be a value between 1 and 60. |
| -Inactivity Timeout | Publish | NEW | Only for use with PublishConfirms type of transactions. The number of minutes to wait after the last message sent before checking to determine if all ACKs/NACKs from Rabbit MQ have been received. Should be a value between 1 and 5. |
| -Resubmit UnAckd Messages | Publish | Only for use with PublishConfirms type of transactions. If true and ‘Detect Duplicates’ are selected, messages that were published but were not acknowledged will be republished. This should only occur when dealing with clustered/mirrored Rabbit MQ instances. The republish would occur when a connection is reestablished with another server in the cluster. | |
| Time To Live | Publish | A value in minutes that specifies how long messages are valid for delivery before they are expired (dead letter) and transferred as a failed message into the Neuron ESB database. | |
| Must be Routable | Publish | NEW | If set to true, the message must be routable by Rabbit MQ. If the message cannot be routed to a destination queue, it will be stored as a failed message into the Neuron ESB database. **This will incur a significant performance penalty. This should NEVER be needed as Neuron ESB will dynamically create any missing queue or exchange on startup. |
| Prefetch Size | Receive | NEW | The number of messages that will be prefetched from the queue to transport layer. A value of 0 means unlimited. |
| -Detect Duplicates | Receive | Only for use with PublishConfirms type of transactions. If true, duplicate messages received by the Neuron ESB Party will be discarded. This can be used to provide once only delivery. | |
| -Detection Window | Receive | Only for use with PublishConfirms type of transactions. The amount of time (in minutes) in which previously received message meta data will be maintained in memory to search against for duplicate messages. | |
| -Report Duplicates | Receive | Only for use with PublishConfirms type of transactions. If true, if a duplicate message is discovered it will be logged as a Warning in the Neuron ESB Windows Event log. | |
| SSL Enabled | Security | NEW | Connect to Rabbit MQ Server using only SSL |
| -Port | Security | NEW | SSL Port for all Rabbit MQ server connections |
| -SSL Protocol | Security | NEW | SSL Protocol to use for all Rabbit MQ server connections. |
| -Client Authentication | Security | NEW | Require Neuron ESB to provide Rabbit MQ Server a client certificate to authenticate against. |
| -Certificate | Security | NEW | Select a client certificate configured in the Security section of the Neuron ESB Explorer to authenticate against the Rabbit MQ Server. |
| -Passphrase | Security | NEW | Passphrase for the client certificate, if one exists |
The values of these properties control how the Rabbit MQ transport functions for each Publisher or Subscriber that has a subscription to the configured Topic. In the CU4 release the following properties were removed because they were no longer relevant:
- Failed Message Path
- Auto Acknowledge
For greater clarification of their respective capabilities, the Recoverable property was renamed to Delivery Mode and Reliability Mode was renamed to Transaction Type. Also, in previous versions a user could only select to use Transactions if the persistent messaging was also selected. In CU4, that is no longer a requirement.
In most cases though then internal implementation of most of these properties have changed to provide, better performance, scalability reliability and fault tolerance.
Management
In previous versions, the Neuron ESB Rabbit MQ Transport channel would dynamically create the necessary underlying Rabbit MQ based infrastructure (e.g. Queues, Exchanges, Bindings, etc.) anytime a Neuron ESB Party connected to the bus or, when the Neuron ESB Topic started up. This eliminated the need for administrators to manually create and maintain the Rabbit MQ infrastructure Neuron ESB required. Consequently, this made the underlying Rabbit MQ Transport virtually invisible to anyone using the Neuron ESB Party API, and alleviated the need for administrators to manage additional infrastructure requirements.
However, what Neuron ESB did not do was keep the infrastructure in sync with changes made within the Neuron ESB Explorer. For example, if Topics/Parties were either renamed or deleted, their respective Rabbit MQ Queues and Exchanges would remain, unchanged and orphaned. If renamed, Neuron ESB would simply create a new set of Queues and Exchanges to use. If there were messages in the old Queues, they would remain but would have to be dealt manually by administrators.
Neuron ESB also created an unnecessary extra sets of Queues and Exchanges if the Recoverability property was set to True. All of this has been changed in the CU4 release.
Naming Conventions
The first notable change that we made in the CU4 was renaming of the underlying Rabbit MQ Queues and Exchanges. In previous versions of Neuron ESB, Queues and Exchanges used the following naming conventions:
Rabbit MQ Exchanges: <InstanceName>.<Zone>.<Topic>.d.ad
Rabbit MQ Queues: <InstanceName>.<Zone>.<Topic>.<Party>.d.ad
Where:
- InstanceName = Name of the Neuron ESB runtime Instance running the solution
- Zone = The name of the Neuron ESB Zone within the solution
- Topic = The name of the Neuron ESB Topic within the solution
- Party = The name of the Neuron ESB Party within the solution
- d = The d is appended if the Neuron ESB Topic was configured to be persistent
- ad = The ad is appended if the Neuron ESB Topic was configured to be deleted when Parties are no longer connected to the Topic
In the CU4 Release the naming conventions have been simplified to the following, eliminating the unnecessary extra sets of Queues and Exchanges to be managed:
Rabbit MQ Exchanges: NEURON.<InstanceName>.<Topic>
Rabbit MQ Queues: NEURON.<InstanceName>.<Topic>.<Party>
Synchronization
New in the CU4 release is the full management of the Rabbit MQ infrastructure Queues and Exchanges used by Neuron ESB. Previously, Neuron ESB would only create their respective dependent Rabbit MQ Queues and Exchanges on startup as well as when any Party connected to the bus. Neuron ESB now additionally handles renaming and deleting these if their respective counter parts within the Neuron ESB Explorer (e.g. Topics, Publishers and Subscribers) are renamed or deleted. For deletions, Neuron ESB will delete its respective underlying Rabbit MQ Queues only if there are no messages that remaining in the Queue.
Performance and Reliability
A number of internal changes have been made to the Rabbit MQ Transport to enhance reliability, error reporting, and functionality while at the same time significantly increase the performance of certain operations and message throughput.
Serialization Format
One of the first changes made was to the serialization method that Neuron ESB uses to interact with the underlying Rabbit MQ infrastructure. Previously, Neuron ESB serialized the entire Neuron ESB Message using Binary Serialization. With the introduction of CU4, this has been changed to a custom serialization method where only the body of the Neuron ESB Message is published, while the necessary internal Neuron ESB Message headers are custom serialized as Rabbit MQ custom header properties. This has several advantages; reduces CPU utilization, allows for the message body to be accessed without proprietary methods and reduces the overall payload size that the underlying Rabbit MQ infrastructure has to work with.
Publish Confirm Transactions
The Neuron ESB Rabbit MQ Transport supports both Transaction types that Rabbit MQ offers; their channel based Transaction model as well as their batched style Transaction model e.g. Publish Confirms. Both are Acknowledge, Negative Acknowledgement (ack/nack) based models. Users can learn more about Publish Confirms here: https://www.rabbitmq.com/confirms.html , as well as why Rabbit MQ introduced them: http://www.rabbitmq.com/blog/2011/02/10/introducing-publisher-confirms .
In CU4 a number of enhancements were made to the Publish Confirm model to make it more reliable as well as more performant. Neuron ESB now handles the ack/nack reconciliation process more efficiently, especially where multiple acks/nacks are received on a single event, alleviating unnecessary locking on the collection of messages we have to maintain internally. The CU4 release also exposes additional properties that can be used to finely tune the performance and throughput as well the reliability of the batch transaction such as Batch Confirm Timeout and Inactivity Timeout. These properties force Neuron ESB to call into Rabbit MQ for it to finish sending any pending acks/nacks, and only then do we resubmit the messages that we’ve neither received acks or nacks for. Messages we receive nacks for or where we’re notified by Rabbit MQ that that message is undeliverable, are automatically moved into the Neuron ESB Failed database table.
Receiving Messages
In previous versions the underlying Neuron ESB Rabbit MQ Transport would receive messages for its respective Neuron ESB Parties (or Dead Letter processing) by creating an underlying consumer and continually polling the queue. In CU4 this has been changed to use Rabbit MQs new event based consumer.
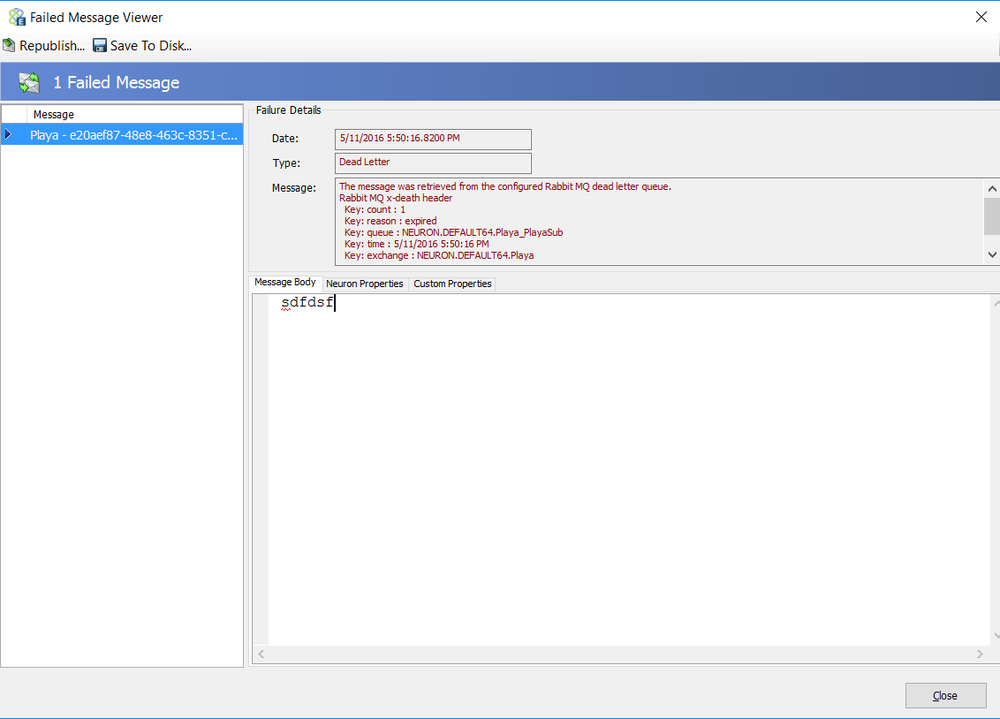
Dead Letter Processing
The CU4 Rabbit MQ Topic transport implementation includes a custom Dead Letter processor, Exchange and Queue to handle those messages delivered to Subscribers that exceed the configured Time to Live property. These messages are automatically detected and moved into the Neuron ESB Failed Message database table.
These messages will be available to be queried, viewed, modified and resubmitted by using the Failed Message Viewer window launched from the Failed Messages report located by navigating to Activity->Database Reports->Failed Messages within the Neuron ESB Explorer.
The messages recorded will have an Exception Type of Dead Letter. The failure message will contain failure details such as the name of the underlying Queue and the associated Exchange that the message expired in as well as the date time stamp indicating when the message expired.
CU4 Performance Comparison
The latest Neuron ESB public release was tested against the CU4 release using a relatively underpowered non server grade machine configured with 16GB RAM, Windows 7 64 bit, Dual CPU (quad core). The results of the testing can be found in the table below:
| Configuration | Messages Sent/Received | Message Size (Bytes) | CU3(msg/sec) | CU4(msg/sec) |
| No Persistence/No Transactions | 500,000 | 100 | 4,550 | 12,000 |
| No Persistence/No Transactions | 500,000 | 1024 | 4,200 | 9,400 |
| Persistence/No Transactions | 500,000 | 100 | 4,400 | 8,500 |
| Persistence/No Transactions | 500,000 | 1024 | 4,075 | 7,900 |
| Persistence/Publish Confirm Transactions/Batch Size = 1000 | 500,000 | 100 | 1,750 | 3,000 |
| Persistence/Publish Confirm Transactions/Batch Size = 1000 | 500,000 | 1024 | 1,300 | 3,000 |
Basic Improvements
A variety of improvements for the Neuron ESB Rabbit MQ Transport have been included in the CU4 release. For example, Request/Response type message communication when using Neuron ESB Sub Topics was not supported in previous releases. Neuron ESB now monitors more events from Rabbit MQ to better respond to error conditions for everything from resource constrictions to unanticipated shutdown events. Failed message auditing has been refactored to decrease the opportunity for faults to occur when attempting to store failed or dead letter messages to the Neuron ESB failed database table
Security
With CU4s support for Rabbit MQ 3.5.6 comes support for SSL. SSL can be enabled in the Transport Properties located on the Networking tab of the Topic by navigating to Messaging->Publish and Subscribe->Topics within the Neuron Explorer.
Once SSL has been enabled, the Rabbit MQ SSL port needs to be provided and the SSL Protocol to use must be selected. Although Neuron ESB and Rabbit MQ supports both SSL2, SSL3, TLS, TLS 1.1 and TLS 1.2 by default SSL3 support is disabled by Rabbit MQ to avoid POODLE attacks. More about Rabbit MQ and its SSL support can be found here: http://www.rabbitmq.com/ssl.html
Client Authentication can also be enabled by providing a Certificate (registered within the Security section of the Neuron ESB Explorer).
Configuring SSL support is done by modifying the Rabbit MQ configuration file as well as registering several important Environment Variables for the machine. More information can be found here: http://www.rabbitmq.com/configure.html.