Multiple Instances
Overview
Neuron ESB offers powerful runtime and scalability features that allow businesses to quickly deploy solutions. Solutions can scale both vertically and/or horizontally using the Neuron ESB Runtime Service across one or more servers. The Neuron ESB Runtime Service loads a Neuron ESB Configuration store (*.ESB), which can contain one or more business solutions. In older versions of Neuron ESB, only one instance of the Neuron ESB Runtime Service could be deployed on a server. This required organizations to maintain all of their business solutions within one Neuron ESB Configuration store. If partitioning of business solutions was necessary, or one of the solutions required a 32 bit versus a 64 bit execution environment, the only solution was to export that business solution to a unique Neuron ESB Configuration store and deploy it to a dedicated server, as pictured below.
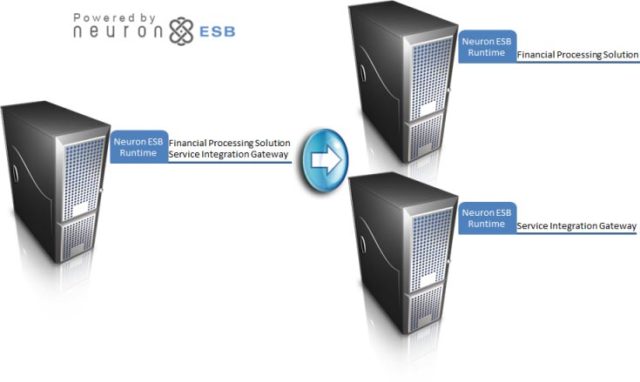
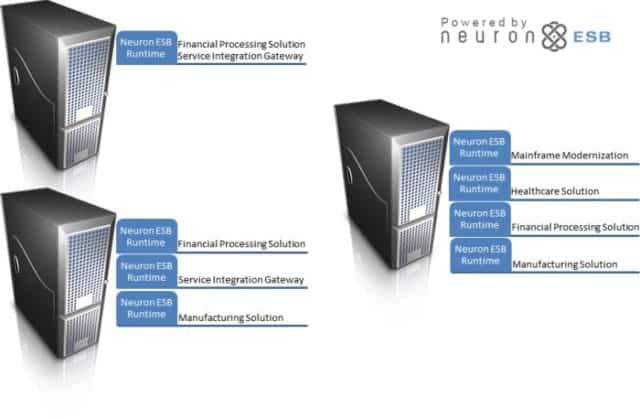
Neuron ESB now provides Multi Instance support for the Neuron ESB Runtime Service. This capability allows organizations to install and run multiple instances of the Neuron ESB Runtime Service on a single server. Each instance can be configured as either a 32 or 64 bit process, capable of running side by side. Each instance of the runtime can load an independent Neuron ESB Configuration store. This allows organizations to easily partition business solutions to run on a single server, effectively eliminating prior constraints, as depicted below.
Why Use Multiple Instances?
Neuron ESB Multi Instance support enables a number of powerful scenarios including:
Multiple Developer Support – The ability to deploy many independent Neuron ESB Configuration stores to a single server enables developers to easily work on their own solutions while deploying to the same servers.
Performance Scale Out – Neuron ESB’s Multi Instance support provides a new level of scale out by allowing organizations to separate and deploy more resource intensive elements of a solution to dedicated servers.
Solution Partitioning – Departments within an organization may require partitioning of applications for management, security or policy compliance. Individual departments may require their own Neuron ESB Configuration store so that they can be independently developed, administered and deployed.
32-bit and 64-bit Processing – Businesses may have solutions that require ODBC connectivity. Many ODBC drivers require 32 bit process execution environments. Using Neuron ESB, businesses can run elements of one solution under a 64 bit process, while running ODBC elements of another solution using a 32 bit process.
Default Installation – Single Instance
When Neuron is first installed, a single instance of the ESB Runtime Service is created. This is the same behavior as previous releases. Unlike the previous releases, however, the installation creates a folder called “DEFAULT”:
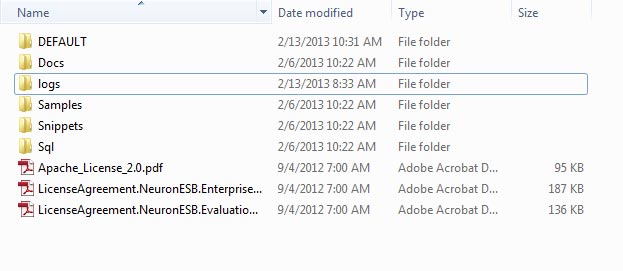
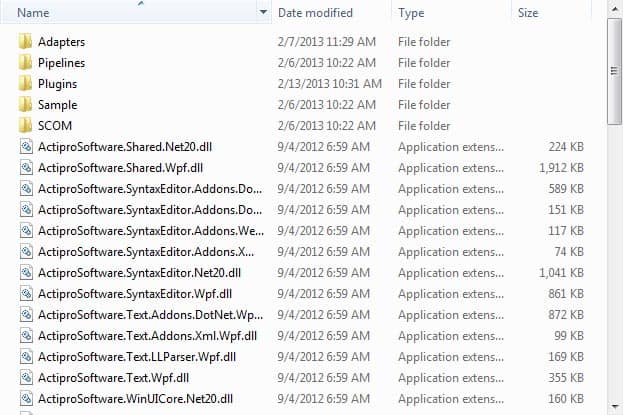
The DEFAULT folder represents the default instance of the Neuron ESB Runtime Service that gets installed by the setup program. The contents of this folder are a complete install of all the Neuron ESB executables, assemblies and configuration files, including the Adapters, Pipelines and Plugins folders:
If Neuron is installed with the x86 version of the setup program, the DEFAULT folder will contain the x86 assemblies. If it’s installed with the x64 version of the setup program, the DEFAULT folder will contain the x64 assemblies.
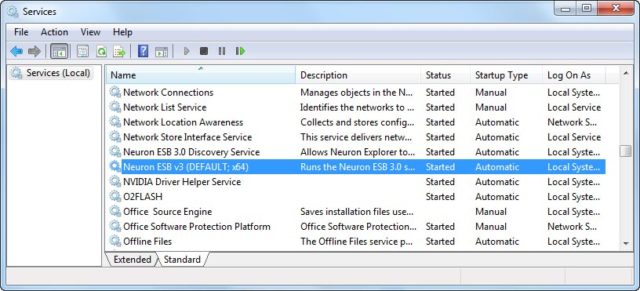
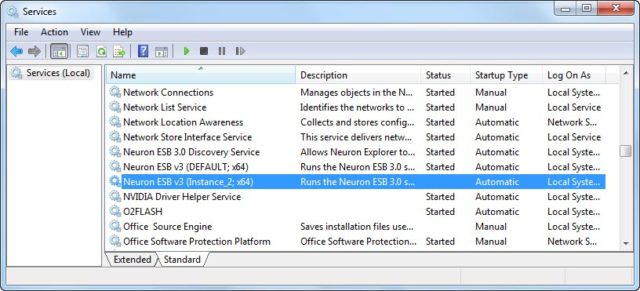
A Default instance of the Neuron ESB Runtime Service is added to the Services console. The setup program also installs the Neuron Discovery Service. This service is used by the Neuron Explorer to discover the ESB Runtime instances running on the server:
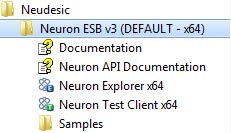
Finally, the Neuron setup program adds the default Program Files group. The Neuron ESB group includes links to the documentation, samples, and the Neuron Explorer and Test Client:
The Default instance of Neuron behaves very similar to Neuron 2.5 and previous releases. The biggest difference is how the Neuron Explorer discovers and connects to the Default instance. This is covered below in Neuron Explorer.
Multiple Instances
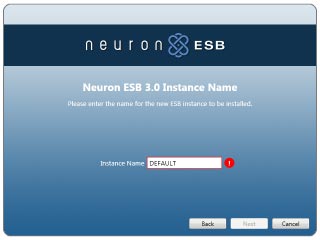
Installing a new instance of Neuron ESB is very simple – just run Setup.exe again. If you need an x64 instance of Neuron, run the x64 version of the installer. If you need an x86 version, run that version of the installer. When prompted to enter a license key, you can enter the same key that you did for the first instance. The only difference is when you are prompted to enter the instance name. The installer will notify you that the DEFAULT instance already exists:
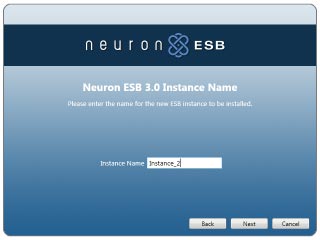
Enter a new Instance Name and complete the installation:
When the installer completes a new instance of the Neuron ESB Runtime Service is added to the Services console:
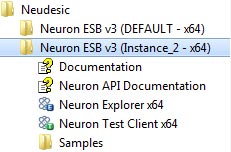
Finally, when a new Neuron ESB instance is created, a new Program Files group containing links to the Neuron Explorer and Test Client is created:
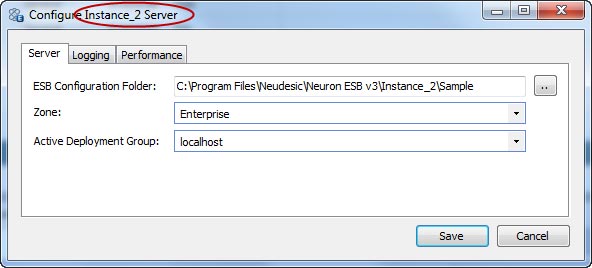
Regardless of which Program Files group the Neuron Explorer is opened from, it can Connect to any running instance of the Neuron ESB Runtime or open any ESB Configuration file. However, when using the Neuron Explorer to Configure a Neuron ESB Runtime instance through the Configure Server toolbar button, it will only modify the runtime instance config file located in the same directory as the Neuron Explorer executable. For example, when Neuron Explorer is launched from the DEFAULT subfolder, it can only configure the DEFAULT runtime instance. When you click on the Configure Server button, the dialog box will display which runtime instance is being configured:
When you click on the Start/Stop/Restart button on the toolbar, the selected action will affect only the instance that was displayed in the Configure Server dialog box in Figure 10.
Deploying Multiple Instances
Create a New Instance
Deploying new instances is very simple. Run the Setup.exe for the platform you want to install a new install and enter a new instance name:

When the installer completes, there will be new directory named <instance-name>, a new menu group with shortcuts to Neuron Explorer and test client under the Program Files\Neudesic folder and a new Neuron ESB service installed in the services viewer.
Delete an Instance
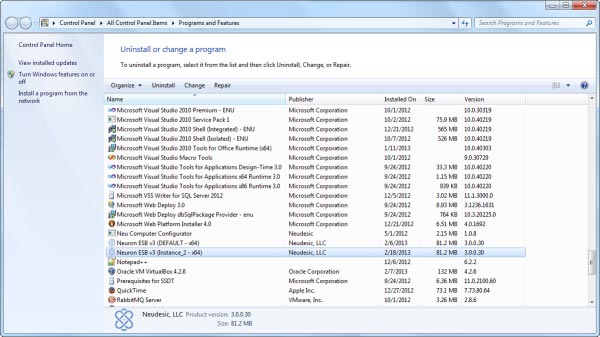
To remove an instance use the Add/Remove Programs feature in Windows:
Working with Multiple Instances
Configuring the Neuron ESB Runtime Service
Prior to starting a newly created Neuron ESB Runtime Service, you must modify the Runtime instance’s configuration to use the correct ESB Configuration file. To modify the configuration:
- Click on the Start button, All Programs->Neudesic, then click the group for the Runtime instance you want to modify, then Neuron Explorer.
- Click the option to Open a Neuron Configuration and then select the Configuration file you want to configure the runtime instance to use from the File Location browser on the right. Click Open. Note – if you want to create a new ESB Configuration, click the option to Create a Neuron Configuration, then save the configuration and continue with step 3.
- If necessary, modify the ports used by this configuration and save the changes. See the section titled Port Conflicts below for more information.
- Click the Configure Server button on the toolbar. Verify the instance you want to configure is displayed in the dialog box (see Figure 10).
- In the ESB Configuration File field, either select the Configuration file from the dropdown list or browse for it using the file browser.
- Select the appropriate Zone, Active Deployment Group and the Trace Level.
- Click the Save button.
- Select Start from the toolbar.
Another way to modify the instance’s configuration is to manually edit the esbService.exe.config file located in the instance-specific subfolder. Open this file and modify the esbEnvironment application key to the location of the ESB Configuration file the service should host:
<appSettings> <add key="esbInstanceName" value="Instance_2" />
<add key="esbEnvironment" value="C:\Program Files\Neudesic\Neuron ESB v3\Instance_2\Sample" />
<add key="esbZone" value="Enterprise" />
<add key="esbRole" value="primary" />
<add key="esbDeploymentGroup" value="localhost" />
<add key="overrideDotNetThreadPoolSize" value="false" />
<add key="dotNetMaxWorkerThreads" value="500" />
<add key="dotNetMaxIOThreads" value="1000" />
<add key="dotNetMinWorkerThreads" value="50" />
<add key="dotNetMinIOThreads" value="100" />
</appSettings>
If necessary, update any other values that are specific to the ESB Configuration file such as the esbZone or esbDeploymentGroup.
Port Conflicts
By default, Neuron ESB Configurations utilize the same port numbers for its various services. When deploying multiple Neuron ESB instances, the ESB Configurations must be modified to avoid port conflicts. If you attempt to start a second Neuron instance that utilizes the same port values for these services, the service will fail to start. There are three places where port conflicts can occur – Zone Ports, Topic Network settings and Service Endpoint Client Connectors.
Zone Ports
The default port settings for a Zone are as follows:
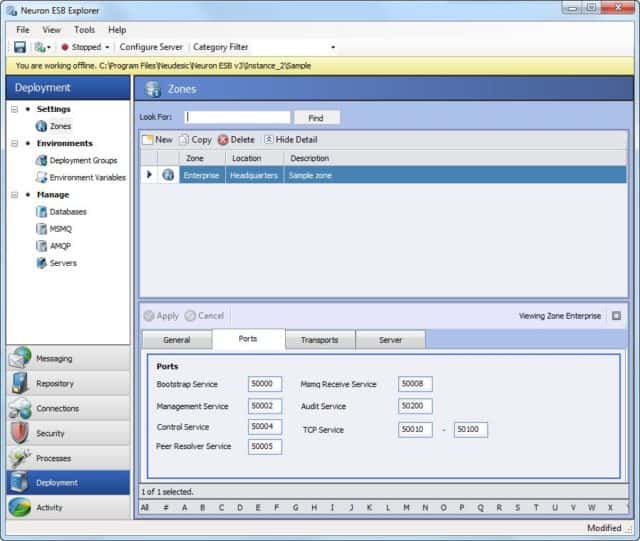
If one Neuron runtime instance is configured to use an ESB Configuration that utilizes these ports, you cannot start a second instance that’s configured with the same values. The easiest way to modify the port settings is to increase the port number range by 1000. For example, the figure below show the port values in the 52000 range (the port number 51000 is the default port number used by the discovery service):
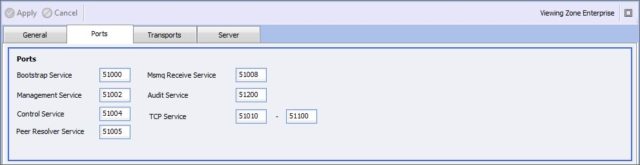
When modifying the Zone ports in an ESB Configuration, it is beneficial to modify the default transport Port settings for any transports your Configuration will use. This is especially helpful when creating a new Configuration, as all new topics will automatically inherit the modified port settings.
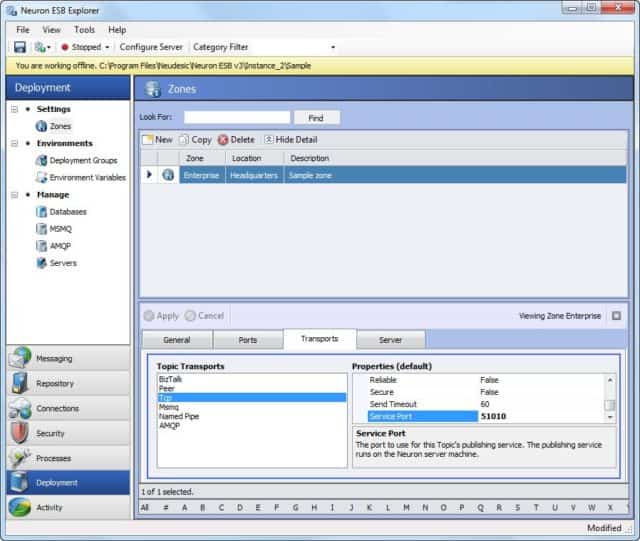
You do not need to modify any port settings for the Msmq, RabbitMQ, Named Pipe or Peer transports. The only value that you must modify is the Service Port setting as displayed in Figure 14.
Note – The Peer and Tcp Transports each have a Client Port Base setting. This is the base port value that clients will use to connect to Neuron. A client can be an adapter endpoint, service endpoint or a client application utilizing the Client API to connect to Neuron. Under normal circumstances the value of this port does not need to change, even when using multiple runtime instances. However, if the number of clients could potentially exceed 1000, either the Client Base Port for an instance needs to be modified or the Client Port Range needs to be increased.
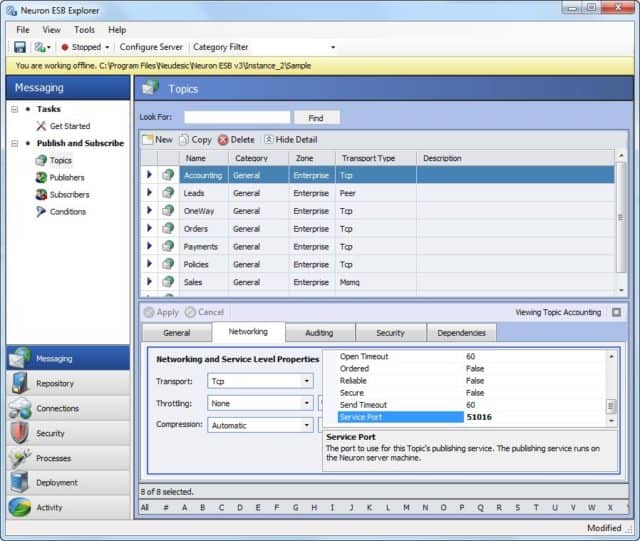
Topic Network Settings
You will also need to modify any Tcp Topics that are already configured. Existing topics are not automatically updated when the Zone Transport properties are modified. Topic port values are found in Messaging->Topics-><topic name>, on the Networking tab. The only value that needs to be modified is the Service Port setting:
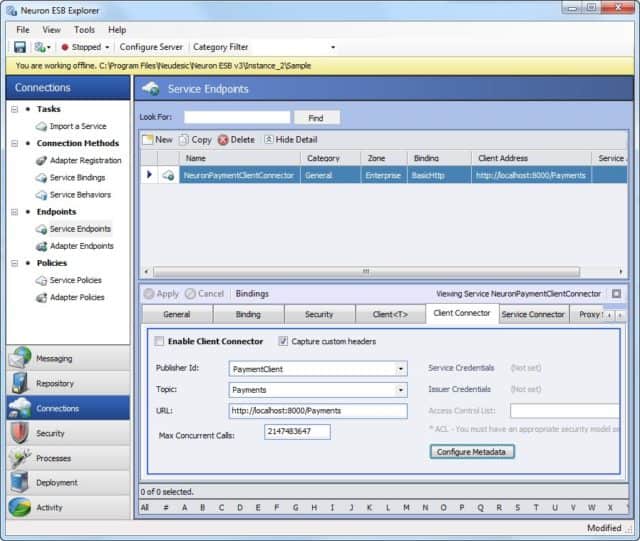
Client Connectors
If your ESB Configuration utilizes client connectors, you also must make certain there aren’t any port conflicts between the client connectors in the different configurations. One best practice is to use a different range of ports for the client connectors in each ESB Configuration (i.e. 8000-8099):
Neuron Discovery Service
The Neuron setup program installs the Neuron Discovery Service. This service is used by the Neuron Explorer to discover the running instances of Neuron ESB on the server. All Neuron instances depend on this service; therefore it will be started automatically whenever a Neuron Runtime Service is started. The Discovery Service is installed in the x86 Program Files location, i.e. C:\Program Files (x86)\Neudesic\Neuron ESB v3.
By default, the Discovery Service listens on port 51001. To change this port, modify the file DiscoveryService.exe.config:
<endpoint address="net.tcp://localhost:51001"
          binding="netTcpBinding"
          bindingConfiguration=""
          contract="Neuron.DiscoveryService.Contracts.IDiscoveryService" />
Neuron Explorer
The Neuron Explorer now uses the Discovery Service to find running instances of the Neuron ESB Service. When you open the Neuron Explorer the Connect Options section displays the installed instances of Neuron:
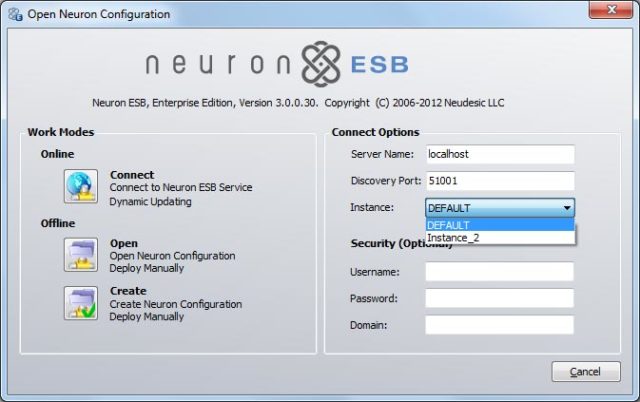
To connect to a specific instance of Neuron ESB, select that instance from the Instance dropdown list and click the Connect button. If the selected instance is not already started, you will be prompted to start the instance before connecting.
Managing Multiple Instances
You can manage multiple instances through the Neuron ESB Explorer without having to disconnect/reconnect to each instance separately. Once you open Neuron ESB Explorer, click on Deployment->Servers. This page will display all the instances on every server listed in the Deployment Group selected from the dropdown list. For example, if you have a Deployment Group named “Development”, with one server and two instances installed, you will see this:
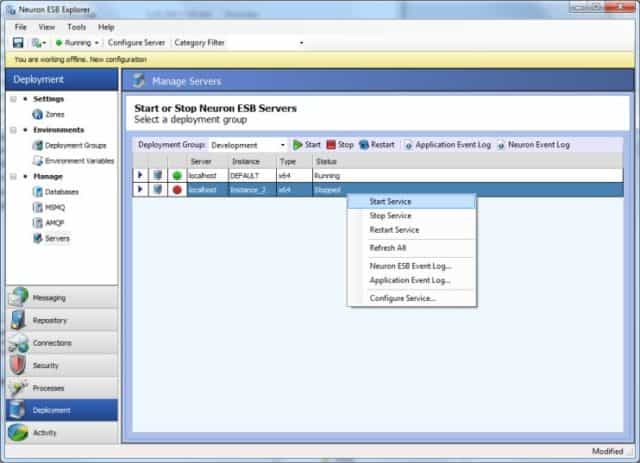
From here you can Start/Stop/Restart the instance, view the event logs for that instance and configure that instances service (i.e. the Neuron ESB Configuration it executes, the logging level, etc).
Neuron Audit Database
The Neuron Audit Database can now be used by multiple deployment groups and by multiple Neuron ESB instances. This means that when utilizing multiple instances, you have the choice between using a different Neuron Audit Database with each individual instance or share a Neuron Audit Database across multiple instances. The latter helps provide consolidated reporting of audited and failed messages.
Neuron Test Client
The Neuron Test Client connects to the bootstrap service on port 50000 by default. This setting is saved in the file NeuronTestClient.exe.config. To change the port number the test client is using:
- Click on the Start button, All Programs->Neudesic, then click the group for the Runtime instance you want to modify, then Neuron Test Client.
- Click Tools->Connection Settings:
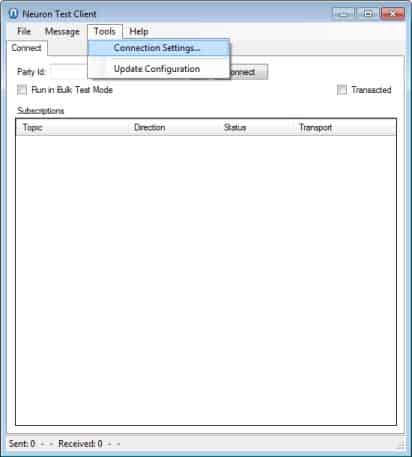
- Modify the port value in the Neuron Address text box:
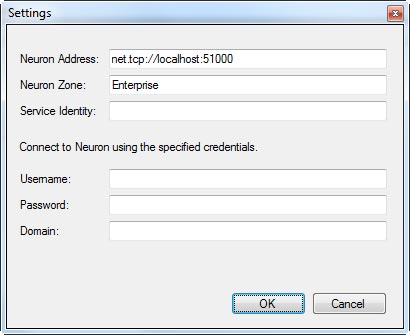
- Click OK.
The new Neuron Address is automatically saved in the config file for this instance of the Test Client.
Troubleshooting
Logging with Multiple Instances
The default location of the log files is in the Logs subfolder of the main Neuron ESB installation directory. The first time each instance is started, a new subfolder is created in the Logs folder and given the same name as the instance. To change the location of where the logs are located, add the following registry keys and set them to the path of the log folder:
HKEY_LOCAL_MACHINE\SOFTWARE\Wow6432Node\Neudesic\ESB\SystemLogFolder
HKEY_LOCAL_MACHINE\SOFTWARE\Neudesic\ESB\SystemLogFolder
Event Logs
All Neuron ESB instances will write all errors to the Windows NT Neuron ESB event log. The event logging has been improved in release 2.6 to enable users to sort and search for entries specific to the Neuron ESB Instance to allow third party tools to more easily monitor the event log. Neuron now uses the name of the instance as the Event “Source” field and the original Event sources (i.e. TCP Channel, Endpoint Connector, etc) are used as specific Event “Task Categories”.
New Instance Fails to Start
If you attempt to start a new instance and it fails to start, look in the Neuron ESB Event Log for error messages. The most common errors and solutions are listed below.
| Exception | Solution |
| There is already a listener on IP endpoint 0.0.0.0:<port number>. | This is a port conflict on the server. Either another Neuron ESB instance or application is listening on this port. Edit the ESB Configuration and modify the port settings to an unused range. |