Correlated Workflow
Overview
There are three basic types of workflows: Normal, Request-Reply and Correlated. This sample shows a Correlated Workflow that joins order records after a Process has split them into separate messages. A Correlated-type workflow is executed once for each unique value of the correlation set defined in the Workflow Endpoint. This is referred to as the Singleton pattern. In this sample, orders are assigned to batches and the batch ID is used as the correlation set. All orders in batch ‘B001’ are handled by one instance of the workflow while all orders in batch ‘B002’ are handled by another workflow instance.
Solution
Here is an overview of the sample:
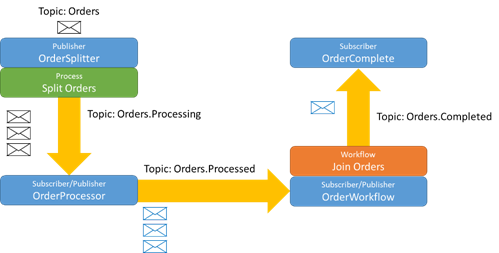
The OrderSplitter publisher receives a message on the Orders topic which includes multiple orders represented in the body of the message as XML. The Split Orders process intercepts this message and splits each order into a separate message that is published on the Orders.Processing topic.
The OrderProcessor subscriber receives these messages and adds a <Status> element to the message when it is processed. The OrderProcessor can process messages in any order and processing can occur immediately or over the course of hours, days or longer. When a message is processed it is published on the Orders.Processed topic which is received by the OrderWorkflow subscriber.
The OrderWorkflow subscriber sends the message to the Join Orders workflow. All messages sent on Orders.Processed have a custom property, orders.batchID, which is used to send all orders for a given batch to a unique instance of the workflow. That way all orders for batch ‘B001’ are handled by one instance of the workflow and orders for batch ‘B002’ are handled by another. When all order messages for a given batch have been received by the workflow, they are joined together into a final message and published on the Orders.Completed topic which is received by the OrderComplete subscriber.
For this sample OrderSplitter and OrderComplete will be Neuron Test Clients and the OrderProcessor will be a .NET WPF application using the Neuron Client API.
Running the Sample
Open the Sample
This sample contains a Neuron ESB Configuration, a Visual Studio project, and this documentation page. To open this sample, see the topic Using the Neuron Samples and select the Correlated Workflow sample. This sample requires a configured SQL Server database. See the topic Configure the Database for Workflow Samples to setup the database. Don’t forget to start the Neuron ESB Service after configuring the database!
Configure the Visual Studio Project
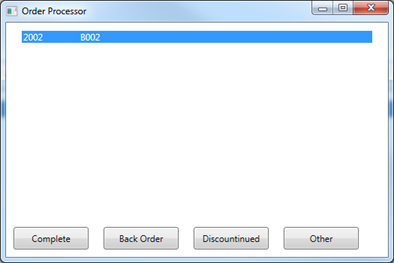
This sample includes a Visual Studio project called OrderProcessor. Before running this project, correct the references to Neuron.dll, Neuron.Esb.dll, Neuron.Esb.XmlSerializers.dl, Neuron.Pipelines and Neuron.Scripting.dll in the OrderProcessor project. Start the project and you will see the empty OrderProcessor app:
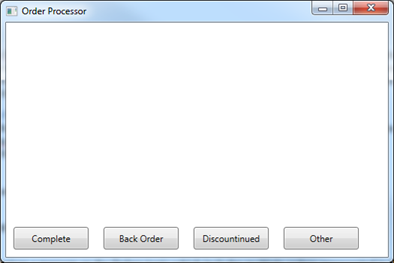
The sample is now configured and ready to use.
Open the Solution in Neuron Explorer
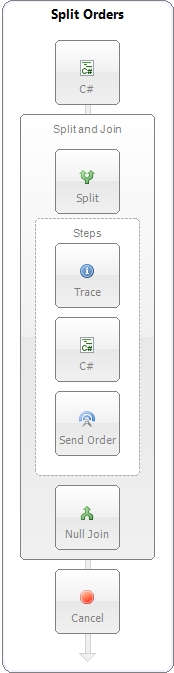
Click the Processes tab and double-click the Split Orders process item to view the process steps:
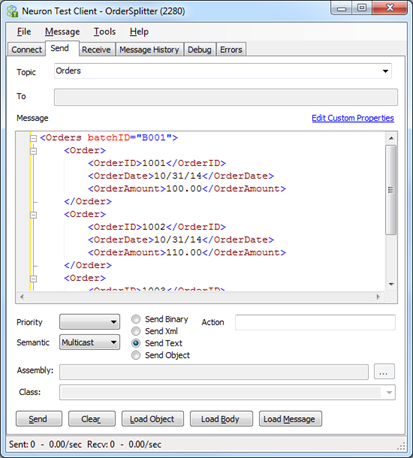
The message that the Split Orders process receives will be in the following format:
<Orders batchID="B001">
  <Order>
    <OrderID>1001</OrderID>
    <OrderDate>10/31/14</OrderDate>
    <OrderAmount>100.00</OrderAmount>
  </Order>
  <Order>
    <OrderID>1002</OrderID>
    <OrderDate>10/31/14</OrderDate>
    <OrderAmount>110.00</OrderAmount>
  </Order>
  <Order>
    <OrderID>1003</OrderID>
    <OrderDate>10/31/14</OrderDate>
    <OrderAmount>120.00</OrderAmount>
  </Order>
</Orders>
The Split Orders process does the following:
- The first C# code step parses the XML message and gets the batchID as well as the number of orders in the batch. These are added to context.Properties so that they are accessible in the Steps section of the Split process step.
- The Split step is configured with an XPath property set to: Orders/Order. Each step in the Steps section will access a new message where the XML body is a single order:
<Order>
  <OrderID>1001</OrderID>
  <OrderDate>10/31/14</OrderDate>
  <OrderAmount>100.00</OrderAmount>
</Order>
- The Trace step logs the order message
- The C# code step creates the following custom properties on the order message: orders:batchID, orders:ordersInBatch
- The “Send Order” Publish step publishes the order message on the Orders.Processing topic.
- The Split step has a Null Join configured as the sample shows how to use a workflow to join the orders instead of having the process do it.
- The Cancel step cancels further publication of the original message on the Orders topic as there is no subscriber to receive it.
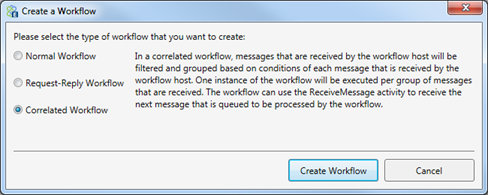
Before looking at the Join Orders workflow, it is important to understand that when this workflow was created, the Correlated Workflow type was selected:
The messages that the workflow will receive will be in the following format:
<Order>
  <OrderID>1001</OrderID>
  <OrderDate>10/31/14</OrderDate>
  <OrderAmount>100.00</OrderAmount>
</Order>
Each message has the following custom properties defined and it is the value of the batchID custom property which will determine when a new workflow instance will be used:

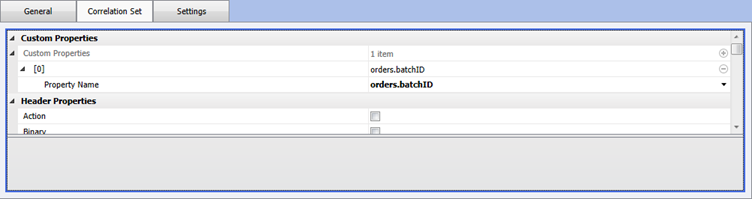
The Workflow Endpoint was configured so that the orders.batchID custom property defines the correlation set:
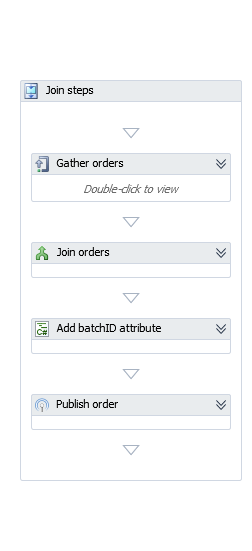
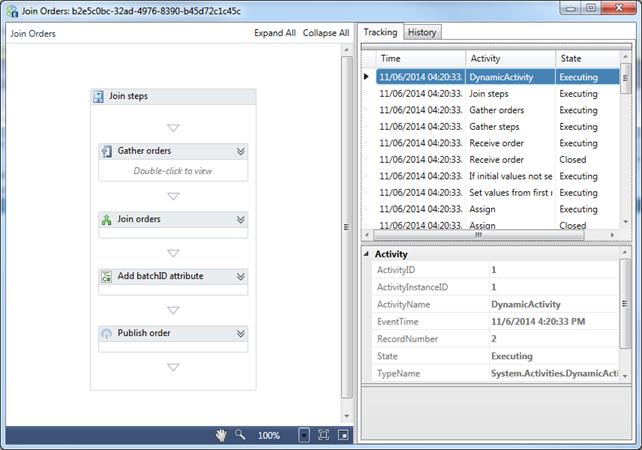
In the Processes section, double-click the Join Orders workflow to see the workflow activities:
The workflow uses the following variables:
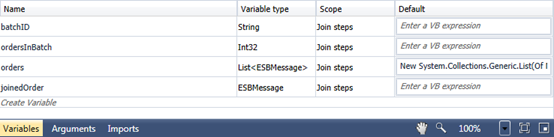
- batchID – the batchID from the incoming message custom property
- ordersInBatch – the number of orders in the batch from the incoming message custom property
- message – an ESBMessage object used in the “Gather orders” scope to receive the incoming order message
- orders – a collection of ESBMessage objects; used gather the incoming messages
- joinedOrder – the ESBMessage object created when all orders in the orders collection are joined
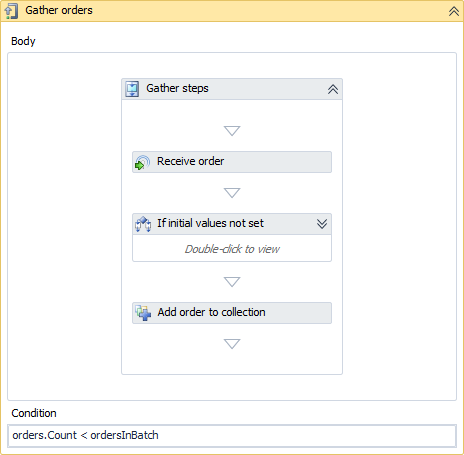
The “Gather orders” group is a DoWhile activity that loops until the number of orders added to the orders collection matches the number expected in the ordersInBatch custom property. Since the Condition of theDoWhile happens after the Receive, at least one message must be received to continue the workflow:
When a message is received on the Orders.Processed topic the workflow engine determines based on the value of the orders.batchID custom property if a new workflow instance needs to be created or if the message should be routed to an existing workflow instance. The existing workflow instance does not need to be actively running. When a workflow is unloaded, it is persisted to the database. The workflow engine will resume the workflow when necessary and route a message to it.
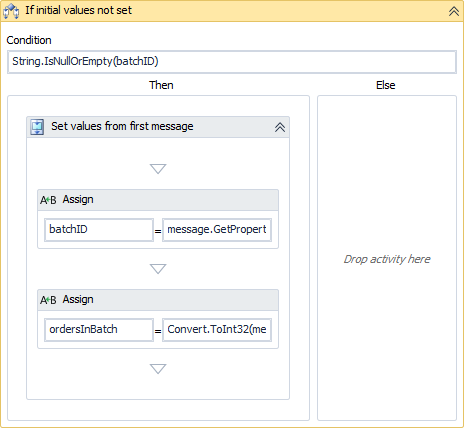
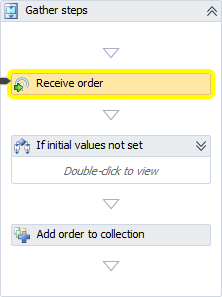
The Receive Message activity (named “Receive order”) gets the message and assigns it to the message variable. If this is the first message received by this instance of the workflow then the If activity executes assigning values to the batchID and ordersInBatch variables:
Finally, the AddToCollection activity (“Add order to collection”) adds the message to the orders collection.
After the “Gather orders” group is the JoinMessages activity named “Join orders”. It has the following properties:
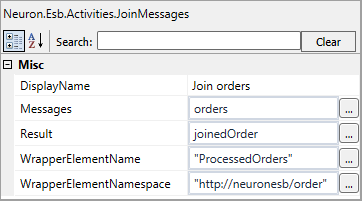
This activity takes all the messages in the orders collection and joins the XML from the body of each message into a new XML document. The root node of the document is named “ProcessedOrders” and the XML will have a default namespace of “http://neuronesb/order”. A new message is created with this XML and assigned to the joinedOrder variable.
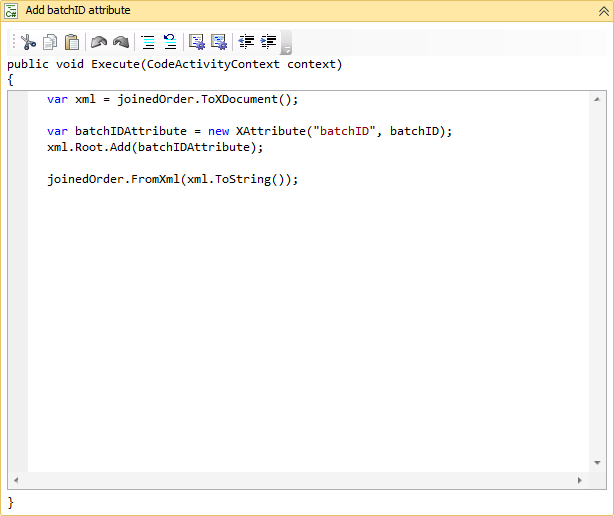
Next a C# code activity modifies the XML and adds the batchID attribute to the root node:
The final activity in the workflow is a PublishMessage activity named “Publish order”:
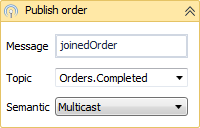
It takes the message assigned to joinedOrder and publishes it on the Orders.Completed topic.
Test the Workflow in Neuron Explorer
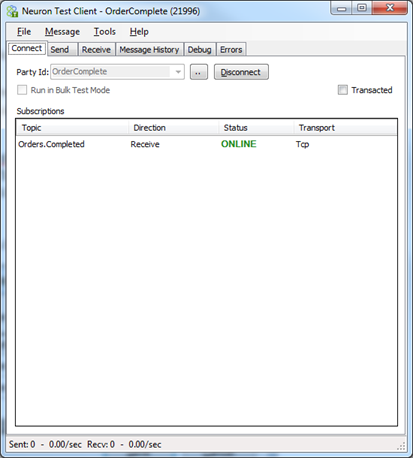
Before testing this workflow, open a Neuron Test Client and connect it to the OrderComplete subscriber:
In the Workflow Designer do the following:
- To run the workflow, click the Test Workflow button on the toolbar
- On the Edit Test Message dialog, enter the following for the message body:
<Order>
  <OrderID>2001</OrderID>
  <OrderDate>10/31/14</OrderDate>
  <OrderAmount>100.00</OrderAmount>
</Order>
- Click the Custom Properties button and enter the following values:

- For the Source Id property, enter “OrderWorkflow” this value will be used while testing the PublishMessage activity so that the message is published from the correct Publisher. The Topic property indicates that this message is being received from the Orders.Processed topic.
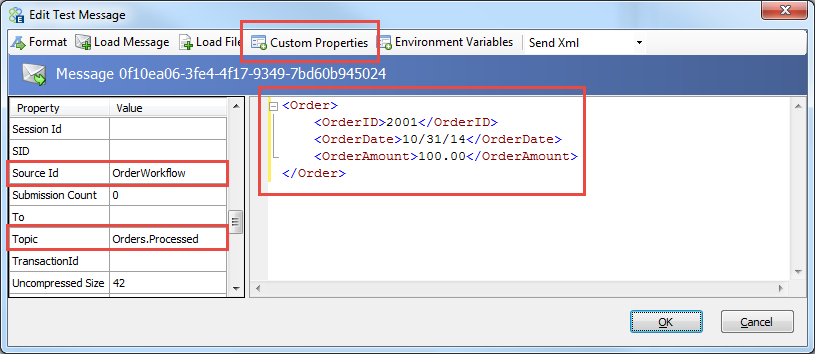
- Click the OK button.
- The Workflow Designer will show the running workflow by highlighting the currently executing activity in yellow. The workflow will stop on the ReceiveMessage activity:
- The Edit Reply Message dialog will appear. The first message dialog started off the workflow testing, but the XML in the message body was not used. Now when we click OK on this second message dialog, the XML will be used as if the ReceiveMessage activity had picked up this message for processing and the workflow will continue:
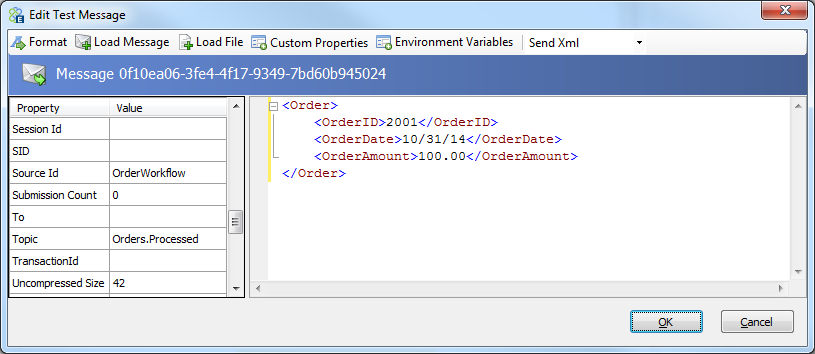
- Click the OK button.
- The workflow will continue and then stop again on the ReceiveMessage activity. Because the orders.ordersInBatch value was set to 2 then the message dialog will appear a total of two times after the initial message dialog. You can leave the values the same and click OK again.
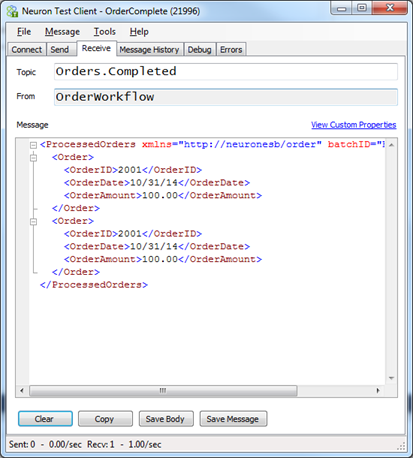
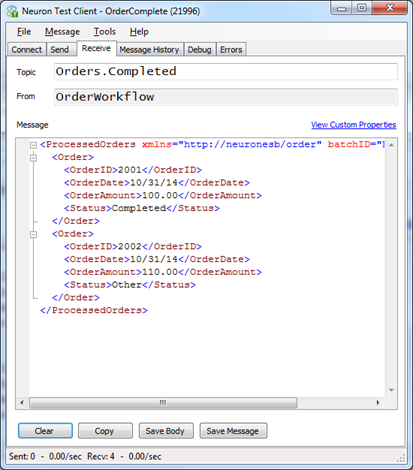
- When the workflow is complete, look at the Neuron Test Client for the OrderComplete subscriber and you will see the completed order:
Executing the Workflow
- Open an instance of the Neuron Test Client and connect using the OrderSplitter:

- Make sure that the second Neuron Test Client is connected to the OrderComplete subscriber.
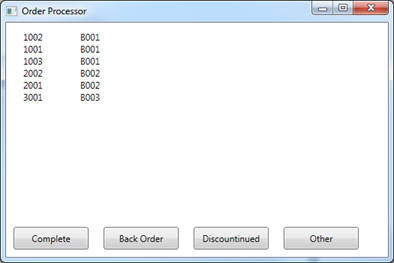
- Make sure the OrderProcessor application is running:
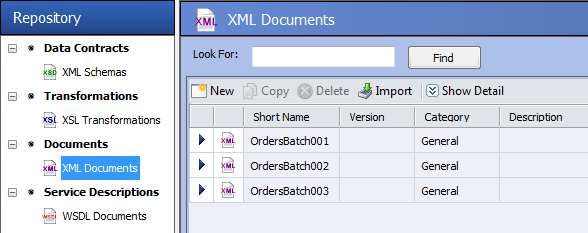
- In Neuron Explorer, click on the Repository tab and then on XML Documents to see the three documents we will be using:
- On the Send tab of the OrderSplitter Test Client paste the contents of the OrdersBatch001 XML file and click the Send button. Repeat with OrdersBatch002 and OrdersBatch003:
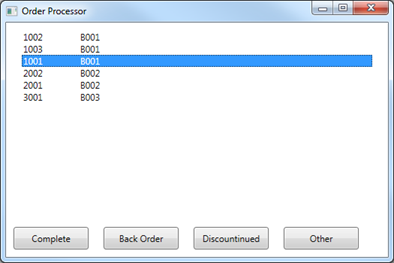
- The OrderProcessor app should now show all 6 orders (3 separate batches):
- In Neuron Explorer, click on the Activity tab and then Workflow Tracking. Click Run Report and you will see no workflow instances have executed:
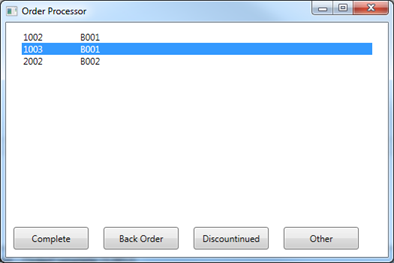
- In the OrderProcessor app, select order 1001 and click the Complete button. The item will be removed from the list:
- Click Run Report on Workflow Tracking and you will see one instance of the Join Orders workflow has Started:

- In OrderProcessor, click on 2001 and click Completed. Also, click on 3001 and click Completed. Because each of the 3 processed orders have a different batch ID then each will get a new instance of the Join Orders workflow. There should now be 3 instances in Workflow Tracking after you click the Run Report button:

- The rows in the report are shown with the newest start time on top. So, the first row represents batch ‘B003’, next row ‘B002’ and the third row ‘B001’. Batch ‘B003’ is complete because there was only one order in that batch. Batch ‘B001’ might be shown in the Unloaded state. This will occur if more than a minute passes without receiving another message for that batch.
- If no workflow is Unloaded, wait a minute and refresh the report. Batch ‘B001’ should be Unloaded and possibly batch ‘B002’ as well.
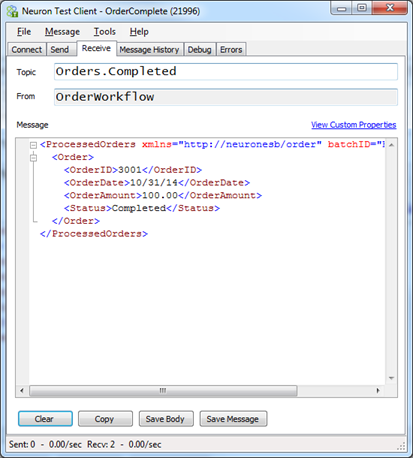
- In the OrderComplete Test Client, the Receive tab will show the completed batch ‘B003’:
- In OrderProcessor, click 1003 and click the Back Order button:
- Re-run the Workflow Tracking report and now batch ‘B001’ has been Resumed:

- In OrderProcessor click on 1002 and click the Discontinued button.
- Re-run the Workflow Tracking report and batch ‘B001’ will be Completed:

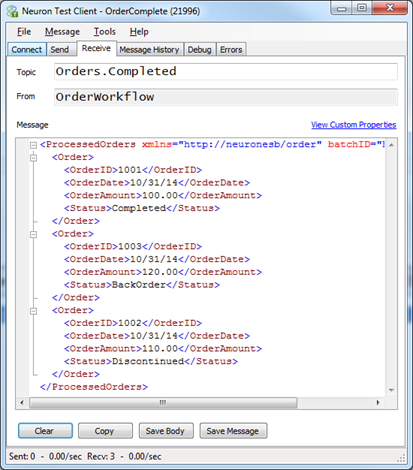
- The Neuron Test Client for OrderComplete will now show batch ‘B001’:
- Last time in OrderProcessor, select 2002 and click the Other button:
- Workflow Tracking shows that all Workflows have been completed:

- The OrderComplete Test Client shows batch ‘B002’:
- In Workflow Tracking, double-click the last row representing batch ‘B001’ to open the Tracking Detail screen:
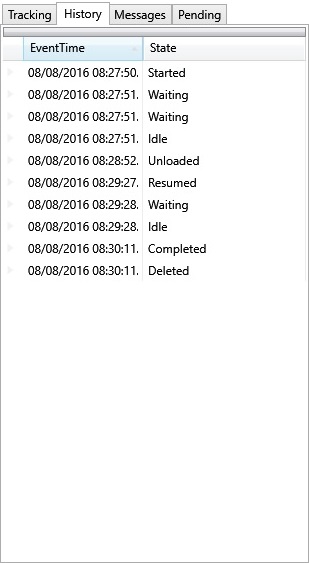
- Click on the History tab to see that the workflow was Started, a minute later it went Idle and was Unloaded, was later Resumed only to go Idle and be Unloaded a minute after that. The workflow was then Completed and the instance Deleted from the Workflow Engine:
- The Tracking tab shows each executed activity in the workflow. Click on the first “Receive order” with State of Closed entry and the activity will be highlighted in the Workflow Designer:
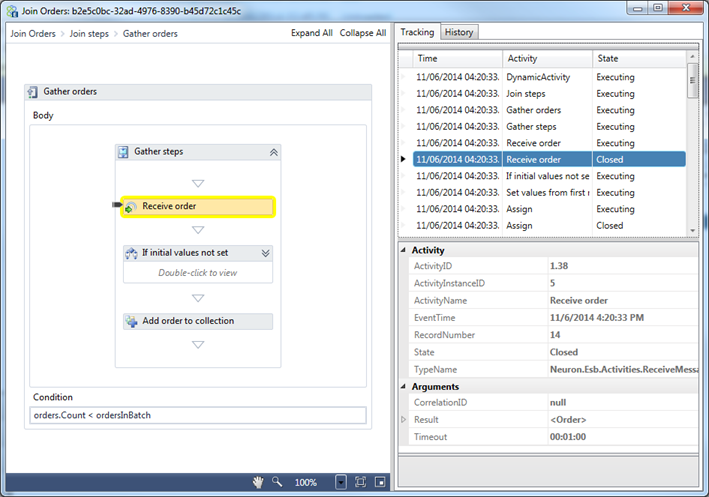
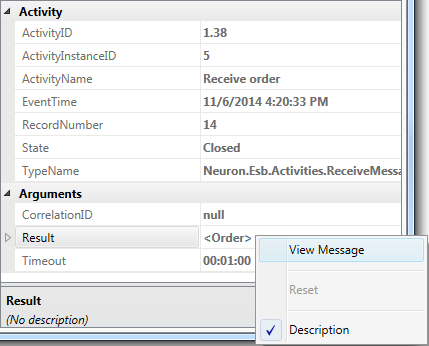
- Right-click on the Result entry in the property grid and select View Message to open the Message Viewer:
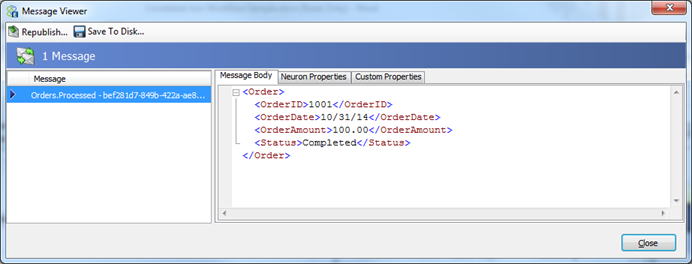
- The Message Body tab shows the Order message received by the workflow:
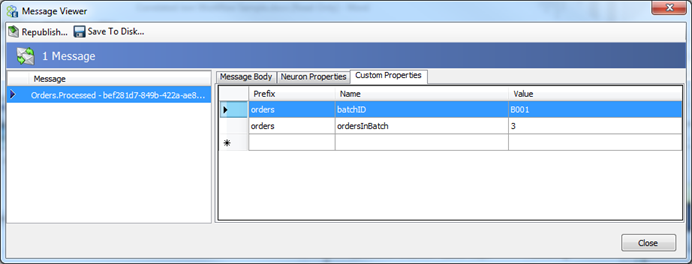
- The Custom Properties tab shows custom properties sent with the message:
- Some properties of interest from the Neuron Properties tab are: Created, Machine, Message Id, Source Id, and Topic.
You have successfully tested and executed this solution and understand the Process steps and Workflow activities used.