Correlated Send/Receive Workflow
Overview
This sample shows an order message sent to a normal-type workflow that then publishes it to another topic for further processing. When that processing completes the order is sent back to the existing instance of the workflow that published it. Routing to the original workflow is done by setting the correlation set on the PublishMessage activity to the order ID.
Solution
Here is an overview of the sample:
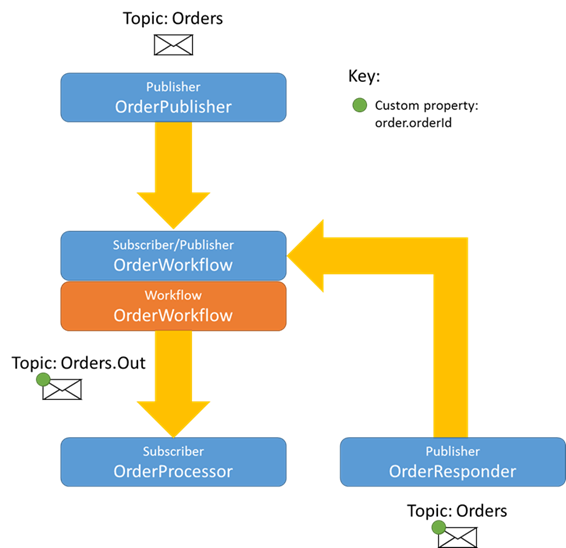
The OrderPublisher publisher sends a message on the Orders topic which is received by the OrderWorkflow subscriber and passed to a new instance of the OrderWorkflow workflow. The OrderWorkflow creates a unique order ID for the order, adds it as a custom property to the message and publishes it on the Orders.Out topic. The PublishMessage activity that publishes the message has been configured to use the order.orderId custom property to define the correlation set. As a result of the publish, a correlation ID is created which is used later in the workflow on the ReceiveMessage activity. The ReceiveMessage activity waits for a message to be sent to this instance of the workflow that matches the order ID used on the publish step. If it takes more than a minute to receive this correlated message, the workflow is unloaded. The exact instance of the workflow that published the message will be resumed once the workflow engine receives a message that matches the correlation ID.
At some later point the OrderResponder publisher sends a message on the Orders topic and sets the order.orderId custom property to match a message previously received by the OrderProcessor. This allows the workflow engine to route the message to the correct instance of the workflow based on the values that comprise the correlation set. The workflow continues executing any remaining activities.
When developing a workflow that includes a correlated send/receive, the workflow’s subscriber needs a minimum of three separate topic subscriptions:
- A receive subscription to a topic that will create a new instance of the workflow
- A send subscription to a topic where the message creating the correlation set will be published to
- A receive subscription to a topic where the correlated response will be received from
Running the Sample
Open the Sample
This sample contains a Neuron ESB Configuration and this documentation page. To open this sample, see the topic Using the Neuron Samples and select the Correlated Send and Receive sample. This sample requires a configured SQL Server database. See the topic Configure the Database for Workflow Samples to setup the database. Don’t forget to start the Neuron ESB Service after configuring the database!
Open the Solution in Neuron Explorer
Before looking at the OrdersWorkflow, it is important to understand that when this workflow was created, the Normal Workflow type was selected:
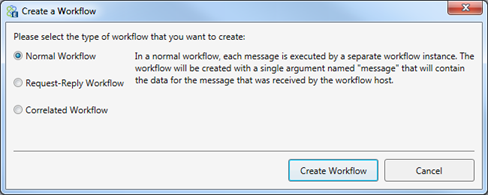
A Correlated Send and Receive pattern uses the correlation properties on the PublishMessage and ReceiveMessage activities to accomplish the correlation. This pattern is often used for long-running processes and so it will most often be used with a Normal Workflow and not used with a Request-Reply Workflow.
The messages that the workflow will receive will be in the following format:
<Order>
  <OrderDate>10/31/14</OrderDate>
  <Items>
    <Item>
      <ProductCode>P001</ProductCode>
      <Description>Product 1</Description>
      <UnitPrice>2.99</UnitPrice>
      <Qty>2</Qty>
    </Item>
    <Item>
      <ProductCode>P002</ProductCode>
      <Description>Product 2</Description>
      <UnitPrice>5.79</UnitPrice>
      <Qty>5</Qty>
    </Item>
  </Items>
</Order>
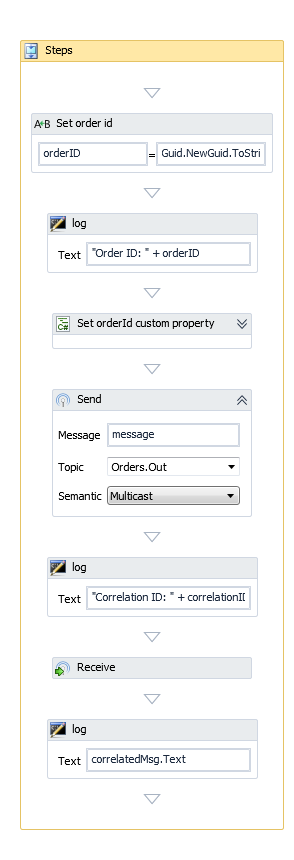
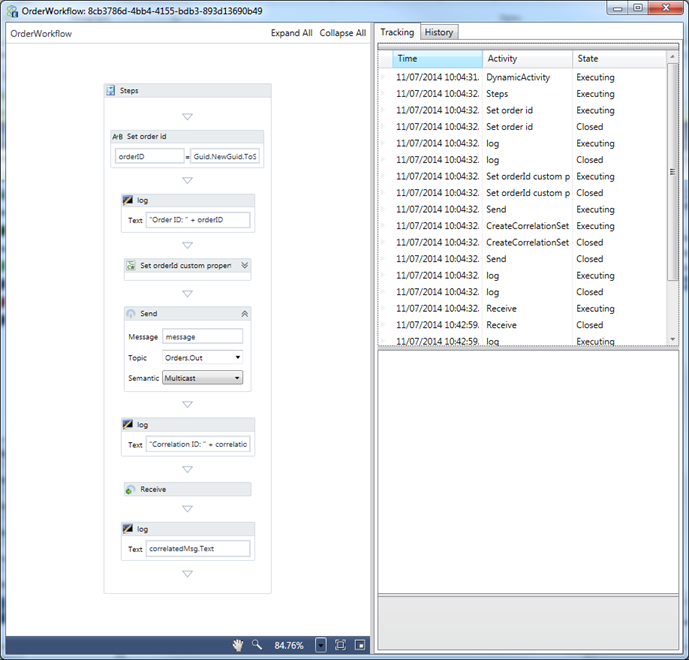
In the Processes section, double-click the OrderWorkflow workflow to see the activities:
The workflow has the following arguments:

- message – the ESBMessage sent on the topic that the Workflow Endpoint subscribed to
- configuration – access to ESB configuration items. (not used in sample)
- environmentVariables – the environment variables configured as part of the solution (not used in sample)
The workflow uses the following variables:

- orderID – the order ID value generated as part of the workflow
- correlatedMsg – the ESBMessage object returned as part of the ReceiveMessage activity
- correlationID – The unique value based on the correlation set defined on the PublishMessage activity using the order.orderID custom property and also used by the ReceiveMessage activity
Here is an explanation of the workflow:
- Generate a unique order ID and set the orderID variable
- Log the orderID
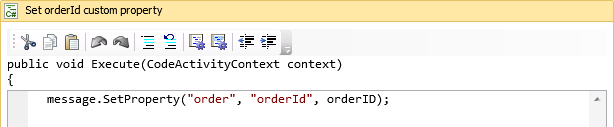
- The C# code step (named “Set orderId custom property”) adds a custom property to the message argument
- The PublishMessage activity (named “Send”) publishes the message on the Orders.Out topic. The CorrelationID property is set to the correlationID variable:
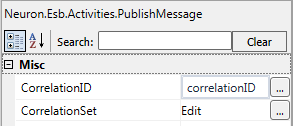
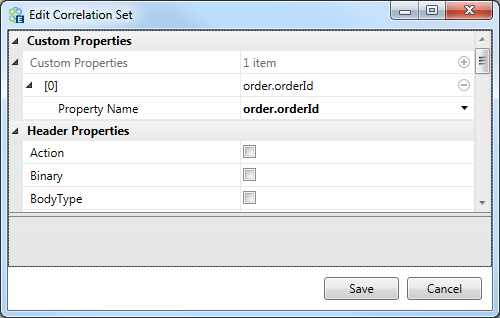
- Clicking on the ellipsis button next to the CorrelationSet property shows that the correlation set is defined as consisting of only the order.orderId custom property:
- Log the correlationID
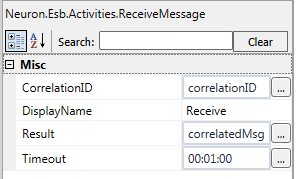
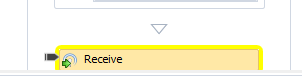
- The workflow waits on the ReceiveMessage activity (named “Receive”) for a new message that matches the correlationID value generated and when it receives the message assigns it to the correlatedMsg variable as configured in the property grid:
- Log the correlatedMsg text
Test the Workflow in Neuron Explorer
In the Workflow Designer do the following:
- To run the workflow, click the Test Workflow button on the toolbar
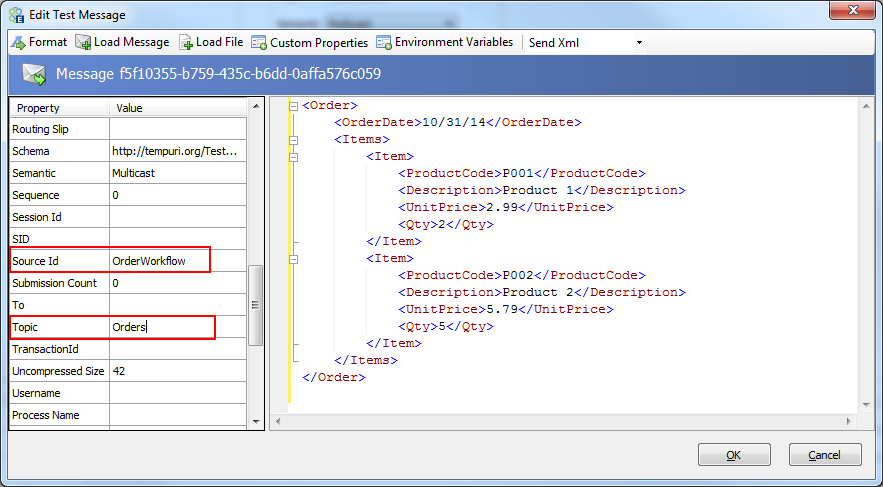
- On the Edit Test Message dialog, enter the following for the message body:
<Order>
  <OrderDate>10/31/14</OrderDate>
  <Items>
    <Item>
      <ProductCode>P001</ProductCode>
      <Description>Product 1</Description>
      <UnitPrice>2.99</UnitPrice>
      <Qty>2</Qty>
    </Item>
    <Item>
      <ProductCode>P002</ProductCode>
      <Description>Product 2</Description>
      <UnitPrice>5.79</UnitPrice>
      <Qty>5</Qty>
    </Item>
  </Items>
</Order>
- For the Source Id property, enter “OrderWorkflow” this value will be used while testing the PublishMessage activity so that the message is published from the correct Publisher. The Topic property indicates that this message is being received from the Orders topic.
- Click the OK button.
- The Workflow Designer will show the running workflow by highlighting the currently executing activity in yellow. The workflow will stop on the ReceiveMessage activity:
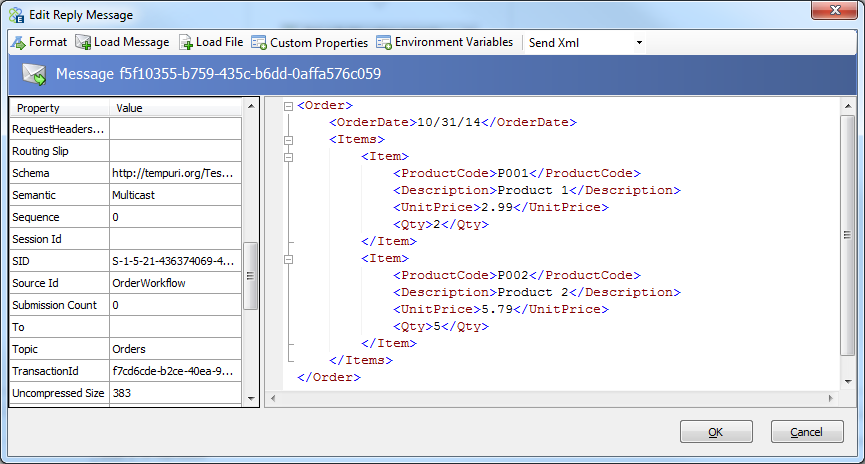
- The Edit Reply Message dialog will appear. The first message dialog started off the workflow testing and simulated the PublishMessage activity. Now when we click OK on this second message dialog, the XML will be used as if the ReceiveMessage activity had picked up this message for processing and the workflow will continue:
- Click OK
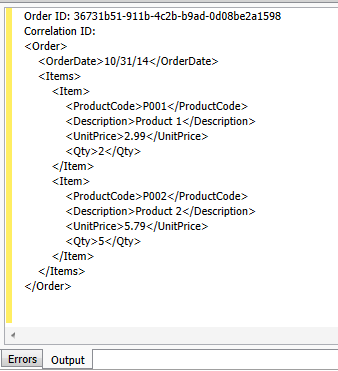
- The Output window will show you the result of the workflow. Note that since this is simulation mode there will not be a Correlation ID displayed:
Executing the Workflow
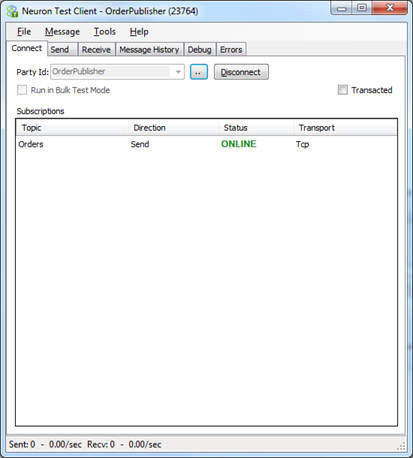
- Open an instance of the Neuron Test Client and connect to OrderPublisher:
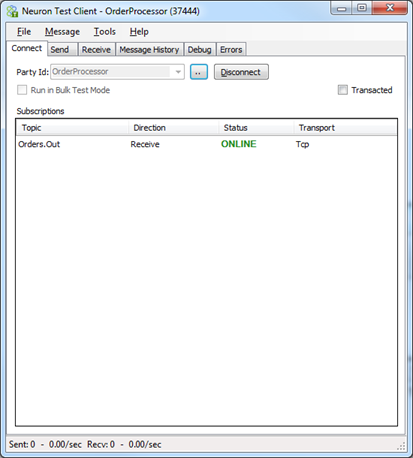
- Connect the second Neuron Test Client to OrderProcessor:
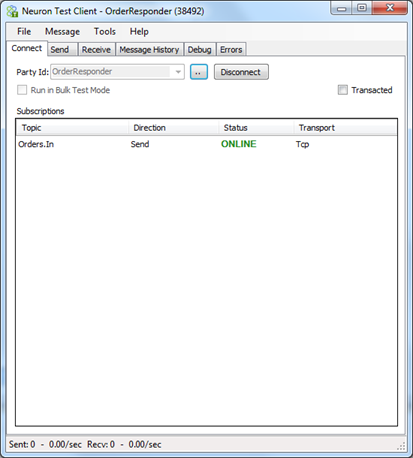
- Connect the third Test Client to OrderResponder:
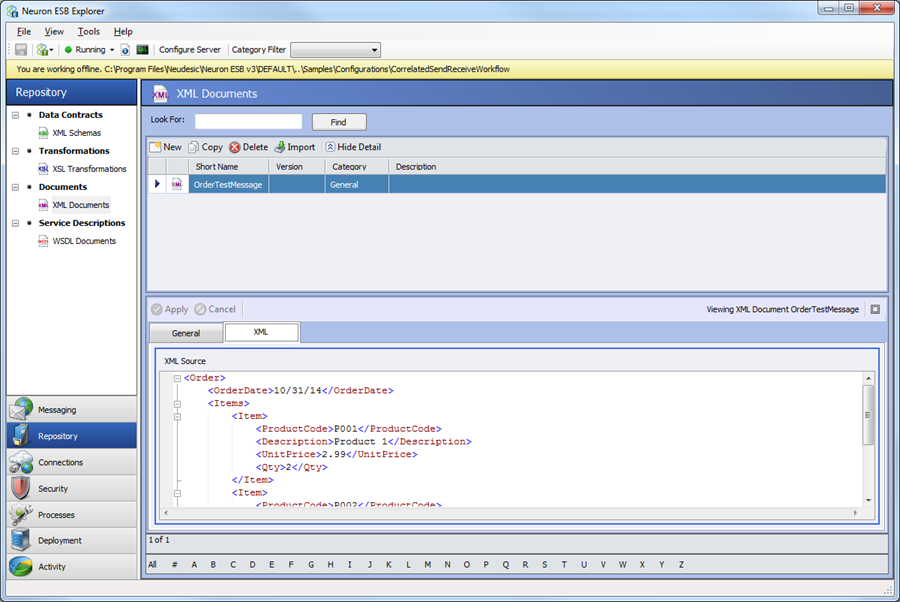
- In Neuron Explorer, click on the Repository tab and then on XML Documents. Select the OrderTestMesage and then the XML tab to see the XML we will be using. Copy the XML:
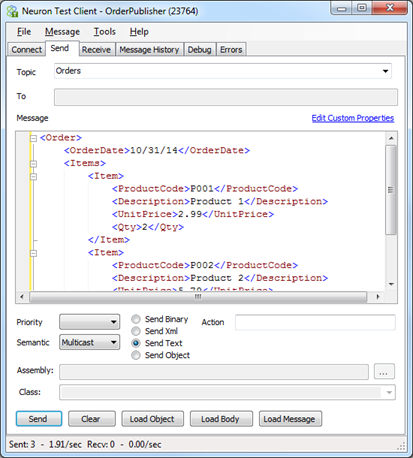
- On the Send tab of the OrderPublisher Test Client paste the contents of the OrderTestMessage XML file and click the Send button. Click Send two more times:
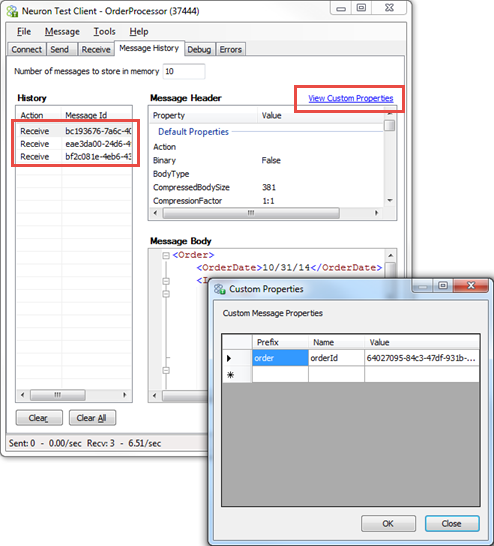
- The OrderProcessor Test Client on the Message History tab will show all 3 messages received. Click a row in the History list to see message header and body. Click the View Custom Properties link to see that the workflow did generate an order ID and assign it to the custom property:
- In Neuron Explorer, click on the Activity tab and then Workflow Tracking. Click Run Report and you will see that 3 workflow instances have executed. The state of the workflows will be Started or Unloaded depending on if you executed the report within 1 minute of the workflow being executed. Wait at least a minute and then refresh the list. Now they will all be Unloaded:

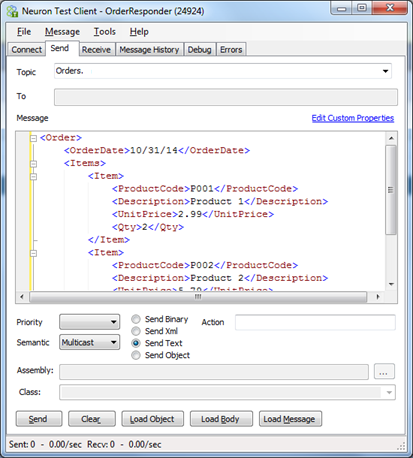
- In the OrderProcessor Test Client, select the first item in the History list and copy the message body from this test client and paste it into the OrderResponder Test Client on the Send tab:
- On the OrderProcessor Test Client, open the Custom Properties window and copy the GUID value from the last column of the orderId row:
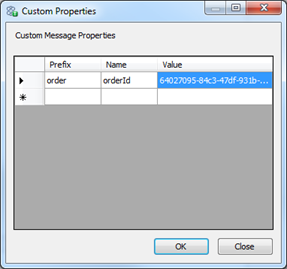
- Paste this into the Edit Custom Properties grid on the OrderResponder Test Client:
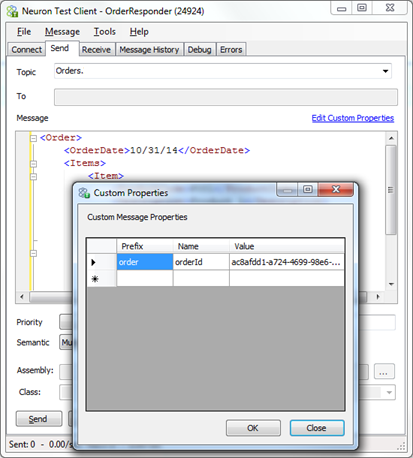
- Click the Send button.
- Click Run Report on Workflow Tracking and you will see one instance of the workflow has changed to Completed:

- Repeat the above process with the other 2 messages. Copy the body and custom properties from the OrderProcessor Test Client to the OrderResponder Test Client. After sending each of those messages, all 3 workflows will be Completed.
- Double click a Completed workflow from the Workflow Tracking screen to open the Tracking Detail screen:
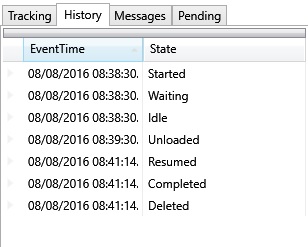
- Click on the History tab to see that the workflow was Started, a minute later it went Idle and was Unloaded, was later Resumed. The workflow was then Completed and the instance Deleted from the Workflow Engine:
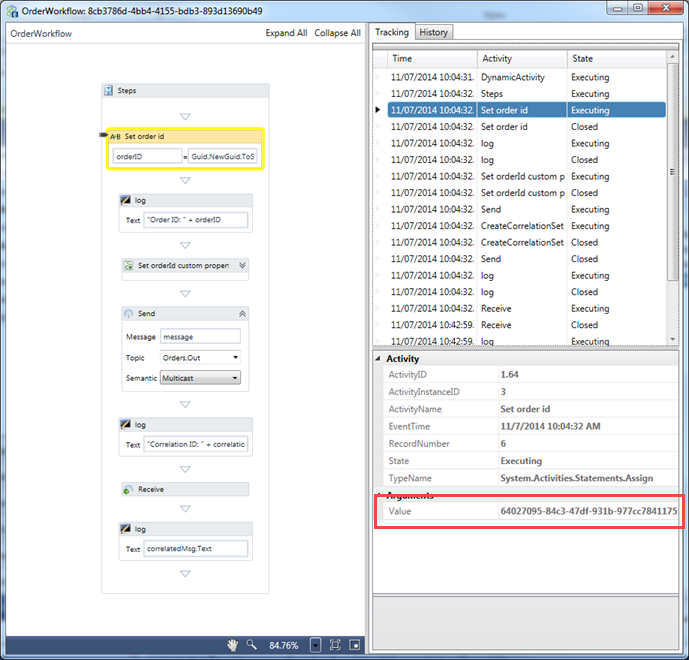
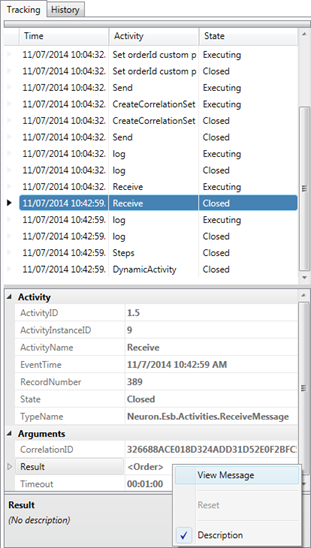
- The Tracking tab shows each executed activity in the workflow. Click on the first “Set order id” item with State of Executing and the activity will be highlighted in the Workflow Designer. Note the value of the orderId variable:
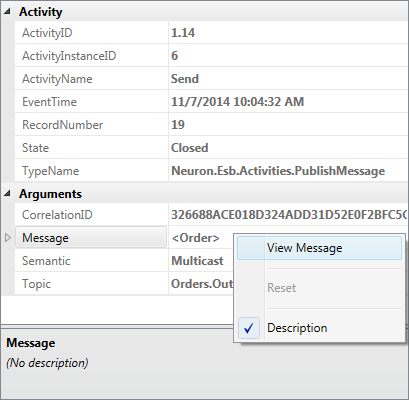
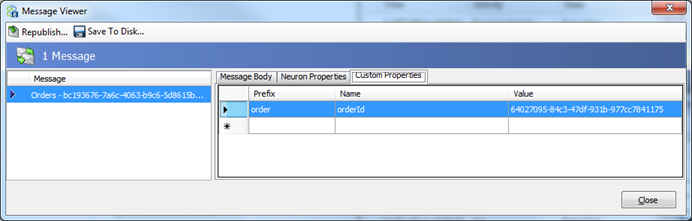
- Select the Tracking row for the Send Activity and the Closed State.
- Right-click on the Message entry in the property grid and select View Message to open the Message Viewer:
- Click the Custom Properties tab and verify that it is the same order ID and noted earlier. This shows the order ID used by the PublishMessage activity:
- Close the Message Viewer window.
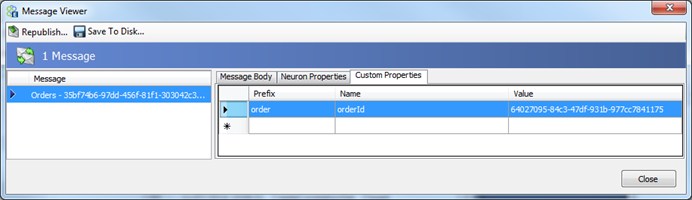
- On the Tracking tab, select the Receive Activity and the Closed State. In the property grid, right-click the Result and click View Message to see the message that was correlated back to the original workflow and picked up by the ReceiveMessage activity:
- On the Message Viewer on the Custom Properties tab you will see that sure enough the order ID matches the one that was published showing correct routing based on a correlation set based on the order.orderId custom property:
You have successfully tested and executed this solution and understand the Workflow activities used.