Configuring Parties
Once a Party connects to the bus, either remotely or locally, it immediately downloads its relevant configuration information from the Neuron ESB Server. When configuration of a Party changes within the Neuron ESB Explorer UI, all connected Parties automatically get updated and will respect the new configuration. The interval (in seconds) for Parties auto updating their configuration is managed through the “Client Polling Interval” property is located under the Server Options section of the Zone’s Server tab by selecting Deployment ->Divisions->Zones from the navigation bar located on the left hand side of the Neuron ESB Explorer. The default time is 15 seconds.
Configuration of existing and new Parties is done through the Details Pane. The Details Pane consists of a 4 tabs, representing 4 sections of the configuration:
- General –general information such as the name of the Party, the category (metadata) associated with the Party, as well as a description and the current zone. More importantly, Subscriptions are defined on this tab as well.
- Security – This contains options for locking down parties using Windows Integrated security. Also contains options for local logging and session activity. Control of instances is configured here as well.
- Process –Associate one or more processs to a Party
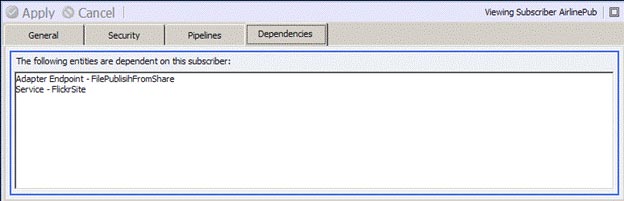
- Dependencies – This will list Service Connectors, Client Connectors and Adapter Endpoints that reference the Party
Users must select the Apply button, followed by clicking the Save button on the toolbar for any changes made to Party configuration to take effect. All changes are made dynamically if the Neuron ESB Explorer is connected to the configuration in “OnLine” mode. If the Neuron ESB Explorer is connected to a configuration file in “OffLine” mode, but the Neuron ESB Service is configured to use that same configuration file, the Neuron ESB Service will detect the file change, and load the changes to the Party dynamically.
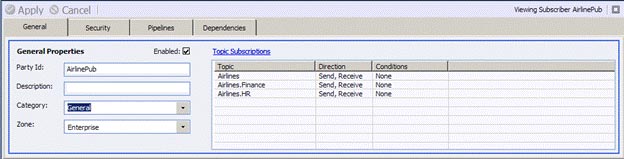
General
The General tab of the Details Pane is the first section to configure when creating a new Party.
Property Table
| Property Name | Required | Description |
| Party Id | Yes | This is the name of the Party. This is commonly referred to as the Party ID, Publisher ID or Subscriber ID |
| Enabled | Yes | True by default. If set to False, the Party will appear to be grayed out within the Management Window. |
| Description | No | Text description of the Party. Will be displayed in the Management Window. |
| Category | No | Metadata associated with the Party. Any existing categories will be displayed in the drop down box. If a new category is desired, it can be manually entered into the text box. Once the Party has been saved, the new category will be available to be used anywhere within the Neuron ESB Explorer |
| Zone | Yes | The zone that the Party will be associated with. By default this is “Enterprise”. Additional zones can be configured in the Deployment section of the Navigation Bar. |
| Topic Subscriptions | Yes | This is the area where subscriptions are defined. Users click on the hyperlink label, “Topic Subscriptions” to open the Subscriptions dialog box. All existing subscriptions are displayed in the data grid located directly below the hyperlink label. |
Subscriptions
Subscriptions link Parties to Topics and control the flow of messaging between all Parties. Each party must have at least one subscription. When editing a Party, any existing subscriptions are listed on the General tab. There is also a Topic Subscriptions hyperlink for editing the list of subscriptions. Clicking this link displays the Subscriptionsdialog box.
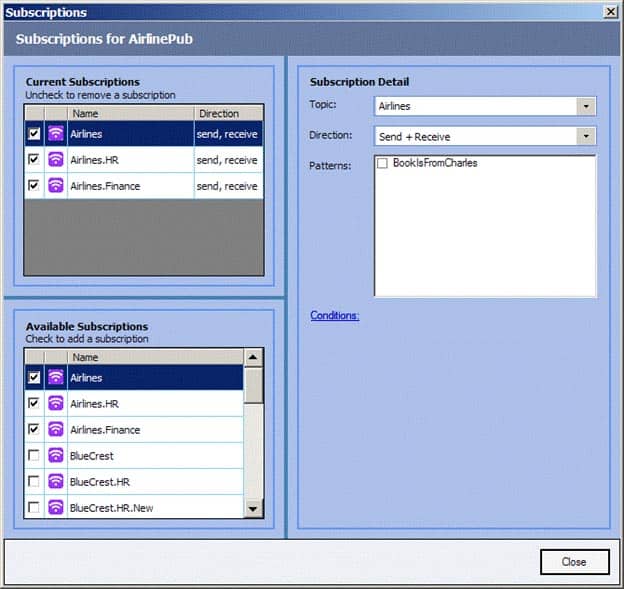
View/Modify Subscriptions
Current Subscriptionsare located in the checked list box located in the top left hand corner of the Subscriptions dialog box. This displays all current subscriptions to Topics, specifically the name of the Topic, as well what “Direction” the subscription for the Party is allowed to have. A Party can have subscriptions to multiple Topics, all with different “Direction” parameters.
Direction determines the capacity in which the Party is either allowed to publish, subscribe (or both) messages to a Topic. The possible choices are Send (Publish), Receive (Subscribe), Send/Receive or Exclude. The Exclude option is equivalent to not having a subscription at all and its use is deprecated.
To view the details of a Subscription, click on a specific subscription in the Current Subscriptions list. The details will be displayed in the Subscription Detail section on the right hand of the Subscription dialog box.
A Subscription has the following properties displayed in the Subscription Detail section:
- Topic – This is the name of the Topic that the Party is linking to.
- Direction – This determines the role of the Party in reference to the Topic. Either the Party will be allowed to Send (Publish), Receive (Subscribe) or both.
- Pattern – This is a checked list of persisted (reusable) Message Patterns that can be selected to further refine the subscription to a Topic. For example, users can define a Message Pattern that, when evaluated with the Topic part of the subscription, performs stateful inspection of the message body or header to determine if the criteria contained in the pattern is a match with the message. The Party is allowed to receive or send the message if the Message Pattern evaluates to True.
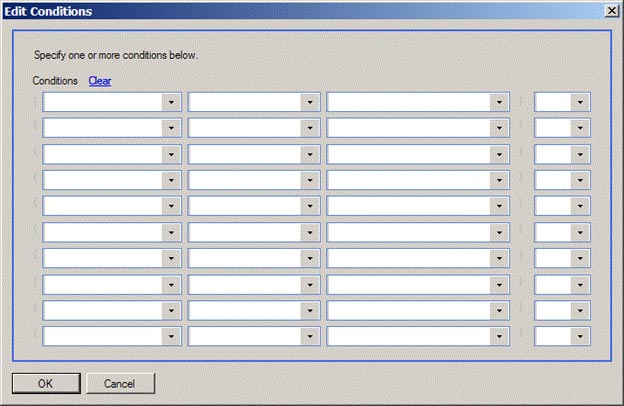
- Conditions – This is identical to Message Patterns (with very few exceptions) except that they are not reusable across other Parties. Clicking on the “Conditions:” hyperlink button will display the Conditions dialog box. A set of conditions can be defined, joined by AND/OR/XOR
All Modifications to Subscriptions are saved by clicking the Close button, followed by selecting Apply, and then save from Neuron ESB Explorer.
Adding Subscriptions
Users can add a subscription to a Topic by clicking the checkbox by the Topic listed in the Available Subscriptions checked list box located in the lower left hand corner of the Subscriptions dialog box. Once selected, the Topic name will appear in the Current Subscription list box, and its details will appear in the Subscription Details section of the Subscription dialog box.
Message Patterns
Message Patterns are a useful, reusable way to further restrict message flow across topics by either content or context. Message Patterns can be managed by selecting Messaging ->Topics->Patterns from the navigation bar located on the left hand side of the Neuron ESB Explorer. This will open the Message Pattern Management Window. When a Message Pattern is selected, the Details Pane will be displayed on the lower bottom of the Management Window. Below this will be the navigation bar. Above the Management Window will be the Search bar. The Details Pane is where users enter information for a new Pattern, or modify information for an existing Pattern.
A Pattern can be persisted to the Neuron ESB Configuration by clicking the Apply button. However, it will not be enabled for runtime execution or activation until it is saved (by clicking the Save toolbar button).
When a subscription has either Conditions or Message Patterns, messages are filtered such that only when the Conditions and/or Message Patterns are met is a message passed on to an endpoint, or allowed to be published.
The Message Pattern dialog allows you to specify one or more conditions, which can be joined by AND/OR/XOR and supports parenthetic expressions. For example:
(BodyType = ‘PurchaseOrder’ OR BodyType = ‘PurchaseOrderV2’) AND Body Matches XPath ‘//PurchaseOrder[@Status=’Approved’])
In contrast, Conditions are virtually identical to Message Patterns, except the options to check the conditions against are slightly different, they can only be created within the Conditions dialog box, accessed through the Subscriptions dialog box and they are not reusable.
Configuring Message Patterns
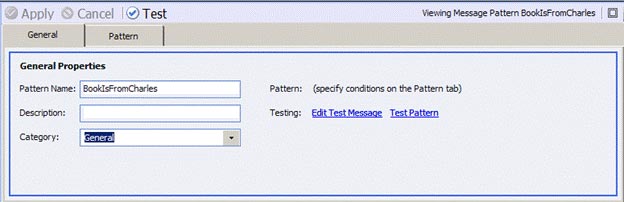
Configuration of existing and new Message Patterns is done through the Details Pane. The Details Pane consists of a 2 tabs, representing 2 sections of the configuration:
- General –general information such as the name of the Message Pattern, the category (metadata) associated with the Pattern, as well as a description. This also contains an area to insert a test message to that the pattern can be tested.
- Pattern – This is the dialog box that contains the Message Pattern’s set of conditions.
Users must select the Apply button, followed by clicking the Save button on the toolbar for any changes made to Message Pattern configuration to take effect. All changes are made dynamically if the Neuron ESB Explorer is connected to the configuration in “OnLine” mode. If the Neuron ESB Explorer is connected to a configuration file in “OffLine” mode, but the Neuron ESB Service is configured to use that same configuration file, the Neuron ESB Service will detect the file change, and load the changes to the subscription dynamically.
General
The General tab of the Details Pane is the first section to configure when creating a new Message Pattern.
Property Table
| Property Name | Required | Description |
| Pattern Name | Yes | This is the name of the Message Pattern. |
| Description | No | Text description of the Party. Will be displayed in the Management Window. |
| Category | No | Metadata associated with the Message Pattern. Any existing categories will be displayed in the drop down box. If a new category is desired, it can be manually entered into the text box. Once the Pattern has been saved, the new category will be available to be used anywhere within the Neuron ESB Explorer |
| Edit Test Message | No | This is a hyperlink button. This will display the Edit Test Message dialog box in which a test message can be entered and stored with the pattern. This is used in conjunction with the Test Pattern hyperlink and Test buttons. |
| Test Pattern | No | This is a hyperlink button. This will evaluate the test message entered using the “Edit Test Message” hyperlink button against the pattern to determine if there is a match. |
Pattern
The Pattern tab is where a set of conditions can be configured for runtime evaluation against messages. There are 6 columns of drop down combo boxes:
Property Table
| Column Name | Required | Description |
| Open Parenthesis | No | Used to supports parenthetic expressions. |
| Context Reference | Yes | Contains a list of ESB Message header properties (meta data) as well as references to the ESB Message Body that conditions can be evaluated against. For a complete list, see the “Conditions– Context Reference Availability” table. |
| Predicate | Yes | Contains a list of predicates that can be used to evaluate a condition against the selected context reference. For a complete list, see the “Conditions– Predicate Availability” table. |
| Condition | Yes | Users may enter text, numeric or literal string. This value is used with selected predicated for runtime evaluation against the context reference. |
| Close Parenthesis | No | Used to supports parenthetic expressions. |
| Join Selector | No | Used to support multiple conditions. User can select Blank (no selection), AND, OR, XOR. Default is Blank |

Conditions– Context Reference Availability
| Context Reference | Message Pattern | Conditions | Description |
| Action | X | X | The SOAP action associated with the message, if any |
| Body | X | X | The body of the message |
| BodyType | X | X | The name of the object that was serialized to create the message payload, if any |
| Created | X | The time the message was created | |
| DestID | X | The destination Id of the message, if any (only set if using Direct Messaging to as single target recipient) | |
| Event | X | X | The name of a business event the message corresponds to, if any (Deprecated) |
| Expires | X | The expiration time for the message | |
| MessageID | X | The unique ID of the message (a GUID string) | |
| Object | X | The body of the message | |
| Part | X | The message chunk number, if the message was divided into multiple chunks | |
| Parts | X | The total number of message chunks the message was divided into | |
| Priority | X | An integer priority for the message | |
| Publisher | X | The name of the party that published the message | |
| ReplyToMessageId | X | If this is a reply to a request, the messageId of the original request | |
| ReplyToPartyId | X | If this is a reply to a request, the Party ID of the original request | |
| ReplyToSessionId | X | If this is a reply to a request, the Session ID of the original request | |
| Schema | X | X | The declared schema name for this message, if any (applies to XML messages) |
| Semantic | X | An integer describing the messaging pattern (multicast, request, reply, etc.) | |
| Sequence | X | An integer sequence number for this message unique to the publisher’s session | |
| Session | X | A unique GUID string identifying the publisher’s session | |
| SourceID | X | The name of the party that published the message (same as Publisher) | |
| Topic | X | X | The topic the message was published on |
Conditions– Predicate Availability
| Predicate | Message Pattern | Conditions | Description |
| Contains | X | X | Does the <field> contain the string <value>? |
| Does Not Contain | X | X | Does the <field> NOT contain the string <value>? |
| Does Not Match RegEx | X | X | Does the <field> NOT match the regular expression <value>? |
| Does Not Match XPath | X | X | Does the <field> NOT match the XPath expression <value>? |
| Empty | X | X | Is the <field> null or an empty string? |
| Equals (text) | X | X | Is the <field> textually identical to <value>? |
| Equals (numeric) | X | X | Is the <field> numerically equal to <value>? |
| Less Than | X | X | Is the <field> numerically < <value>? |
| Less Than or Equal | X | X | Is the <field> numerically <= <value>? |
| Greater Than | X | X | Is the <field> numerically > <value>? |
| Greater Than or Equal | X | X | Is the <field> numerically >= <value>? |
| Matches RegEx | X | X | Does the <field> match the regular expression <value>? |
| Matches XPath | X | X | Does the <field> match the XPath expression <value>? |
| Not Empty | X | X | Does the <field> contain a value? |
| Not Equals (text) | X | X | Is the <field> textually NOT identical to <value>? |
| Not Equals (numeric) | X | X | Is the <field> numerically NOT equal to <value>? |
| Not Greater Than | X | X | Is the <field> numerically !> <value>? |
| Not Greater Than or Equal | X | X | Is the <field> numerically !> <value> AND numerically != <value>? |
| Not Less Than or Equal | X | X | Is the <field> numerically !<<value> AND numerically != <value>? |
| Not Less Than | X | X | Is the <field> numerically !<<value>? |
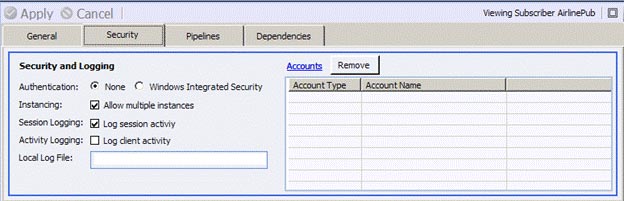
Security
The Security tab contains both security and logging configuration for a party
Property Table
| Property Name | Required | Description | ||||||||||||
| Authentication | Yes | Default is None. None or Windows Integrated is supported. If Windows Integrated Security is selected, then either Groups or Users can be selected from the local machine security account list, or from Active Directory. Accounts are selected by clicking on the “Accounts” hyperlink button to display the Active Directory account selection dialog box. All accounts selected are displayed in the associated data grid. | ||||||||||||
| Instancing | Yes |
Default is to allow multiple instances. Multiple instances of a Party are supported on the same machine. Parties can be restricted to a single instance by un-checking the selection. When restricted to single instance, the Neuron ESB service will monitor all Party connections to the bus. If another instance of the same Party attempts to connect, the connecting instance will receive an error indicating that only one instance can be active at a time. Enforcement only occurs on Connecting. Parties have unique considerations depending on the Transport assigned to the Topic.
Note: Session Logging MUST be enabled to enforce Instancing. If Session Logging is disabled, then Allow Multiple Instances will be active regardless of the setting.
|
||||||||||||
| Session Logging | No | Enabled by Default. If Enabled, a connected Party will periodically log session information to the Neuron ESB service that records its message statistics for the Party, as well as ambient properties such as:
Session activity for all Parties connected to Neuron ESB can be viewed by selecting Activity ->Database Reports->Active Sessions from the navigation bar located on the left hand side of the Neuron ESB Explorer. Periodic logging interval for all Parties is controlled by the “Client Polling Interval” property, located under the Server Options section of the Zone’s Server tab. |
||||||||||||
| Activity Logging | No | By default, all exception information is written to the Windows Application Event Log. However, if Activity Logging is enabled, additional informational logging will be written to a disk file local to the actively hosted Party. The path of the log file can be defined using the Local Log File property. | ||||||||||||
| Local Log File | No |
Used only with Activity Logging property. If blank, log file will be produced at the root of the Neuron ESB Client installation. Log file name format is: “esb_”<name of Party>”_”<session id of Party>”.log” Local file must be in local format ( i.e. “c:\”). UNC names are not supported. |
Process
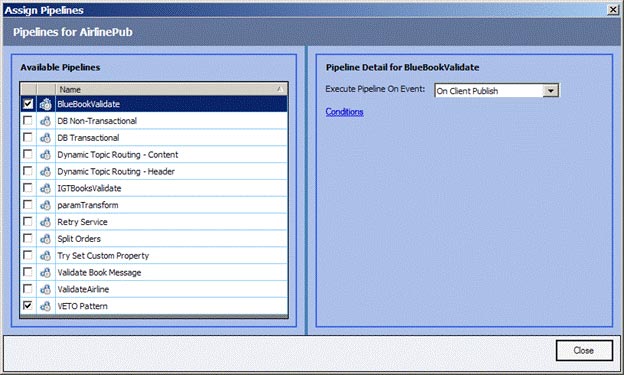
Existing Processes can be added to Parties by clicking the Processes hyperlink button located above the data grid on the Processes tab of the Detail Pane. This will display the Assign Processes dialog box where individual processes can be selected.
Within the Assign Processes dialog box, one or more processes can be selected from the Available Processes checked list box. Once selected, the event to execute the process on must be selected from the Execute Process On Event drop down box.
Processes can be assigned to execute either during the On Client Publish event, the On Client Receive event, or both. Additionally, the execution of a process can be made conditional, by clicking the Conditions hyperlink button located just below the event drop down box. This will display the same Conditions dialog box available through the Subscriptions dialog box described in the View/Modify Subscription section of this document here.
Dependencies
This tab displays all Service Connectors, Client Connectors and Adapter Endpoints referencing the Party. When deleting a Party, a dialog box will be presented displaying those artifacts which will be affected by the removal of the Party.