Business Process to Workflow Sample
The business process to workflow sample will show you how to receive information inside of a business process, in order to return an immediate response to a client, while passing the processing of long running tasks over off to a workflow.
Note: It Is recommended that you already be familiar with Neuron ESB before starting this tutorial. You will also need to ensure that Neuron ESB is installed in your environment and configured appropriately.
This sample contains the following artifacts:
- Neuron ESB Configuration
- Sample Documentation
Overview
There are many scenarios in which a company might require a web request to get an immediate response, despite lengthy tasks still not having yet been completed on the backend.
Neuron ESB relies on its business processes for quick request/reply scenarios and its workflows to handle long running tasks. However, in scenarios where both are required it is necessary for users to be familiar with how to handle the assigning of the long running tasks while still returning a quick response to the user.
Scenario
Today our friend Sam Pleuser is working for an E-Commerce company, helping them to integrate their shopping cart into their enterprise integration architecture. He is informed by his manage of a new requirement for the shopping cart:
After payment processing the shopping cart will send the order to Neuron ESB. Neuron ESB must then identify each item in the order and enter a request in the warehouse fulfillment software for said item to be shipped to the mailing address attached to the order. Once the warehouse has shipped the product the fulfillment software will be updated, which will send a response message to Neuron ESB informing it of the completed shipment. Neuron will need to capture this response and update the shopping cart application, so that customers can see when their orders have shipped.
Sam realizes that this scenario is going to require him to make use of both business processes and workflows inside of Neuron ESB, as the response the customer must be immediate, but the warehouse might take days to fulfill the order.
He begins by mapping out the scenario.
- Order received from shopping cart application
- Order id used by shopping cart to identify a complete order whereas item id is used to identify each item in an order
- Each item in the order must be sent individually to the warehouse fulfillment software
- Once each item is sent to warehouse fulfillment successfully the shopping cart application needs to receive a success message.
- When the warehouse ships an item the fulfillment software will generate a message with the order id and the item id that has been shipped.
- Neuron must capture that message and update the shopping cart application with a new status of item shipped.
With a firm understanding of what needs to be completed, Sam begins to construct the appropriate artifacts in Neuron ESB.
The first thing Sam does is to create the necessary topics and parties.
He creates the following topics
- Orders
- Orders.Request
- Orders.Response
- Fulfillment
- Fulfillment.Request
Sam also creates the following parties
- OrdersPublisher
- Send permissions on Orders.Request
- Receive permissions on Orders.Resposne
- OrdersSubscriber
- Receive permissions on Orders.Request
- Send permissions on Orders.Response
- Send permissions on Fulfillment.Request
- FulfillmentSubscriber
- Receive permissionson Fulfillment.Request
- Send permissions on Orders.Request
With his topics and parties out of the way Sam moves on to generating an XML document that will serve as a template for the messages sent to the fulfillment software.
He creates an XML document in the repository, which he calls “Fulfillment Message Template”, and has the following XML
<Request>
	<OrderId>{0}</OrderId>
	<CustomerName>{1}</CustomerName>
	<MailingAddress>{2}</MailingAddress>
	<ItemId>{3}</ItemId>
	<Quantity>{4}</Quantity>
</Request>
Now that the initial setup is complete Sam can move on to developing is workflow and business process.
Knowing that his business process relies on his workflow, Sam begins by constructing the workflow first.
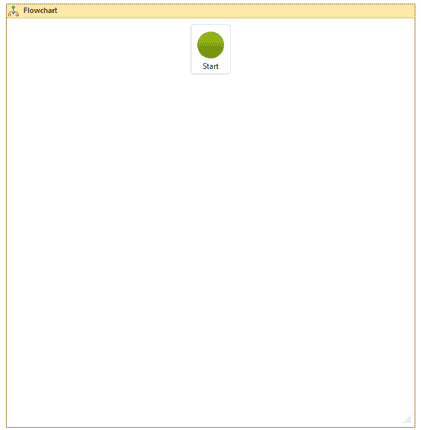
Sam creates a normal workflow called “Fulfillment Workflow”.
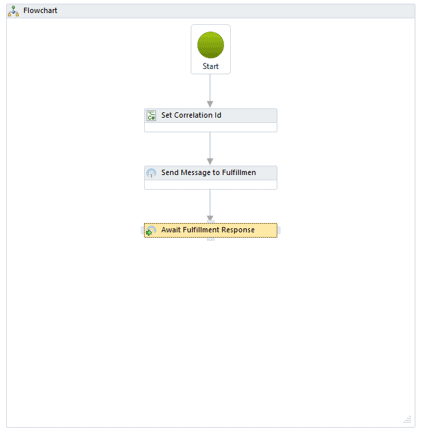
His first step is to place a container into the workflow definition, so that all other steps can be added. Sam uses a Flow Chart container for this, though he easily could have also used a sequence container, for the graphical layout.
He then adds two variables to his workflow definition
- correlationId – A string used to correlate the reply from the fulfillment software with the request sent out by the workflow.
- fulfillmentResponse – An ESBMessage object used by the workflow to capture the response from the fulfillment software.

Next Sam adds a C# activity to the workflow definition and names it “Set Correlation Id”.
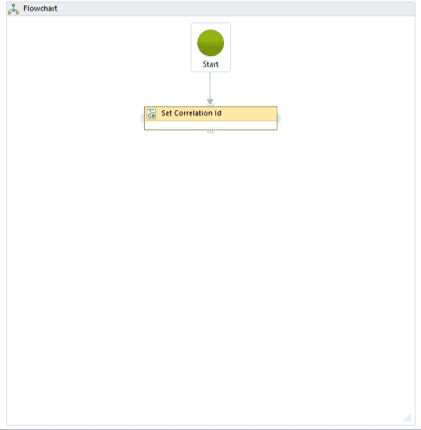
Inside of the C# activity Sam adds the following code
var document = new System.Xml.XmlDocument();
document.LoadXml(message.Text);

var orderId = document.DocumentElement.SelectSingleNode("/Request/OrderId").InnerText;
var itemId = document.DocumentElement.SelectSingleNode("/Request/ItemId").InnerText;
var uniqueId = orderId + "-" + itemId;

message.SetProperty("message", "uniqueId", uniqueId);
This generates a unique id for the message, based on the order id and the item id, and sets it as a property on the message. Sam will use this property later on as the correlation id.
Next Sam adds a publish activity, which he calls “Send Message to Fulfillment”, to the workflow which will send the message over to the fulfillment software application.
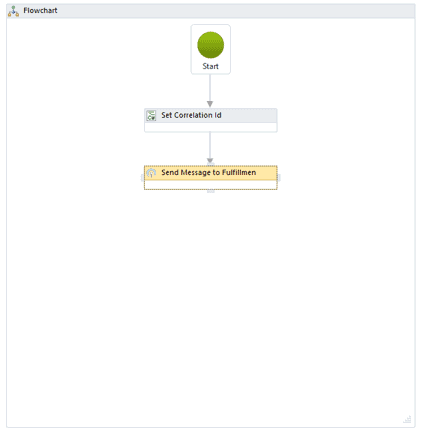
In the property grid for this publish activity Sam sets the following
- CorrelationID -> the correlation id variable (correlationId) that Sam created on the workflow
- Message -> message, which is the message variable for the workflow.
- Semantic -> Multicast, as the workflow is not expecting a standard response, but rather a response later on down the road.
- Topic -> Fulfillment.Request, which is the topic on which the endpoint for the fulfillment software is listening
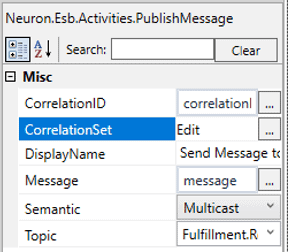
Sam also uses the ellipses next to CorrelationSet to tell the workflow where the correlation id for the message can be found.
Next Sam instructs the workflow to wait for a response from the fulfillment software by placing a receive message activity in the definition, which he calls “Await Fulfillment Response”.
In the property grid for this activity Sam sets the following
- CorrelationId -> the correlation id variable (correlationId) that Sam created on the workflow
- Result -> the ESB message variable (fulfillmentResponse) that Sam created on the workflow
- Timeout -> Sam leaves this as the default value

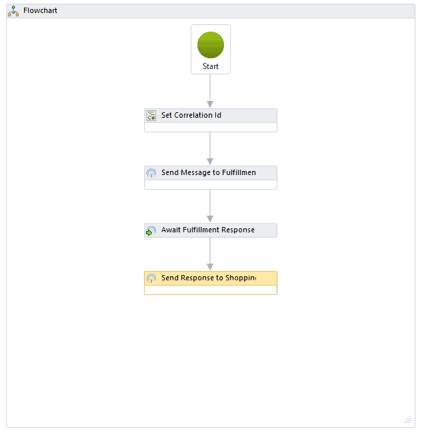
Lastly Sam adds another publish activity, which he names “Send Response to Shopping Cart”, to the workflow definition which will publish the response from the fulfillment software back to the shopping cart application.
In the property grid for this activity Sam sets the following
- Message -> fulfillmentResponse, as the response from the fulfillment software needs to be sent back to the shopping cart application.
- Semantic -> Multicast, as there is no reply expected back from the shopping cart application.
- Topic -> Orders.Response, as this is the topic on which the shopping cart application is listening.
Sam applies and saves his changes to the configuration.
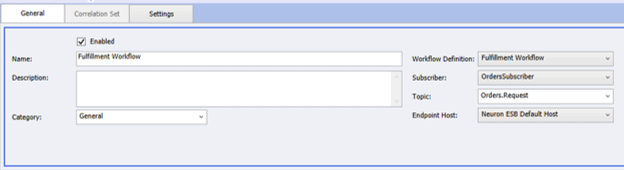
The last thing that Sam has to do for his workflow is to create an endpoint, which he calls “Fulfillment Workflow” to host the workflow definition, with the following properties.
- Workflow Definition -> Fulfillment Workflow
- Subscriber -> OrdersSubscriber
- Topic -> Orders.Request
- Endpoint Host -> Neuron ESB Default Host
Sam knows that his business process will need to achieve a couple of things
- Capture the order id
- Capture the customer information
- Split out each item in the order into its own individual message
- Create a message for the fulfillment system
- Publish the message to the topic on which the fulfillment workflow is listening
- Send a successful response to the shopping cart application once all item messages have been sent
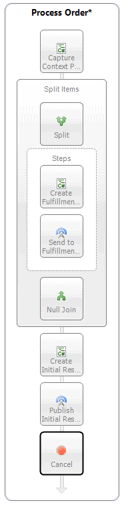
After creating a business process which he calls “Process Order” Sam adds to the business process a C# process step and names it “Capture Context Properties”.
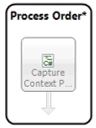
Sam will use this process step to read through the message received from the shopping cart application and capture the order id, customer name and mailing address, as all the item messages being sent to the fulfillment workflow will need this information.
He adds the following code to the process step in order to achieve this.
var document = new System.Xml.XmlDocument();
document.LoadXml(context.Data.Text);

context.Properties["OrderId"] = document.DocumentElement.SelectSingleNode("/Order/OrderId").InnerText;
context.Properties["CustomerName"] = document.DocumentElement.SelectSingleNode("/Order/CustomerName").InnerText;
context.Properties["MailingAddress"] = document.DocumentElement.SelectSingleNode("/Order/MailingAddress").InnerText;
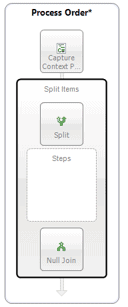
Next Sam adds a split step, which he calls “Split Items” to the business process, which will split the message apart based on an XPath of “/Order/Items/Item”, allowing Sam to identify each individual item in the order and process it as its own unique message. Sam also sets the Join type of this split step to null as he does not need to process the results of the split.
Inside of his split process step Sam adds a C# process step, which he names “Create Fulfillment Request”, which is responsible for taking the information that he saved into the context properties, and combining it with the item id, and quantity from the item message, in order to create a message for the fulfillment software.
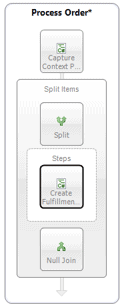
Sam adds the following code to this process step, using the XML document (Fulfillment Message Template) that he created earlier to make sure the message generated is in the proper format for the fulfillment software.
var document = new System.Xml.XmlDocument();
document.LoadXml(context.Data.Text);

var itemId = document.DocumentElement.SelectSingleNode("/Item/Id").InnerText;
var quantity = document.DocumentElement.SelectSingleNode("/Item/Quantity").InnerText;

context.Data.Text = string.Format(context.Configuration.XmlDocs["Fulfillment Message Template"].Xml.ToString(), context.Properties["OrderId"].ToString(), context.Properties["CustomerName"].ToString(), context.Properties["MailingAddress"].ToString(), itemId, quantity);

context.Instance.TraceInformation(context.Data.Text);
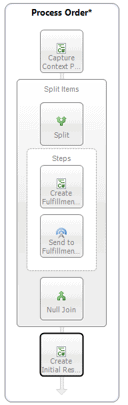
Sam then adds a publish process step, which he calls “Send to Fulfillment Workflow”, in order to publish this newly created message to the topic on which the Fulfillment Workflow is listening (Orders.Request).

In the properties grid for this step Sam sets the following
- Topic Selector -> Topic -> Orders.Request
- Semantic -> Multicast
With the split process step, and its child steps, complete Sam moves on to creating a response message for immediate delivery to the shopping cart application.
Sam adds a c# process step to his business process, which he calls “Create Initial Response Message”. This will generate a response message to be sent immediately back to the shopping cart application, letting it know that the order was received properly and is in the process of being completed.
Inside this process step Sam adds the following code to create his response message.
context.Data.Text = "<Response><OrderId>" + context.Properties["OrderId"].ToString() + "<OrderId><Status>Success</Status></Response>";Sam then adds a publish process step to his business process, which he calls “Publish Initial Response”, which will send a reply message back to the shopping cart application.
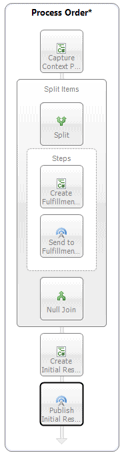
In the property grid for this step Sam sets the following
- Topic Selector -> Topic -> Orders.Request
- Semantic -> Reply
Finally, Sam adds a Cancel process step to his business process to prevent it from publishing the message to the bus, as his process has already handled this for him.
With his process complete Sam applies and saves his changes to the configuration.
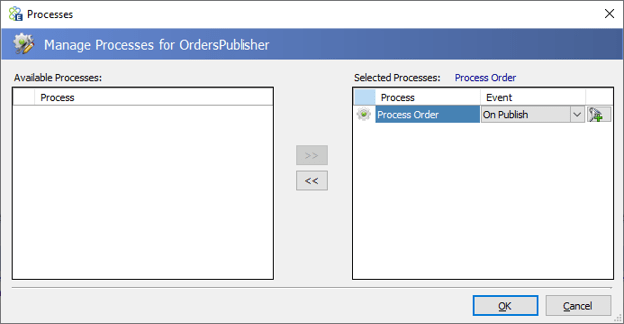
All that is left for Sam to do is to wire up his business process to his publisher so that it is called when a message is received.
Sam sets his Neuron ESB instance to run this new configuration so that he can test his process.
The first thing Sam does is launches a Test Client to replicate the Fulfillment Software application, connecting the test client as the FulfillmentSubscriber.
Next he launches the shopping cart application and enters in an order


Sam Presses 1


Sam Presses 2
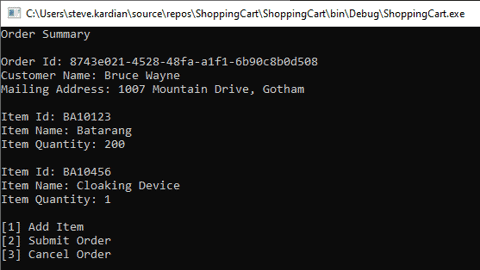
Sam Presses 2
Sam returns to his Neuron Explorer and navigates to Activity -> Workflow Tracking so that he can see the results of the message he just sent.

There are two workflow records in the tracking report, which is what Sam had envisioned as he had two items in his order.
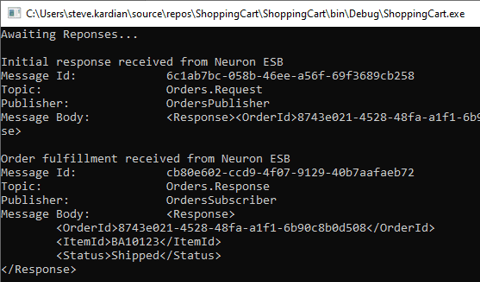
Sam moves on to the Test Client, clicking on the Receive and sees the last message that was sent to the fulfillment software system.
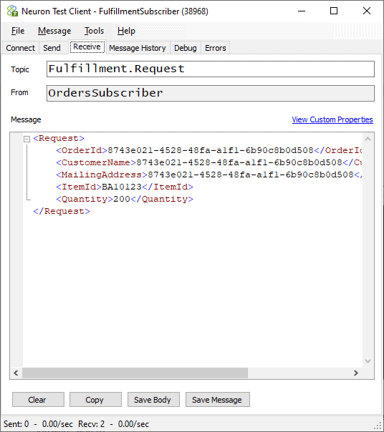
By clicking on the Message History tab he can see all the messages that were sent to the fulfillment software, and as expected there are two of them (one for each item in the order).
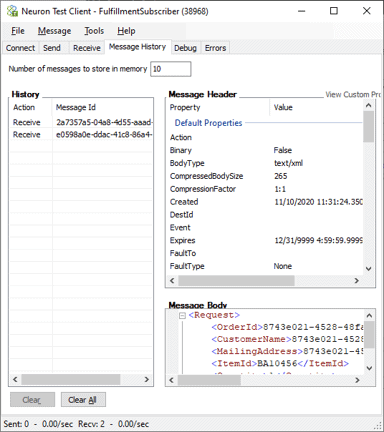
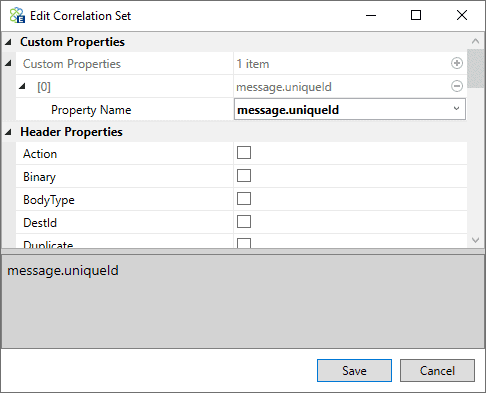
Sam clicks the first message in the message history list and clicks on View Custom Properties to see the unique id that the system generated and attached to the message as the correlation id. Sam copies the value for this property.
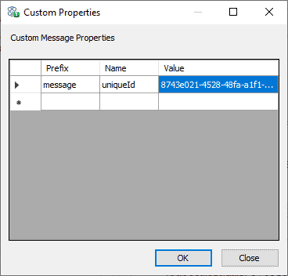
Sam closes the Custom Properties dialog box and clicks on the Send tab of the Test client. He then clicks on Edit Custom Properties and creates a new property with a prefix of message and a name of uniqueId, pasting the copied value into the value field.
This will add the property to outgoing messages and allow Neuron to correlate the message as a reply to the original request.
Sam closes the Custom Property dialog window and enters the following message in the Message pane of the Send Tab.
<Response>
	<OrderId>8743e021-4528-48fa-a1f1-6b90c8b0d508</OrderId>
	<ItemId>BA10123</ItemId>
	<Status>Shipped</Status>
</Response>
He leaves the semantic as multicast, as it is not a direct reply to a request and clicks send, to simulate a response from the fulfillment software application.
There is no doubt in Sam’s mind that more than 60 seconds has passed and so any request reply scenario would have likely timed out by the time that he hit the send key. However, looking at his shopping cart application Sam sees that the message was received and displayed as he had expected it to be.
Sam performs the same test for the second message in the Test Client’s Message History Tab, making sure to change the custom property to the value associated with this message, and again the response is received by the shopping cart application.
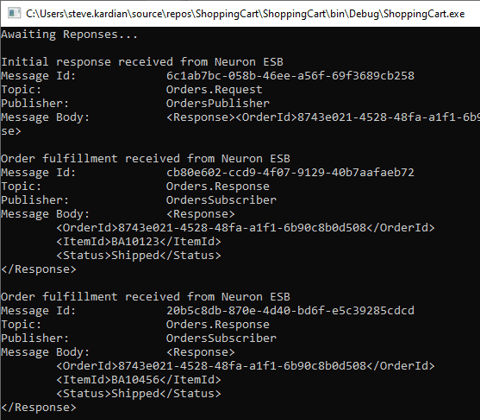
Having verified that he is able to send an order which is split up into individual items, sent as unique messages and that a response can be handled any time later, Sam has achieved the task which he was assigned.