Adapter Endpoints
Adapter Endpoints
A Neuron .NET Adapter offers one or more endpoints for communication. Each endpoint requires a separate Adapter Endpoint definition in the Connections ->Endpoints->Adapter Endpoints area of the ESB Explorer.
An adapter’s traffic can be routed through the ESB. The Adapter and its clients continue to operate as in the past, but the messaging is now open to additional parties through publish-subscribe messaging. For example, messages from clients can be shared with additional parties.
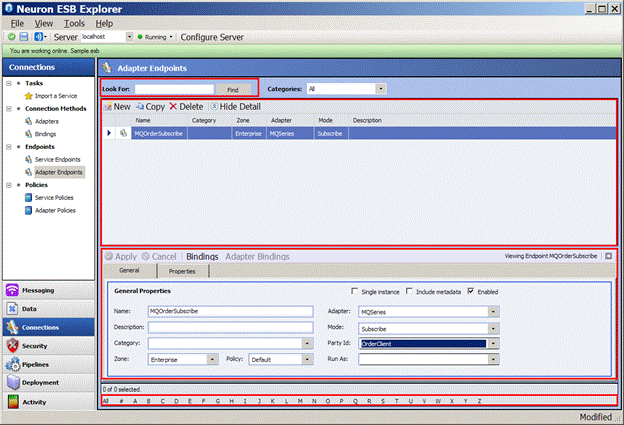
To create an Adapter Endpoint in the Neuron ESB Explorer, select Connections ->Endpoints->Adapter Endpoints from the navigation bar located on the left hand side of the Neuron ESB Explorer. This will open the Adapter Endpoint Management Window. When an Adapter Endpoint is selected, the Details Pane will be displayed on the lower bottom of the Management Window. Below this will be the navigation bar. Above the Management Window will be the Search bar. The Details Pane is where users enter information for a new Adapter Endpoint, or modify information for an existing Adapter Endpoint.
Once an Adapter Endpoint is persisted to the Neuron ESB Configuration (by clicking the Apply button), it will not be enabled for runtime execution or activation until it is saved (by clicking the Save toolbar button).

Management Window
The Management Window displays a list of all saved Adapter Endpoints within the currently opened Neuron ESB configuration. This list can be sorted by clicking on any column within the grid.
Details Pane
The Details Pane lies below the Management Window and is only displayed when an Adapter Endpoint within the Management Window is selected. The Details Pane contains all the configuration settings for an Adapter Endpoint.
Adapter Endpoints are separated into two categories; General and Properties.
- General –general information such as the name of the adapter endpoint, the category (metadata) associated with the adapter, description, current zone, policy and adapter.
- Properties –All the endpoint properties configurable for the specific Adapter selected
Adapter Endpoints can also use Environment Variables. These can be entered for both the General and Properties category by clicking on either the Bindings or Adapter Bindings command button located beside the Apply and Cancel buttons.
Bindings
The General and Properties categories of Adapter Endpoints have associated Binding collections. Bindings are used to override property values at runtime and are associated with the deployment groups. This is especially useful for properties such as connection strings, URL’s, server names, etc.
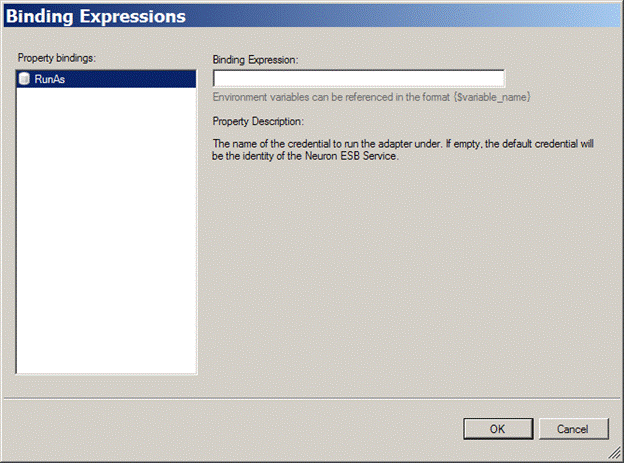
When the General tab of the Details Pane is selected, click the “Bindings” button to open the Binding Expressions Editor as shown in Figure 10.

The General category only exposes one property within the Binding Expression Editor, the RunAs property.
The editor allows you to define a Binding Expression for any scalar property. To add a Property Binding click a property from the property list located at the left of the dialog box. Enter the value in the “Binding Expression” text box. The property name in the list will appear in BOLD font if an expression has been entered.
Before the Adapter Endpoint is executed, the environment variable will be replaced with a pre-defined value that is defined in the Deployment -> Resources -> Environment Variables section of Neuron Explorer. Different values for the variable can be entered for each deployment group.
Note: When the replacement of a value occurs, the same formatting rules apply as if they were entered into the property grid associated with the step. So for example, if the property is a type of Timeout then the value must be specified as “hh:mm:ss” or if the property is a true/false selection then the value must be specified as “True” or “False”.
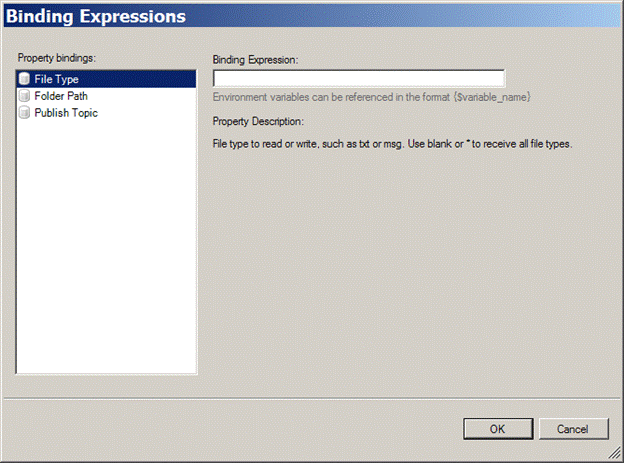
When the Properties tab of the Details Pane is selected, click the “Adapter Bindings” button to open the Binding Expressions Editor as shown in Figure 11.

The Properties category exposes either all or a subset of the properties for an Adapter Endpoint within the Binding Expression Editor.
Navigation Bar
The Navigation Bar lies directly below the Management Window and Details Pane. This allows the user to filter all the Adapter Endpoints currently being viewed in the Management Window by Alpha. The Navigation Bar options are “All”, which will display all topics (default), as well all the letters in the English alphabet (A-Z).
Search Bar
The Search Bar allows users to search for a specific Adapter Endpoint name. By the default, the search field accepts one parameter and uses that in a wildcard search. For example, if the following were entered:
- adapter
The following Adapter names would be returned
- MQSAdapter
- FileAdapterSubscribe
Searches are not case sensitive and search terms must be entered without quotation marks.
Augmenting the Search Bar is a Category filter. All categories created will be auto populated in the drop down selection. By default the selection is “All” which displays all Adapters with all categories.
Add
Adapter Endpoints can be added by clicking the “New” button located at the top of the Management Window. This will display the Details Pane that can be configured for a new Adapter Endpoint.
Delete
Adapter Endpoints can be deleted by clicking the “Delete” button located at the top of the Management Window. This will delete the currently selected Adapter Endpoint.
Copy
The configuration of one Adapter Endpoint can be completely copied to new Adapter Endpoint by clicking the “Copy” button located at the top of the Management Window. The essentially creates a new Adapter Endpoint.
Configuration
Configuration of existing and new Adapter Endpoints is done through the Details Pane. The Details Pane consists of a two tabs, representing two sections of the configuration:
- General – general information such as the name of the adapter endpoint, the category (metadata) associated with the adapter, description, current zone, policy and adapter.
- Properties – all the endpoint properties configurable for the specific Adapter selected
Users must select the Apply button, followed by clicking the Save button on the toolbar for any changes made to Adapter Endpoint configuration to take effect. All changes are made dynamically if the Neuron ESB Explorer is connected to the configuration in “OnLine” mode. If the Neuron ESB Explorer is connected to a configuration file in “OffLine” mode, but the Neuron ESB Service is configured to use that same configuration file, the Neuron ESB Service will detect the file change, and load the changes to the Adapter Endpoint dynamically.
General
The General tab of the Details Pane is the main section to configure when creating or modifying an Adapter Endpoint.
Property Table
| Property Name | Required | Description |
| Name | Yes | This is the friendly name of the Adapter Endpoint |
| Description | No | Text description of the Adapter Endpoint. Will be displayed in the Management Window. |
| Category | No | Metadata associated with the Adapter Endpoint. Any existing categories will be displayed in the drop down box. If a new category is desired, it can be manually entered into the text box. Once the Adapter Endpoint has been saved, the new category will be available to be used anywhere within the Neuron ESB Explorer |
| Zone | Yes | The zone that the Adapter Endpoint will be associated with. By default this is “Enterprise”. Additional zones can be configured in the Deployment section of the Navigation Bar. |
| Policy | Yes | This is a dropdown list populated by Adapter Policies defined in the Connections -> Policies -> Adapter Policies section of Neuron ESB Explorer. Policies control the behavior of an Adapter Endpoint on failure, as well as its availability. |
| Adapter | Yes | List of registered Adapters. |
| Mode | The modes available for the selected Adapter. | |
| Party Id | This is the Party ID that will be associated with the Adapter Endpoint. The Party ID controls the Topic that an Adapter Endpoint can publish or subscribe to. | |
| Run As | No | This is a dropdown list populated by Credentials defined in the Security -> Authentication -> Credentials section of Neuron ESB Explorer. If a credential is selected, the Adapter Endpoint will run under its context instead of the context of the Neuron ESB Service account. |
| Single Instance | Yes | Default is False (unchecked). This is used when Neuron ESB is configured for a Farm (two or more Neuron ESB servers sharing the same ESB Configuration). This controls how many instances of the Adapter Endpoint will be allowed to run simultaneously in the Farm. When unchecked, the Adapter Endpoint will run on every Neuron ESB server. When checked, only a single instance will run. When that instance fails, another instance will automatically be started on the next available Neuron ESB server. |
| Include Metadata | Yes | Default is False (unchecked). This will allow adapter specific custom properties to be added and persisted with the ESB Message. |
| Enabled | Yes | Default is True (checked). |

Properties
The Properties tab of the Details Pane contains all the Adapter specific properties that must be set for the Adapter Endpoint to be functional at runtime. These are displayed within a Property Grid.
Each Adapter will have its own unique set of properties. Please consult the individual Adapter documentation for specific properties.