Using the ODBC Process Step
Overview
There are two ways to integrate with SQL Server in Neuron. The first way is to use one of the two adapters included with Neuron – SQL Adapter or ODBC Adapter. The second way to integrate with SQL Server is to use one of available process steps. Three of the process steps (Store, Table Query and XML Query) only support SQL Server. A fourth process step, ODBC, has been added to Neuron to provide access to any ODBC Data Source. This sample demonstrates how to use the ODBC Process Step to integrate with SQL Server.
There are several scenarios that call for integrating with SQL Server in a process. One common scenario is when you want to query data from a database to create a response to a Web service call. Another common scenario is to perform multiple database operations within the scope of a transaction.
For example, a large purchase order may contain many “Order” records. Each of these Order records needs to be inserted into a database individually. When designing a Neuron solution for this problem, you could use the Split process step to create a new message for each Order record and publish each message to the bus. Then a subscribing party using the SQL Adapter will receive each individual message and perform the insert. But what if you have to perform all the inserts within a single transaction? Then you will need to use the Transaction process step to wrap the process steps in one atomic transaction.
Process Components Demonstrated:
- Exception (Try/Catch/Finally)
- Transaction
- Code
- Split with Null Join
- ODBC
- Trace
Solution
This sample consists of three processes. Each process will demonstrate using one of the different methods for integrating with SQL server with a process step:
|
Process Name |
Process Steps Used |
Description |
|
Insert Orders |
|
Uses the ODBC process step to insert data into a database using a stored procedure. |
|
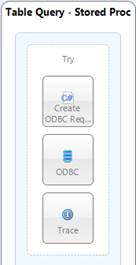
Table Query – Stored Proc |
|
Uses the ODBC process steps to execute a stored procedure to select an order from the database. The order is returned to the test client. |
|
Table Query – Text |
|
Uses the ODBC process steps to execute a SQL SELECT statement to select an order from the database. The order is returned to the test client. |
Insert Orders Process
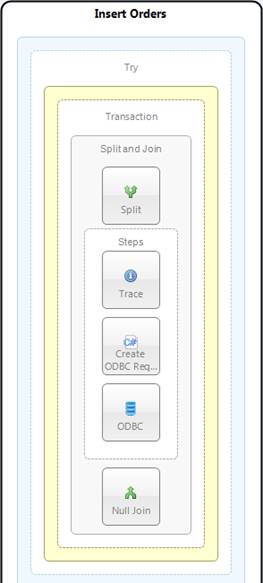
The Insert Orders process shown in Figure 1 will be used to demonstrate how to use the ODBC process step to execute a stored procedure. First, a Split process step is used to extract individual Order messages from the original order batch. Each of these messages will flow through the steps inside the Split execution block (see Note below). Next, a Code step is used to create the request message that is sent to the ODBC process step. The request message must be in this format unless the Parameter Mapper is used.
When executing a Stored Procedure:
<Statement type="StoredProcedure" sql="{Call uspUpdatePhoneNumber(?,?)}">
  <Parameters>
    <Parameter type="int" name="@Id" value="3"/>
    <Parameter type="varchar" name="@PhoneNumber" value="11111"/>
  </Parameters>
</Statement>
When executing a SQL Statement (i.e. INSERT):
<Statement type="Text" sql="INSERT INTO phonebook(LastName, FirstName,PhoneNumber) VALUES(?,?,?)">
  <Parameters>
    <Parameter type="varchar" name="@LastName" value="Wasznicky"/>
    <Parameter type="varchar" name="@FirstName" value="Todd"/>
    <Parameter type="varchar" name="@PhoneNumber" value="3109890000"/>
  </Parameters>
</Statement>
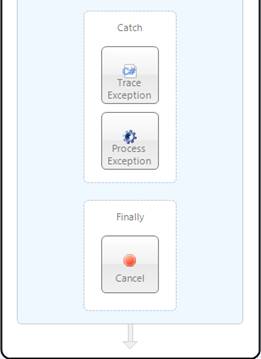
The ODBC process step calls a stored procedure to insert the records into SQL Server. The Split and ODBC process steps are executed within a Transaction execution block (see Note below). This ensures that if one of the individual records fails to be written to the database, the entire batch of orders will be rolled back. When this happens, the original message containing the entire batch of orders will be logged to the failure database and the exception information will be written to the event log. The entire Insert Orders process is enclosed inside an Exception step (see Figure 2). When an exception is throws, the process jumps to the Catch execution block, where the exception information is traced and then processed by the Exception Handing process (see Note below).
<Orders>
  <Order>
    <OrderID>1234</OrderID>
    <OrderDate>4/22/09</OrderDate>
    <OrderAmount>100.00</OrderAmount>
  </Order>
  <Order>
    <OrderID>1235</OrderID>
    <OrderDate>4/22/09</OrderDate>
    <OrderAmount>110.00</OrderAmount>
  </Order>
  <Order>
    <OrderID>1236</OrderID>
    <OrderDate>4/22/09</OrderDate>
    <OrderAmount>120.00</OrderAmount>
  </Order>
<Orders>
Figure 3: Sample Orders message used with the Insert Orders process. Note the highlighted area. An XPath expression of “Orders/Order” specified in the XPath property of the of the Split process step will select each Order block that is found under the root element of Orders.
ODBC Step
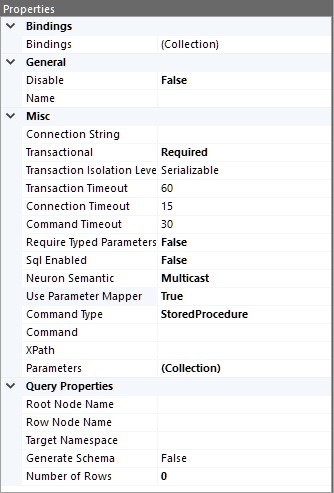
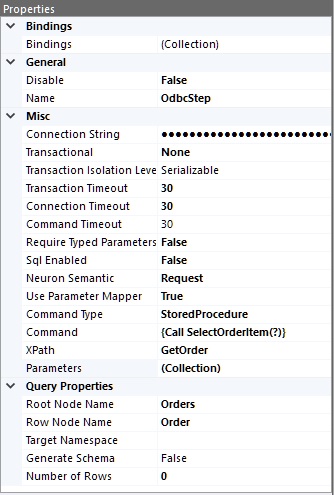
Note the difference between the SQL Store Process Step and the ODBC Process Step. The ODBC Process Step uses the current message for executing SQL statements or stored procedures. There isn’t any property mapping done with this step unless the Parameter Mapper is used.
Parameter Mapper
The ODBC process step has a property called “Use Parameter Mapper”. When set to true, the incoming message will be passed through the Parameter Mapper which allows the message to deviate from the format previously described in this document in the section “Insert Orders Process”.
The Parameter Mapper allows users to specify the Command Type which can be set to Text for passing SQL to be executed (Sql Enabled property must be set to “True”) or to StoredProcedure, which executes a stored procedure.
The Command property is used to set the SQL or stored procedure to be executed.
The XPath property allows users to select a part of the incoming message to be used in the Parameter Mapper using XPath syntax. In this sample, the message to retrieve an order is:
<GetOrder>
          <OrderID>1235</OrderID>
</GetOrder>
When the XPath property is set to “GetOrder”, the child element of GetOrder is passed on to the Parameter Mapper. So the message that the mapper sees is:
<OrderID>1235</OrderID>
The value “1235” is chosen by the Parameter Mapper by setting the SelectionValue property inside the OdbcCallParamter Collection Editor to the XPath “OrderID”.
The Parameters property can be edited by clicking the ellipses button that appears when the property is selected. This button brings up the OdbcCallParameter Collection Editor.
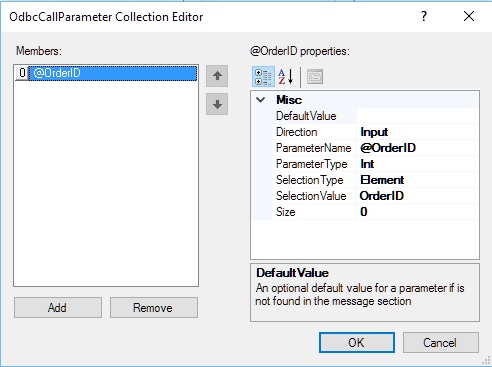
In this example there is 1 parameter in the collection. Each parameter will have the following properties
- DefaultValue: The value that would be used for the parameter if no other value was specified or found in the message.
- Direction: Specifies if the parameter is Input, Ouput, InputOutput, or a ReturnValue.
- ParameterName: The name of the parameter passed in the SQL command.
- ParameterType: The database command parameter type.
- SelectionType: Specifies how to find/select the parameter value from the message. Options are None, Element, Attribute, OuterXml, XPath, MessageHeader, and MessageProperty.
- SelectionValue: Specifies the selector value. Depends on the SelectionType and is used as an argument to the method in the selection type. In this example Element is specified as the selection type and the selection value element name containing the value.
Table Query Processes
The ODBC process step allows you to invoke a stored procedure or execute a SQL SELECT statement. This sample includes two processes that demonstrate each of these methods. The first process, Table Query – Stored Proc, demonstrates how to call a SQL Stored Procedure and receive a result set in return. The second process, Table Query – Text, demonstrates how to call a SQL Statement to receive a result set.
<GetOrder>
   <OrderID>1235</OrderID>
<GetOrder>
Running the Sample
Prerequisites
- Database creation – A SQL database is required to run this sample. To create the database and table associated with this sample run the SQL script titled “MessageData Creation Script” found in the Appendix section of this document.
- For each process, verify the connection string used in the ODBC process steps. Follow the instructions titled “Verify Connection Strings” found in the Appendix section of this document.
Open the Sample
To open this sample, see the topic Using the Neuron Samples and select the ODBC Process Step sample.
Run the Sample
Note: The database table Order must be cleared of all records prior to running the Insert Orders process in the following steps. It must be cleared each time the example is executed. To delete the records in the Order table, run the SQL script titled “Clear Order Table Script” found in the Appendix.
- From the Repository tab in Neuron Explorer copy the test message OrdersTestMessage from the Xml Documents area.
- Navigate to the Process Designer by selecting the Processes tab in the left panel of Neuron Explorer.
- Select the Insert Orders process from the list on the left of the designer.
- On the Process Designer toolbar click the Test button . This will open the Edit Test Message Dialog shown in Figure 8.
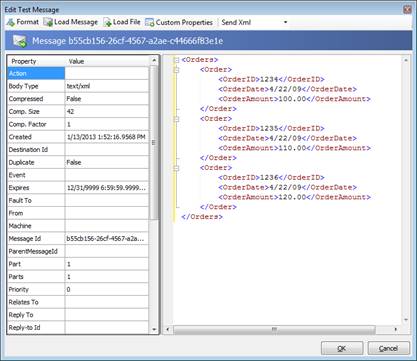
- Paste the test message retrieved in step 1 into the message field of the Edit Test Message dialog as shown in Figure 8.
- Click the OK button on the Edit Test Message dialog. Once the dialog is closed the process will begin execution.
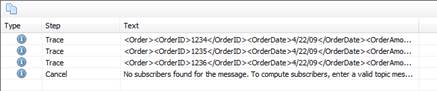
- As the process runs each step will be highlight in green as it is executed. In addition, any trace messages will be visible in the Trace Window. As you visually follow the execution not the sequence of steps. When the process completes, the Trace Window should look similar to what is shown in Figure 9.
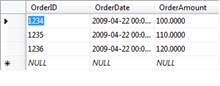
- Check the database using a tool such as SQL Server Management Studio to verify the records were stored in the Order table of the MessageData database. See Figure 10 below.
Get Order(s)
- To test the GetOrders functionality, you will use a Neuron Test Client. In the Neuron ESB Explorer, click Tools->Test Client->1 Test Client.
- Select OrderPublisher as the Party Id and click the Connect button.
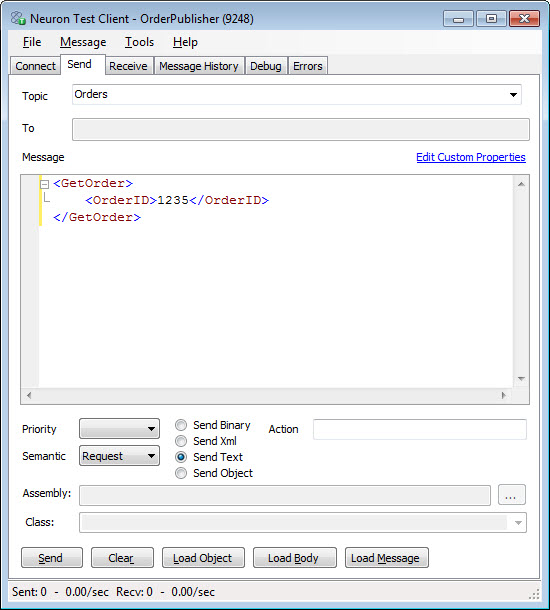
- Click on the Send tab. Enter the message text as shown in Figure 11. Make sure you set the Semantic to Request. If you want to copy the message data, go to the Repository tab in Neuron ESB Explorer and copy the test message GetOrderTestMessage from the Xml Documents area.
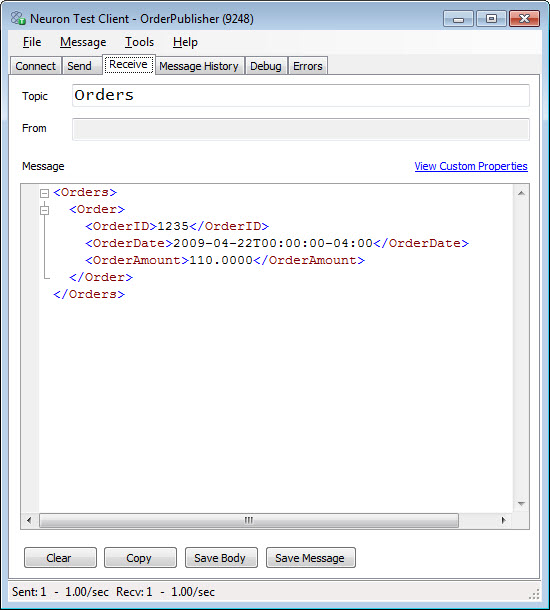
- Click the Send button on the test client, and then navigate to the Receive tab. You should see a response similar to Figure 12.
- Close the Neuron Test Client.
- The party OrderPublisher is initially configured to execute the Table Query – Stored Proc process. To test the other process, go to the Messaging tab in Neuron Explorer and click on Publishers.
- Select OrderPublisher from the list of parties.
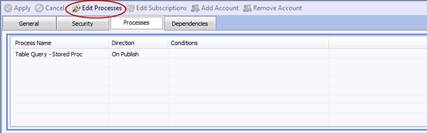
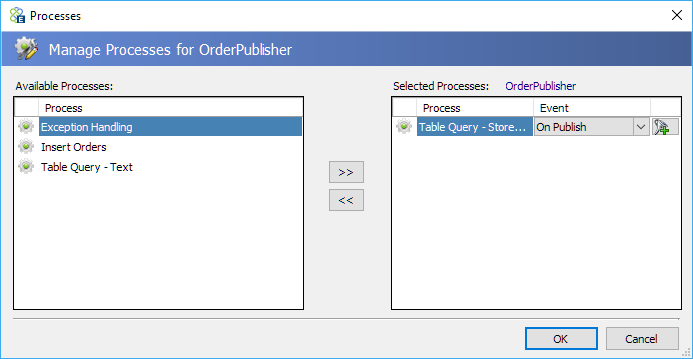
- Click on the Processes tab and then click the Edit Processes button as shown in Figure 13.
- In the Assign Processes dialog box, remove the currently configured process from the Current Processes for: Order Publisher (right-hand pane) and add the process you wish to test next. See Figure 14.
- Click the Close button, then click the Apply button to apply the changes for the party OrderPublisher.
- Save the changes by clicking File->Save.
- Repeat steps 1 – 5 to test the selected process.
Configuration Notes
All processes with the exception of the Code process step are configured by selecting and setting their properties in the property grid located at the bottom right of the process designer. The Code process step is configured by selecting the “Edit” option from the short cut menu that is available when right-clicking the Code step in the process designer. See the process documentation for more information.

Appendix
MessageData Creation Script
 USE [master]
 GO
 CREATE database MessageData
 GO
 USE [MessageData]
 GO
 CREATE table [Order] (OrderID int, OrderDate datetime, OrderAmount   money)
 GO
 CREATE procedure StoreOrderItem (@OrderID int, @OrderDate datetime,   @OrderAmount money)
 AS
 INSERT INTO [Order] (OrderID, OrderDate, OrderAmount) VALUES (@OrderID,   @OrderDate, @OrderAmount)
 GO
 CREATE procedure SelectOrderItem (@OrderID int)
 AS
 SELECT OrderID, OrderDate, OrderAmount FROM [Order] WHERE OrderID=@OrderID
 GO
 CREATE procedureSelectOrderItemXml (@OrderID int)
 AS
 SELECT OrderID, OrderDate, OrderAmount FROM [Order] WHERE OrderID=@OrderID
 FOR XML AUTO, ELEMENTS
 GO
A copy of the full database script for this sample can be found in the Neuron Samples folder under the installation directory: Samples\Processes, file name: CreateSampleDB.sql
Verify Connection Strings
- Open Neuron Explorer and navigate to the Processes section.
- Select the Insert Orders process listed in left panel.
- Select the ODBC process step.
- In the property grid select the Connection String property and click the ellipsis button on the right of the property value.
- The Connection Properties dialog will open as shown below in Figure 16
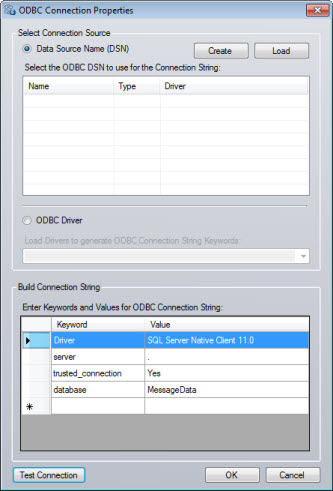
- Make sure the Server and Database is correct then click the Test Connection button to assure that the connection string is correct.
- Click the OK button on the Connection Properties dialog to save your changes.
- Save the changes to the process and the configuration by first clicking the Apply button at the top of the process designer then the Save button on the Neuron Explorer toolbar.
- Repeat steps 3-9 for the Table Query and Xml Query steps in the other four processes.
Clear Order Table Script
USE [master]
GO
DELETE FROM [Order] WHERE 1=1
GO