Developing Custom Process Steps with an Enhanced UI
Overview
Writing custom process steps for Neuron is very common. This sample includes a custom process step that uses an enhanced property grid UI that gives you more control over the UI behavior of the properties in the property grid at design time. For example, this sample demonstrates how to add dynamically displayed properties to the grid (i.e. the properties are hidden and toggled to be displayed based on the value of another property). This sample process step writes a file to the file system, logging the values of the properties set in the property grid. It is recommended that users start with the Simple Custom Process Step sample before attempting to follow this one.
Visual Studio Solution
The Visual Studio solution contains a single C# class library project. This project consists mainly of three components. The first component is the code “MyComplexProcessStep.cs”. This contains all the code for the process step’s functionality and properties, and is similar to the custom process step found in the Simple Custom Process Step sample. The second component is the code “MyComplexProcessStepUIElement.cs”. This file contains all the code for how the properties are displayed as well as how the process step is represented in the Process Designer. The third component is the resource file “Resource1.resx”. This contains all the resources that the process step needs, such as the icon used in Neuron’s process designer, the description of the process step, and the name that will be displayed in the process designer’s toolbox for the process step.
MyComplexProcessStep.cs
This file is similar to the “MySimpleProcessStep.cs” file found in the Simple Custom Process Step sample. There are some key differences, though. Notice that the MyComplexProcessStepUIElement class is passed in as one of the parameters of the “ProcessStep” attribute:
[ProcessStep(typeof(MyComplexProcessStep), typeof(Resource1), "name",
    "description", "ComplexProcessStep_MyComplexProcessStep",
    typeof(MyComplexProcessStepUIElement), Path = "")]
This tells Neuron Explorer that the process step utilizes a StepUIElement to control how the process step will be displayed in the Process Designer. Also notice that the properties for the process step are decorated only with the “DataMember” attribute. This is because the way the properties are displayed is defined in the MyComplexProcessStepUIElement class which means there is no need to define the attributes in the MyComplexProcessStep class.
MyComplexProcessStepUIElement.cs
This is the UI Element class that determines how the custom Process step will be represented in both the property grid and Process Designer. It inherits from the StepUIElement<T> abstract class. The type that is used for the StepUIElement<T> class is the MyComplexProcessStep (the main custom process step class) type.
The MyComplexProcessStepUIElement class consists of very little code:
public MyComplexProcessStepUIElement(Pipeline<ESBMessage> pipeline)
    : base(pipeline, Globals.StepBitMap)
{
}
protected override void OnPaint(PaintEventArgs e)
{
    base.OnPaint(e);
    DrawLabel(e.Graphics, TypedData.Name);
}
public override string Label
{
    get { return Globals.StepName; }
}
public override object BindTo
{
    get
    {
        return new Wrapper(this.TypedData);
    }
}
Notice how the constructor passes the image file used for the process step’s icon to its base class constructor. Also take note of how the overridden OnPaint method calls DrawLabel. Without this call, when the custom process step is dragged and dropped onto the designer surface, the “name” of the process step would not be displayed in the step’s representation in the Process Designer (this can be tested by commenting out the call to DrawLabel). The overridden Label member is what the DrawLabel method uses to get the text that is displayed as the “name” of the process step after being dragged onto the design surface. Lastly, the overridden BindTo member returns a new instance of the Wrapper class. The parameter “this.TypedData” gets an instance of the process step class that is encapsulated in the UIElementContainer class inherited from StepUIElement<MyComplexProcessStep>.
The Wrapper class, which is decorated with the TypeConverter attribute taking a type of Neuron.Esb.PropertiesTypeConverter, allows the property grid to use the TypeConverter’s functionality. This is accomplished essentially through “wrapping” an instance of the custom process step in a class, which exposes the properties of that custom process step and allows for them to be manipulated.
The constructor for the Wrapper class uses one parameter which is the custom process step’s class (the base class’s constructor must also be called using the same class as the Wrapper class’s constructor). In this sample, it is the class “MyComplexProcessStep”, as this is the main class for the custom step.
Since most of the attributes in this sample have been covered in the Simple Custom Process Step sample, only the new ones will be covered. The following is a description of each of the new attributes found in this sample:
[PropertyOrder(0)] – Used to indicate the order that the property should be displayed in within each category. ‘0’ would put that property at the top of the properties in the property’s category, whereas a higher number will put it lower.
[PropertyAttributesProvider(“DynamicShowMeAttributesProvider”)] – Used to indicate that there is a method that should be used to control the property’s attributes. In this sample, the following method is used:
public void DynamicShowMeAttributesProvider(PropertyAttributes attributes)
{
    attributes.IsBrowsable = (IsEnabled == true);
}
The PropertyAttributes class contains the attributes for the property that is decorated with the PropertyAttributesProvider attribute (note that the PropertyAttributesProvider attribute uses the method/provider’s name for its parameter). This allows attributes to be dynamically set at runtime. In this sample, the attribute “IsBrowsable” for the ShowMe property is set to whether the IsEnabled process step property is true or false.
Running the Sample
Open the Sample
To open this sample, see the topic Using the Neuron Samples and select the Complex Custom Process Step sample.
Configure the Sample
When launching this sample from the Samples Explorer, a Visual Studio project is opened. The references in this project need to be verified and the project needs to be built.
- In Visual Studio, expand the References list in the Solution Explorer.
- There needs to be references to these Neuron ESB Assemblies in this list:
- Neuron
- Neuron.Esb
- Neuron.Esb.XmlSerializers
- Neuron.Pipelines
- Neuron.Pipelines.Design
- Neuron.Scripting
- Neuron.UI
- If the references show an error, remove them and re-add them from the Neuron program files installation directory (C:\Program Files\Neudesic\Neuron ESB v3\DEFAULT).
- Build the solution.
- Copy the process assembly ComplexProcessStep.dll from the build output folder (C:\Program Files\Neudesic\Neuron ESB v3\Samples\Processes\ComplexProcessStep\ComplexProcessStep\bin\Debug) to the Pipelines folding in the Neuron program files installation directory (C:\Program Files\Neudesic\Neuron ESB v3\DEFAULT\Pipelines).
Create a new Neuron Configuration
- If Neuron ESB Explorer is already opened, close it and re-open it, and create a new Neuron Configuration (for this sample you do not need to configure a topic, publish or subscriber). You will not be able to see the custom process step in the list of processes until you close and re-open the ESB Explorer.
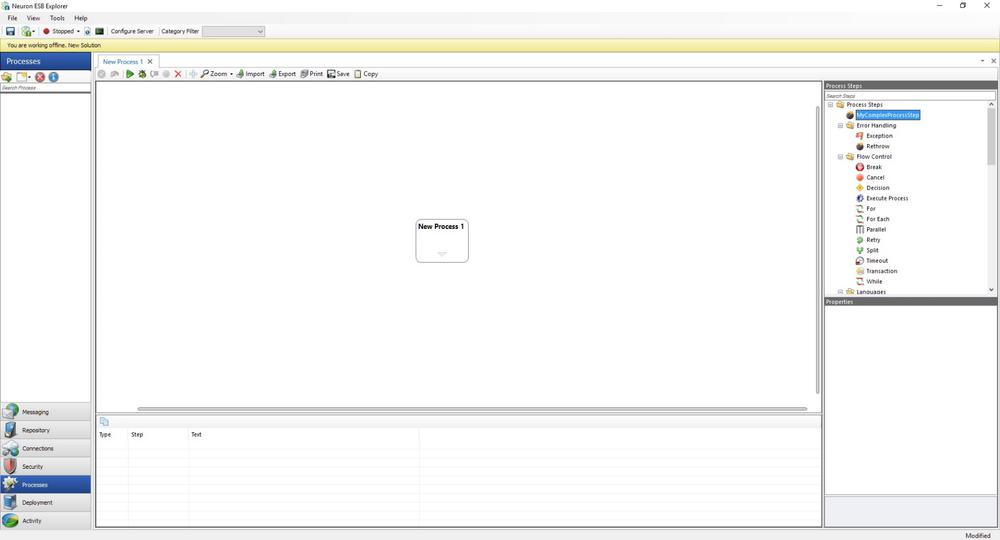
- Navigate to Processes, you should see the custom process MyComplexProcessStep in the list of Process Steps:
- Click and drag the custom process step to the process designer and select it. A list of the custom process properties will be displayed in the property grid:
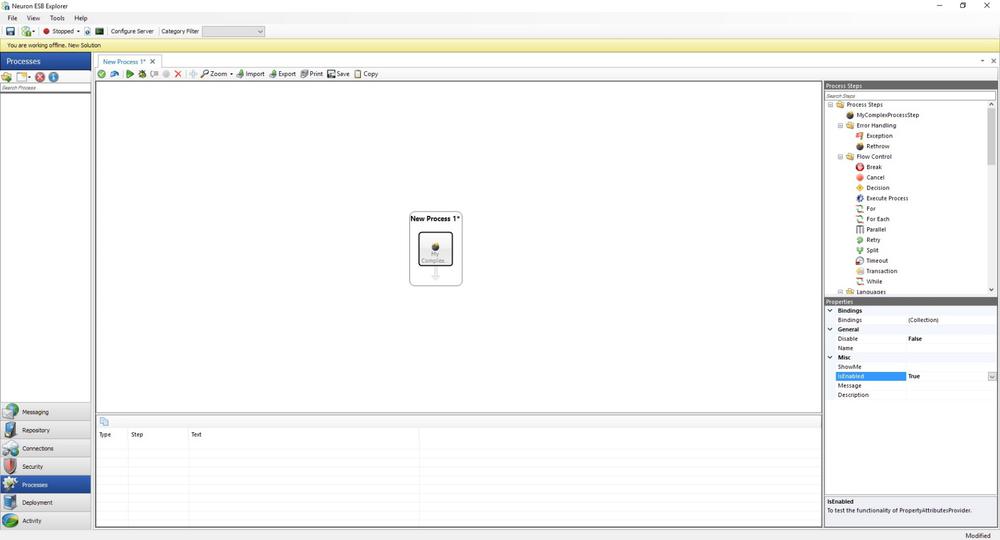
- To see how dynamic property enablement works, toggle the IsEnabled property between True and False. When set to False, the ShowMe property is not displayed. When set to True, that property is displayed.
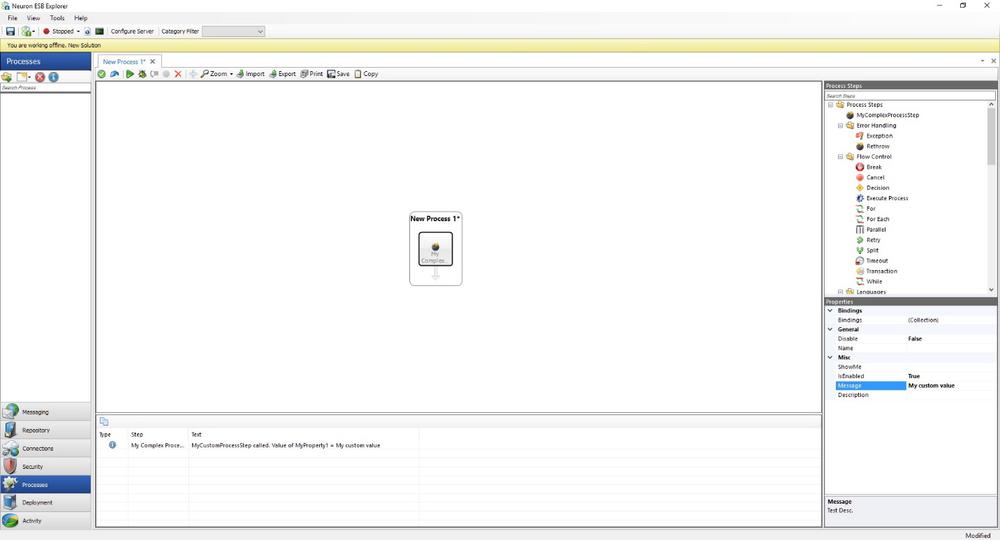
- Set the value of Message to anything (i.e. “My custom value”), and test the process by clicking the Test Process button /. In the Edit Test Message dialog, leave the default values and click the OK button.
- The custom process step will write a trace message to the output window:
- The custom process step will also write the same output to the file C:\complexprocessstep.txt.